
Tag: Local SEO
How to Embed Your Google Business Profile Location on Your Website to Strengthen SEO
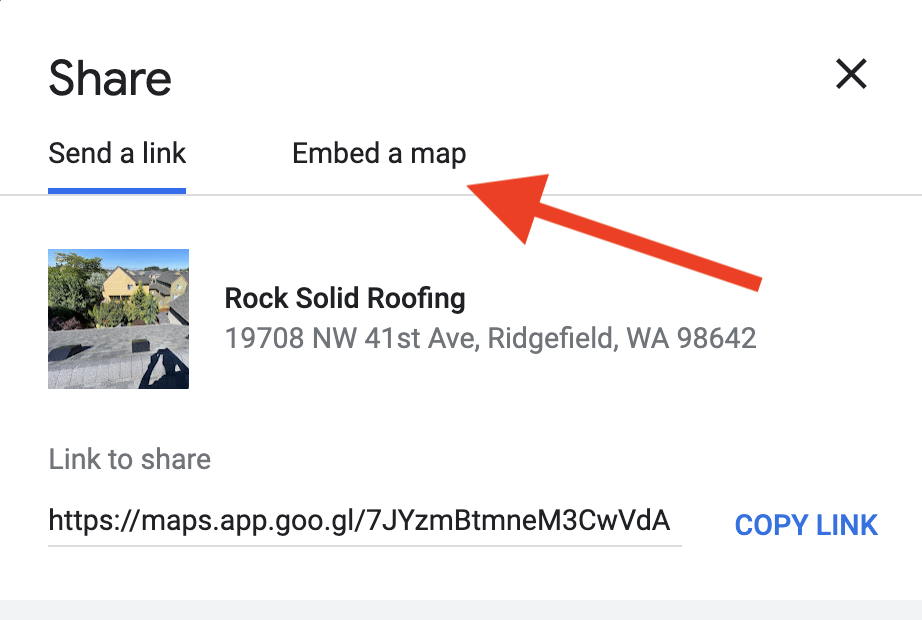
Embedding your Google Business Profile (GBP) location on your website is a powerful strategy to enhance your local SEO, improve user experience, and build trust with potential customers. In the “How to Embed Your Google Business Profile Location on Your Website to Strengthen SEO” video, you learn a straightforward method to integrate Google Maps into your website seamlessly. This comprehensive guide will expand on those instructions, providing you with detailed steps, best practices, and additional insights to maximize the effectiveness of embedding your GBP location for optimal SEO benefits.
Why Embedding Your Google Business Profile Location Matters
Embedding your GBP location on your website offers numerous advantages that can significantly impact your business’s online presence and customer engagement.
Enhance Local SEO
Integrating your GBP location with your website helps Google associate your business with specific geographic areas. This association improves your visibility in local search results, making it easier for customers in your vicinity to find your services. Properly embedded maps and location information signal to search engines that your business is relevant to local queries, boosting your local SEO rankings.
Improve User Experience
Providing an embedded Google Map on your website allows visitors to easily locate your business. It eliminates the need for customers to search for your address separately, enhancing their overall browsing experience. A clear and interactive map can also help users plan their visits more efficiently, increasing the likelihood of converting website visitors into actual customers.
Build Trust and Credibility
Displaying your physical location through an embedded Google Map adds legitimacy to your business. Customers are more likely to trust and engage with businesses that provide transparent and accessible location information. This transparency can lead to increased customer confidence and higher conversion rates.
Facilitate Customer Engagement
An embedded map not only shows your location but can also include additional information such as your business hours, contact details, and links to your GBP. This comprehensive information hub encourages customers to interact with your business more effectively, whether by calling, visiting, or leaving a review.
Step-by-Step Guide to Embedding Your Google Business Profile Location
Follow these steps to seamlessly embed your GBP location on your website, ensuring that it strengthens your SEO and enhances user experience.
Step 1: Access Your Google Business Profile
- Sign In to Your GBP Account
- Navigate to Google Business Profile and click on “Manage now.”
- Log in using the Gmail account associated with your business profile. Ensure you have administrative access to make changes.
- Select the Appropriate Business Profile
- If you manage multiple business profiles, choose the one you want to update. This ensures you’re working on the correct profile.
Step 2: Get the Embed Code from Google Maps
- Open Google Maps
- Go to Google Maps and ensure you are signed in with the same Google account linked to your GBP.
- Locate Your Business
- In the search bar, enter your business name to find its location on the map.
- Access the Share Option
- Click on the Share button, usually represented by an icon with an upward arrow or three connected dots.
- Select “Embed a Map”
- In the sharing options, select the “Embed a map” tab. This will display a preview of the map along with the HTML embed code.
- Choose the Map Size
- You can choose from predefined sizes such as Small, Medium, Large, or Custom. For most websites, the Medium size offers a good balance between visibility and space usage. If needed, select Custom to specify exact dimensions.
- Copy the Embed Code
- Click on the Copy HTML button to copy the embed code to your clipboard.
Step 3: Embed the Map into Your Website
The method to embed the map varies depending on the website builder you use. Below are instructions for popular platforms:
For WordPress (Using Elementor)
- Access Your WordPress Dashboard
- Log in to your WordPress admin panel.
- Edit the Page with Elementor
- Navigate to the page where you want to embed the map and click “Edit with Elementor.”
- Add an HTML Widget
- In the Elementor sidebar, search for the HTML widget.
- Drag and drop the HTML widget to the desired location on your page, such as the footer or contact section.
- Paste the Embed Code
- In the HTML widget settings, paste the embed code you copied from Google Maps.
- Adjust the Size if Needed
- If you chose a Custom size earlier, ensure that the dimensions are correctly reflected. You can adjust the width and height attributes in the embed code if necessary.
- Save and Publish
- Click “Update” to save your changes. Preview the page to ensure the map appears correctly.
For Other Website Builders (e.g., Wix, Squarespace)
- Access the Page Editor
- Log in to your website builder account and navigate to the page where you want to embed the map.
- Add an HTML or Embed Element
- Look for an HTML, Embed, or Custom Code element in your website builder’s toolbar.
- Insert the Embed Code
- Drag and drop the embed element to your desired location on the page.
- Paste the Google Maps embed code into the provided field.
- Adjust the Map Dimensions
- Modify the width and height parameters in the embed code if needed to fit your page layout.
- Save and Publish
- Save your changes and publish the page. Verify that the map displays correctly on both desktop and mobile devices.
Step 4: Optimize the Embedded Map for SEO
- Add Descriptive Alt Text
- While embedded maps don’t directly support alt text, ensure that the surrounding content includes descriptive keywords related to your location and services. This helps search engines understand the relevance of the embedded map.
- Include NAP Information
- Ensure that your Name, Address, and Phone number (NAP) are clearly visible on the same page as the embedded map. Consistent NAP information across your website and GBP boosts local SEO.
- Ensure Mobile-Friendliness
- Verify that the embedded map is responsive and displays correctly on mobile devices. A mobile-friendly map enhances user experience and contributes to better SEO rankings.
Best Practices for Embedding Your Google Business Profile Location
Implementing best practices ensures that your embedded map effectively strengthens your SEO and enhances user engagement.
Use High-Quality Maps
- Clear and Relevant: Ensure the embedded map clearly shows your business location without unnecessary clutter. Highlighting nearby landmarks can help users recognize your area more easily.
- Interactive Features: Allow users to interact with the map, such as zooming in and out or switching to satellite view, to improve usability.
Place the Map Strategically
- Contact or Footer Section: Embedding the map in the contact section or footer ensures it’s easily accessible without overwhelming the main content of your page.
- Dedicated Location Page: Consider creating a dedicated page for your business location with an embedded map, detailed directions, and additional location-specific information.
Keep Your GBP Information Updated
- Consistent Updates: Regularly update your GBP and ensure that the embedded map reflects any changes in your business location or contact details.
- Monitor for Accuracy: Periodically check the embedded map to ensure it still points to the correct location, especially if you move or rebrand your business.
Enhance with Additional Content
- Directions and Contact Info: Provide clear directions and contact information alongside the embedded map to assist customers in finding and reaching your business.
- Customer Testimonials: Including customer testimonials or reviews near the embedded map can build trust and encourage potential customers to choose your services.
Leverage Analytics
- Track Engagement: Use website analytics tools to monitor how users interact with the embedded map. Understanding engagement can help you optimize its placement and functionality.
- Adjust Based on Data: Use insights from analytics to make informed decisions about improving the user experience, such as adjusting map size or placement for better visibility.
Common Mistakes to Avoid
Avoiding these common pitfalls ensures that your embedded map contributes positively to your SEO efforts and user experience.
Using Incorrect Embed Codes
- Impact: Incorrect or outdated embed codes can result in broken maps or inaccurate location displays.
- Solution: Always use the latest embed code from Google Maps and verify its functionality after embedding.
Overloading Pages with Multiple Maps
- Impact: Embedding multiple maps on a single page can confuse users and dilute the SEO benefits.
- Solution: Limit the number of embedded maps per page to maintain clarity and focus. Typically, one well-placed map per page is sufficient.
Ignoring Mobile Optimization
- Impact: A non-responsive embedded map can lead to a poor user experience on mobile devices, negatively impacting SEO rankings.
- Solution: Ensure that your embedded map is responsive and adjusts seamlessly to different screen sizes. Test the map on various devices to confirm its functionality.
Neglecting Local SEO Best Practices
- Impact: Simply embedding a map without optimizing surrounding content can limit SEO benefits.
- Solution: Incorporate local SEO best practices, such as using relevant keywords, maintaining consistent NAP information, and providing detailed location-specific content.
Failing to Update Embedded Maps
- Impact: An outdated map can mislead customers and harm your business’s credibility.
- Solution: Regularly review and update your embedded maps to reflect any changes in your business location or contact information.
Frequently Asked Questions
Can I Embed Multiple Locations on My Website?
Yes, you can embed multiple Google Maps on your website if your business operates in multiple locations. However, ensure that each map is clearly labeled and placed in appropriate sections, such as dedicated location pages or a comprehensive contact page.
Do I Need a Google Business Profile to Embed a Map?
While having a Google Business Profile enhances the accuracy and relevance of the embedded map, it is not strictly required. However, linking your embedded map to your GBP ensures consistency and maximizes SEO benefits.
How Can I Customize the Appearance of the Embedded Map?
You can customize the appearance of the embedded map by adjusting the size parameters (width and height) in the embed code. For more advanced customization, consider using the Google Maps Platform, which offers extensive customization options through APIs.
Will Embedding a Google Map Improve My SEO?
Yes, embedding a Google Map can improve your local SEO by providing search engines with clear location information and enhancing user engagement on your website. This can lead to higher visibility in local search results and increased traffic to your site.
Can I Embed a Map Without Using an iframe?
Embedding a Google Map typically involves using an iframe provided by Google Maps. However, for more advanced integrations, you can use the Google Maps JavaScript API to embed and customize maps dynamically. This requires some coding knowledge but offers greater flexibility and functionality.
Maximizing the Impact of Embedding Your Google Business Profile Location
To fully leverage the benefits of embedding your GBP location, integrate this strategy into your broader marketing and operational plans.
Align with Your Marketing Strategy
- Promote Location-Based Campaigns: Use the embedded map to support location-based marketing campaigns, highlighting special offers or services available in specific areas.
- Local Content Marketing: Create content that emphasizes your local presence, such as blog posts about local events or partnerships, and link them to the embedded map for enhanced relevance.
Coordinate with Offline Operations
- Incorporate Maps in Print Materials: Use the same map embedded on your website in your print materials, such as brochures and business cards, to ensure consistency across all customer touchpoints.
- Provide Clear Directions: Use the embedded map to offer detailed directions to your physical location, making it easier for customers to visit your business.
Utilize Advanced SEO Techniques
- Structured Data Markup: Implement structured data (Schema.org) markup on your website to provide additional context about your business location. This helps search engines better understand and index your location information.
- Optimize Local Keywords: Incorporate local keywords related to your service areas in your website content, meta descriptions, and headings to enhance your local SEO efforts.
Foster Customer Engagement
- Interactive Features: Encourage customers to interact with the embedded map by providing prompts to get directions, view your location on Google Maps, or contact you directly from the map interface.
- Gather Customer Feedback: Use the embedded map as an opportunity to collect customer feedback about their experience finding your location, helping you identify areas for improvement.
Monitor and Analyze Performance
- Use Analytics Tools: Track how users interact with the embedded map using website analytics tools. Analyze metrics such as map clicks, zooms, and directions requests to understand user behavior and optimize your map placement.
- Adjust Based on Insights: Use the insights gained from analytics to make informed decisions about adjusting your map’s size, placement, or additional information to better meet customer needs.
Conclusion
Embedding your Google Business Profile location on your website is a strategic move that can significantly enhance your local SEO, improve user experience, and build trust with potential customers. By following the step-by-step guide provided in this post, implementing best practices, and avoiding common mistakes, you can ensure that your embedded map effectively showcases your business location and contributes positively to your online presence. Regularly update and optimize your embedded maps to stay aligned with your business goals and market trends, ensuring sustained growth and success in a competitive landscape.
How to Add Categories, Subcategories, & Services to Your Google Business Profile

Optimizing your Google Business Profile (GBP) by adding relevant categories, subcategories, and services is essential for home-service businesses aiming to enhance their online visibility and attract more customers. In the “How to Add Categories, Subcategories, & Services to Your Google Business Profile” video, you learn effective strategies to categorize your business accurately. This comprehensive guide will expand on those instructions, providing you with detailed steps, best practices, and additional insights to ensure your GBP is fully optimized for maximum impact.
Why Proper Categorization Matters
Accurate categorization of your business on Google is fundamental for several reasons:
Enhanced Visibility in Search Results
Choosing the right categories ensures that your business appears in relevant search queries. When potential customers search for specific services you offer, Google matches these queries with your GBP categories, increasing the likelihood of your business being displayed prominently.
Improved Local SEO
Google uses your business categories to understand what your business does, which directly influences your local SEO rankings. Proper categorization helps Google index your business correctly, making it easier for customers in your service areas to find you.
Targeted Customer Reach
By selecting specific subcategories, you can target niche markets within your industry. This precision helps attract customers who are specifically looking for the services you offer, improving the quality of leads and increasing conversion rates.
Step-by-Step Guide to Adding Categories, Subcategories, & Services
Follow these steps to effectively add and manage categories, subcategories, and services in your Google Business Profile.
Step 1: Access Your Google Business Profile
- Sign In to Your GBP Account
- Navigate to Google Business Profile and click on “Manage now.”
- Log in using the Gmail account associated with your business profile. Ensure you have administrative access to make changes.
- Select the Appropriate Business Profile
- If you manage multiple business profiles, select the one you want to update. This ensures you’re working on the correct profile.
Step 2: Navigate to the Categories Section
- Open the Profile Dashboard
- Once signed in, you’ll be directed to your business’s dashboard. Here, you can manage various aspects of your profile, including information, photos, and reviews.
- Locate the “Categories” Tab
- In the dashboard menu, find and click on the “Categories” tab. This section allows you to add and manage the categories and services your business offers.
Step 3: Add Primary and Secondary Categories
- Add Primary Category
- Click on the “Add Primary Category” button.
- Enter the main category that best describes your business. For example, if you’re a plumbing company, select “Plumber.”
- Add Secondary Categories
- You can add up to nine secondary categories. These should represent other services or specialties your business offers.
- For instance, a plumbing company might add secondary categories like “Drain Cleaning,” “Leak Detection,” or “Bathroom Remodeler.”
Step 4: Add Subcategories and Specific Services
- Use a Tool for Recommendations
- Utilize tools like GMB Everywhere to get recommendations for relevant categories and subcategories. This ensures you’re covering all aspects of your services without overloading your profile.
- Select Relevant Subcategories
- Within each category, add subcategories that are specific to the services you provide. For example, under “Bathroom Remodeler,” you might add “Bathtub Reglazing” or “Grab Bar Installation” if these are services you offer.
- Avoid Irrelevant Subcategories
- Only add subcategories that are directly related to your business operations. Adding irrelevant subcategories can confuse customers and dilute your profile’s effectiveness.
Step 5: Add Custom Services
- Click on “Add More Services”
- If you offer services that are not listed in the recommended categories, click on the “Add More Services” button.
- Enter Custom Service Details
- Input the name and description of the custom service. For example, “Eco-Friendly Plumbing Solutions” or “24/7 Emergency Plumbing Services.”
- Save the Custom Service
- After entering the details, click “Save” to add the custom service to your profile.
Step 6: Review and Save Changes
- Double-Check Your Entries
- Ensure that all categories, subcategories, and services accurately reflect your business offerings. Verify that there are no spelling mistakes or incorrect entries.
- Save All Changes
- Click the “Save” button to apply all your updates to your Google Business Profile.
Best Practices for Managing Categories, Subcategories, & Services
Implementing best practices ensures that your GBP categories and services are optimized for maximum visibility and effectiveness.
Be Specific and Accurate
- Choose Precise Categories: Select categories that closely match your primary business activities. Avoid overly broad categories that can dilute your profile’s relevance.
- Use Exact Terms: If Google offers a specific category that matches your service, use it. For example, “Emergency Plumbing Services” is more specific and effective than just “Plumber.”
Utilize Recommended Tools
- Leverage Tools like GMB Everywhere: Use tools to discover additional relevant categories and subcategories. These tools can provide insights into what competitors are using and suggest optimal categories for your business.
Regularly Update Your Profile
- Keep Information Current: As your business evolves, update your categories and services to reflect new offerings or changes in your operations.
- Add Seasonal Services: Incorporate seasonal services or promotions into your categories to capture timely customer interest.
Optimize Service Descriptions
- Clear and Concise: Write clear and concise descriptions for each service. Highlight the benefits and unique aspects of each service to attract more customers.
- Incorporate Keywords: Use relevant keywords naturally within your service descriptions to improve local SEO and search visibility.
Avoid Overloading with Irrelevant Categories
- Stay Relevant: Only add categories and subcategories that are relevant to your business. Irrelevant categories can confuse customers and negatively impact your SEO.
- Maintain Focus: Focus on the core services that define your business. This helps in maintaining a strong and focused online presence.
Consistent Branding
- Align with Website Content: Ensure that the categories and services listed in your GBP align with the content on your website. Consistency across platforms reinforces your brand and improves trust.
- Use High-Quality Images: Complement your categories with high-quality images that represent each service. Visual content enhances the appeal and credibility of your profile.
Common Mistakes to Avoid
Avoiding common pitfalls can ensure that your GBP remains effective and continues to drive quality leads.
Adding Irrelevant Subcategories
- Impact: Adding subcategories that do not reflect your actual services can mislead customers and harm your SEO rankings.
- Solution: Only include subcategories that are directly related to the services you offer. Regularly review and update your subcategories to maintain relevance.
Overcomplicating Categories
- Impact: Having too many categories can dilute the focus of your profile and make it harder for customers to find what they’re looking for.
- Solution: Limit the number of categories to those that are most relevant and impactful. Focus on quality over quantity.
Neglecting Regular Updates
- Impact: An outdated profile can lead to missed opportunities and reduce customer trust.
- Solution: Schedule regular reviews of your GBP to ensure that all information is current and accurately reflects your business offerings.
Ignoring Category Recommendations
- Impact: Missing out on optimal categories can limit your visibility in search results.
- Solution: Utilize recommended tools and guidelines to choose the best categories for your business. Stay informed about new categories that Google may introduce.
Inconsistent Information Across Platforms
- Impact: Inconsistencies between your GBP and other online platforms can confuse customers and harm your SEO.
- Solution: Ensure that your business hours, services, and other key information are consistent across all platforms, including your website and social media profiles.
Frequently Asked Questions
How Many Categories Can I Add to My Google Business Profile?
You can add up to nine categories to your GBP, including one primary category and up to eight secondary categories. Focus on selecting the most relevant and impactful categories to maximize your profile’s effectiveness.
Can I Add Custom Categories if They Are Not Listed?
Yes, you can add custom services to your GBP even if they are not listed in Google’s recommended categories. Click on “Add More Services” and enter the details of the custom service to include it in your profile.
How Often Should I Update My Categories and Services?
Regularly review and update your categories and services at least once a month or whenever there are significant changes in your business operations. Keeping your profile current ensures that it remains relevant and effective in attracting customers.
What Tools Can Help Me Choose the Right Categories?
Tools like GMB Everywhere can provide recommendations for categories and subcategories based on your business type. These tools analyze competitor profiles and suggest optimal categories to enhance your GBP.
What Should I Do If a Category Change is Disapproved by Google?
If Google disapproves a category change, review Google’s category guidelines to ensure compliance. Make sure the new category accurately represents your business services, and try submitting the change again with the necessary adjustments.
Maximizing the Impact of Categories, Subcategories, & Services
To fully leverage the benefits of adding categories, subcategories, and services to your GBP, integrate these strategies into your broader marketing and operational plans.
Align with Your Marketing Strategy
- Targeted Campaigns: Use your GBP categories to support targeted marketing campaigns. Highlight specific services in your ads and promotions that align with your GBP categories.
- Content Marketing: Create blog posts, social media content, and other marketing materials that emphasize the services listed in your GBP. This reinforces your expertise and improves SEO.
Enhance Customer Engagement
- Detailed Service Pages: Link your GBP services to detailed service pages on your website. This provides customers with more information and improves the SEO performance of your website.
- Interactive Content: Use interactive content like videos and infographics to showcase your services. Visual content can engage customers and provide a better understanding of your offerings.
Monitor and Analyze Performance
- Use Analytics Tools: Leverage Google Analytics and GBP insights to monitor how different categories and services are performing. Identify which services generate the most leads and optimize your offerings accordingly.
- Adjust Based on Data: Use performance data to refine your categories and services. Focus on high-performing areas and consider removing or adjusting categories that are underperforming.
Foster Team Collaboration
- Training and Guidelines: Ensure that all team members understand the importance of accurate categorization. Provide training on how to manage and update categories and services in the GBP.
- Consistent Updates: Encourage team members to regularly update the GBP with new services, photos, and other relevant information. Consistency ensures that your profile remains dynamic and engaging.
Leverage Customer Feedback
- Incorporate Reviews: Use customer reviews to identify popular services and areas for improvement. Highlight these services in your GBP categories to attract more customers.
- Adjust Services Based on Demand: Adapt your service offerings based on customer feedback and market demand. Use this information to add or refine categories and services in your GBP.
Conclusion
Effectively adding categories, subcategories, and services to your Google Business Profile is a powerful strategy for home-service businesses seeking to enhance their online presence and attract more customers. By following the step-by-step guide provided in this post, implementing best practices, and avoiding common mistakes, you can ensure that your GBP is fully optimized for maximum visibility and effectiveness. Proper categorization not only improves your local SEO but also helps potential customers find the exact services they need, driving more high-quality leads and fostering business growth. Regularly review and update your categories to stay aligned with your business goals and market trends, ensuring sustained success in a competitive landscape.
How to Mark Leads in Google Local Services Ads to Get More Leads
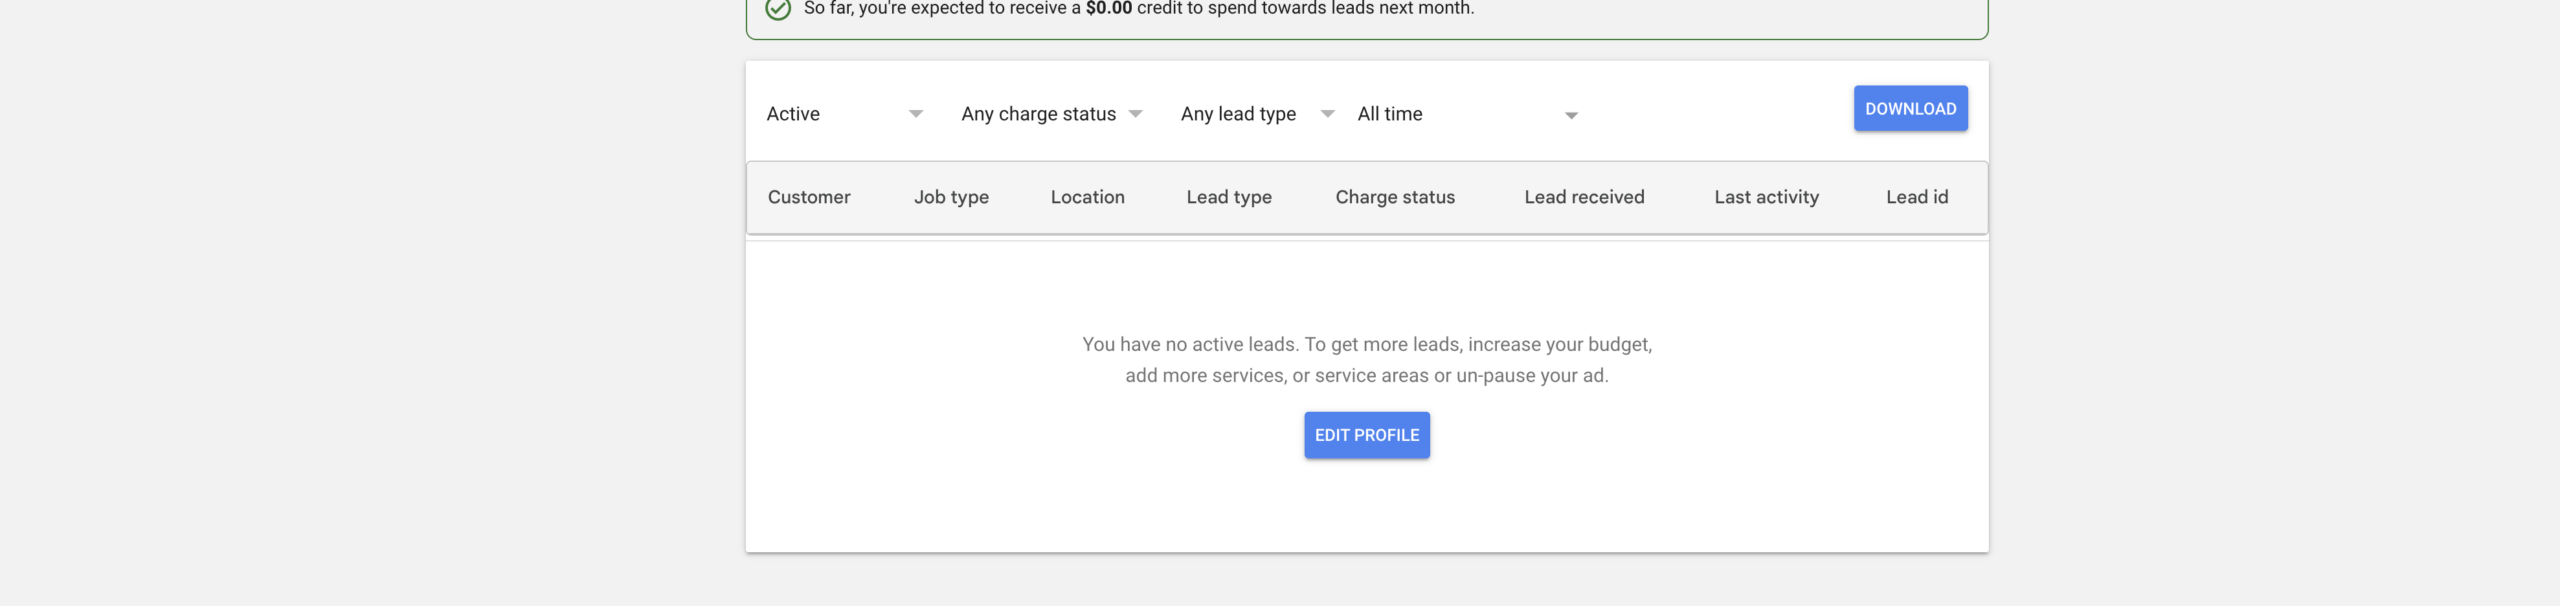
Effectively managing and marking leads in Google Local Services Ads (LSA) is crucial for home-service businesses striving to maximize their online presence and attract more customers. In the “How to Mark Leads in Google Local Services Ads to Get More Leads” video, you learn essential strategies to optimize your lead management process. This comprehensive guide will expand on those insights, providing you with detailed steps, best practices, and additional tips to ensure that your LSA account generates more high-quality leads and drives business growth.
Why Marking Leads is Important
Marking leads in your Google Local Services Ads account is not just a routine task; it plays a pivotal role in how Google perceives and distributes leads to your business. Proper lead management can significantly influence the quantity and quality of leads you receive, ultimately impacting your revenue and market presence.
Impact on Lead Generation
Consistently marking leads helps Google understand which leads are valuable and which are not. When you mark leads as booked or completed, you signal to Google that these leads were successfully converted into customers. This positive feedback encourages Google to prioritize your business in future lead distributions, resulting in more high-quality leads.
Improving Ad Performance
Google uses the data from how you mark leads to optimize your ad performance. By accurately categorizing leads, you help Google fine-tune its algorithms to deliver more relevant and qualified leads to your business. This optimization leads to higher conversion rates and a better return on your advertising investment.
Enhancing Local SEO
Active and engaged management of your leads can improve your local SEO rankings. Google rewards businesses that demonstrate consistent and effective engagement with their ads. By marking leads appropriately, you enhance your business’s credibility and reliability in Google’s eyes, which can boost your visibility in local search results.
Step-by-Step Guide to Marking Leads in Google Local Services Ads
Follow these steps to efficiently mark leads in your Google Local Services Ads account, ensuring that you send the right signals to Google and optimize your lead generation process.
Step 1: Access Your Google Local Services Ads Dashboard
- Sign In to Your Account
- Navigate to Google Local Services Ads and click on “Sign in” at the top right corner.
- Enter the Gmail account credentials associated with your LSA account.
- Select the Correct Business Profile
- If you manage multiple business profiles, ensure you select the one you want to update. This ensures that changes are made to the appropriate profile.
Step 2: Navigate to the Leads Tab
- Open the Leads Dashboard
- Once signed in, you’ll be directed to your LSA dashboard where you can manage various aspects of your ads and business information.
- Click on the “Leads” Tab
- In the dashboard menu, find and click on the “Leads” tab. This section displays all the leads generated through your LSA account.
Step 3: Rate Your Leads
- Identify New Leads
- Under the “New” tab, you’ll see leads that have just come in and haven’t been responded to yet.
- Rate the Lead Status
- For each lead, assign a rating based on the quality and potential of the lead. For example:
- Very Satisfied: Leads that have been successfully converted into booked customers.
- Satisfied: Leads that have shown interest but haven’t yet converted.
- Unsatisfied: Leads that were not converted or resulted in negative feedback.
- Example: If a lead was converted into a booked customer for LED recessed ceiling lights installation, rate it as “Very Satisfied.”
- For each lead, assign a rating based on the quality and potential of the lead. For example:
Step 4: Mark Leads as Booked
- Select the Lead
- Click on the lead you want to mark as booked. This could be a lead that has scheduled an appointment or completed a service.
- Choose the Booking Status
- You can mark the lead as:
- Upcoming: If the job is scheduled for the future.
- Completed: If the job has been finished.
- Bad Lead: If the lead is invalid or not worth pursuing.
- You can mark the lead as:
- Add Details for Tracking (Optional)
- For upcoming bookings, you can set the appointment time and add any relevant details for tracking purposes.
- Request a Review
- If the job is completed, you can mark it as completed and optionally request a review from the customer. This can enhance your online reputation and provide valuable feedback.
Step 5: Maintain a Clear Leads Dashboard
- Keep “New” and “Active” Tabs Organized
- Regularly review and update leads in the “New” and “Active” tabs to keep your dashboard clear. This helps Google understand your engagement level and adjust lead distribution accordingly.
- Mark Bad Leads Promptly
- If you receive leads from areas you don’t serve or leads that are not relevant, mark them as bad leads to prevent Google from sending similar leads in the future.
Best Practices for Managing Leads
Implementing best practices can enhance the effectiveness of your lead management process, ensuring that you maximize the benefits of your Google Local Services Ads.
Consistent Lead Marking
- Timely Updates: Mark leads as soon as possible, preferably on the same day they are received. This ensures that Google receives accurate data about your lead quality and conversion rates.
- Regular Reviews: Set aside time each day or week to review and update your leads. Consistency is key to maintaining an optimized lead distribution system.
Prompt Response to Leads
- Quick Follow-Up: Respond to new leads promptly. A swift response increases the chances of converting leads into customers and demonstrates your business’s reliability.
- Automate Initial Responses: Use automated messages to acknowledge receipt of a lead and inform the customer that you will be in touch shortly. This keeps the customer engaged while you prepare a personalized response.
Encourage Customer Reviews
- Request Feedback: After completing a service, ask customers to leave a review on your Google Local Services Ads profile. Positive reviews enhance your credibility and attract more leads.
- Simplify the Process: Provide clear instructions or direct links to make it easy for customers to leave reviews.
Common Mistakes to Avoid
Avoiding these common pitfalls can ensure that your lead management process is effective and that your Google Local Services Ads continue to generate high-quality leads.
Not Marking Leads Consistently
- Impact: Inconsistent lead marking can confuse Google’s algorithms, leading to fewer leads being sent to your business.
- Solution: Establish a routine for reviewing and marking leads regularly to maintain accurate and up-to-date lead data.
Misclassifying Leads
- Impact: Incorrectly rating leads can send mixed signals to Google, affecting the quality and quantity of leads you receive.
- Solution: Carefully assess each lead before assigning a rating. Ensure that high-quality leads are marked appropriately to boost their priority in future distributions.
Ignoring Feedback
- Impact: Failing to address negative feedback can harm your online reputation and reduce customer trust.
- Solution: Actively respond to all feedback, especially negative reviews. Use the insights gained to improve your services and customer interactions.
Overlooking Bad Leads
- Impact: Allowing irrelevant or unqualified leads to remain active can waste your time and resources.
- Solution: Promptly mark bad leads to prevent Google from sending similar leads in the future. Regularly review leads to identify patterns and adjust your targeting as needed.
Frequently Asked Questions
How Often Should I Mark Leads in Google Local Services Ads?
Ideally, you should mark leads daily to ensure that Google receives timely and accurate data about your lead quality and conversion rates. Consistent lead marking helps maintain a steady flow of high-quality leads.
What Happens If I Don’t Mark Leads in Google Local Services Ads?
If you neglect to mark leads, Google may reduce the number of leads sent to your account or redirect leads to competitors who are actively managing their lead statuses. This can result in fewer opportunities to convert leads into customers.
Can I Mark Leads as Completed After the Job is Done?
Yes, you can mark leads as completed once the job is finished. This helps Google understand that the lead was successfully converted, which can improve your lead quality and increase the number of leads you receive.
How Do I Mark a Lead as Bad?
To mark a lead as bad:
- Go to the “Leads” tab in your LSA dashboard.
- Select the lead you want to mark.
- Choose the option to mark it as a bad lead.
- Confirm the action.
Can I Change the Rating of a Lead After Marking It?
Yes, you can update the rating of a lead if new information becomes available or if there was an error in the initial rating. Navigate to the lead in your dashboard, adjust the rating, and save the changes.
Maximizing the Impact of Lead Management
To fully leverage the benefits of marking leads in Google Local Services Ads, integrate these strategies into your broader business and marketing efforts.
Integrate with Your CRM
- Seamless Data Flow: Connect your LSA account with your Customer Relationship Management (CRM) system to streamline lead tracking and follow-up processes.
- Enhanced Tracking: Use CRM tools to monitor the progress of each lead, from initial contact to conversion, ensuring no opportunities are missed.
Analyze Lead Data
- Identify Trends: Regularly analyze the data from your lead markings to identify trends and patterns. Understand which services generate the most leads and which areas are most profitable.
- Optimize Targeting: Use insights from your lead data to refine your targeting strategies, focusing on high-performing areas and services.
Optimize Ad Strategies
- Refine Ad Copy: Use the feedback and data from your marked leads to refine your ad copy, highlighting the services and features that resonate most with customers.
- Adjust Budget Allocation: Allocate more budget to high-performing services and areas, ensuring that your advertising spend is directed towards the most lucrative opportunities.
Foster Team Collaboration
- Shared Responsibilities: Encourage your team to collaborate on lead management, ensuring that leads are marked accurately and promptly.
- Training and Guidelines: Provide training and clear guidelines to your team members on how to rate and mark leads effectively, maintaining consistency across the board.
Enhance Customer Communication
- Personalized Follow-Ups: Use the information from your lead markings to personalize your follow-up communications, addressing specific customer needs and preferences.
- Build Relationships: Foster strong relationships with customers by maintaining consistent and thoughtful communication throughout the lead conversion process.
Conclusion
Understanding how to mark leads in Google Local Services Ads is a fundamental aspect of managing your home-service business’s online presence effectively. By following the step-by-step guide provided in this post, implementing best practices, and avoiding common mistakes, you can optimize your lead management process to attract more high-quality leads and drive business growth. Consistent and accurate lead marking not only enhances your ad performance but also improves your local SEO, ensuring that your business remains competitive in the digital landscape. Embrace these strategies to maximize the potential of your Google Local Services Ads and achieve sustained success.
How to Add Photos to Your Google Local Services Ads Account
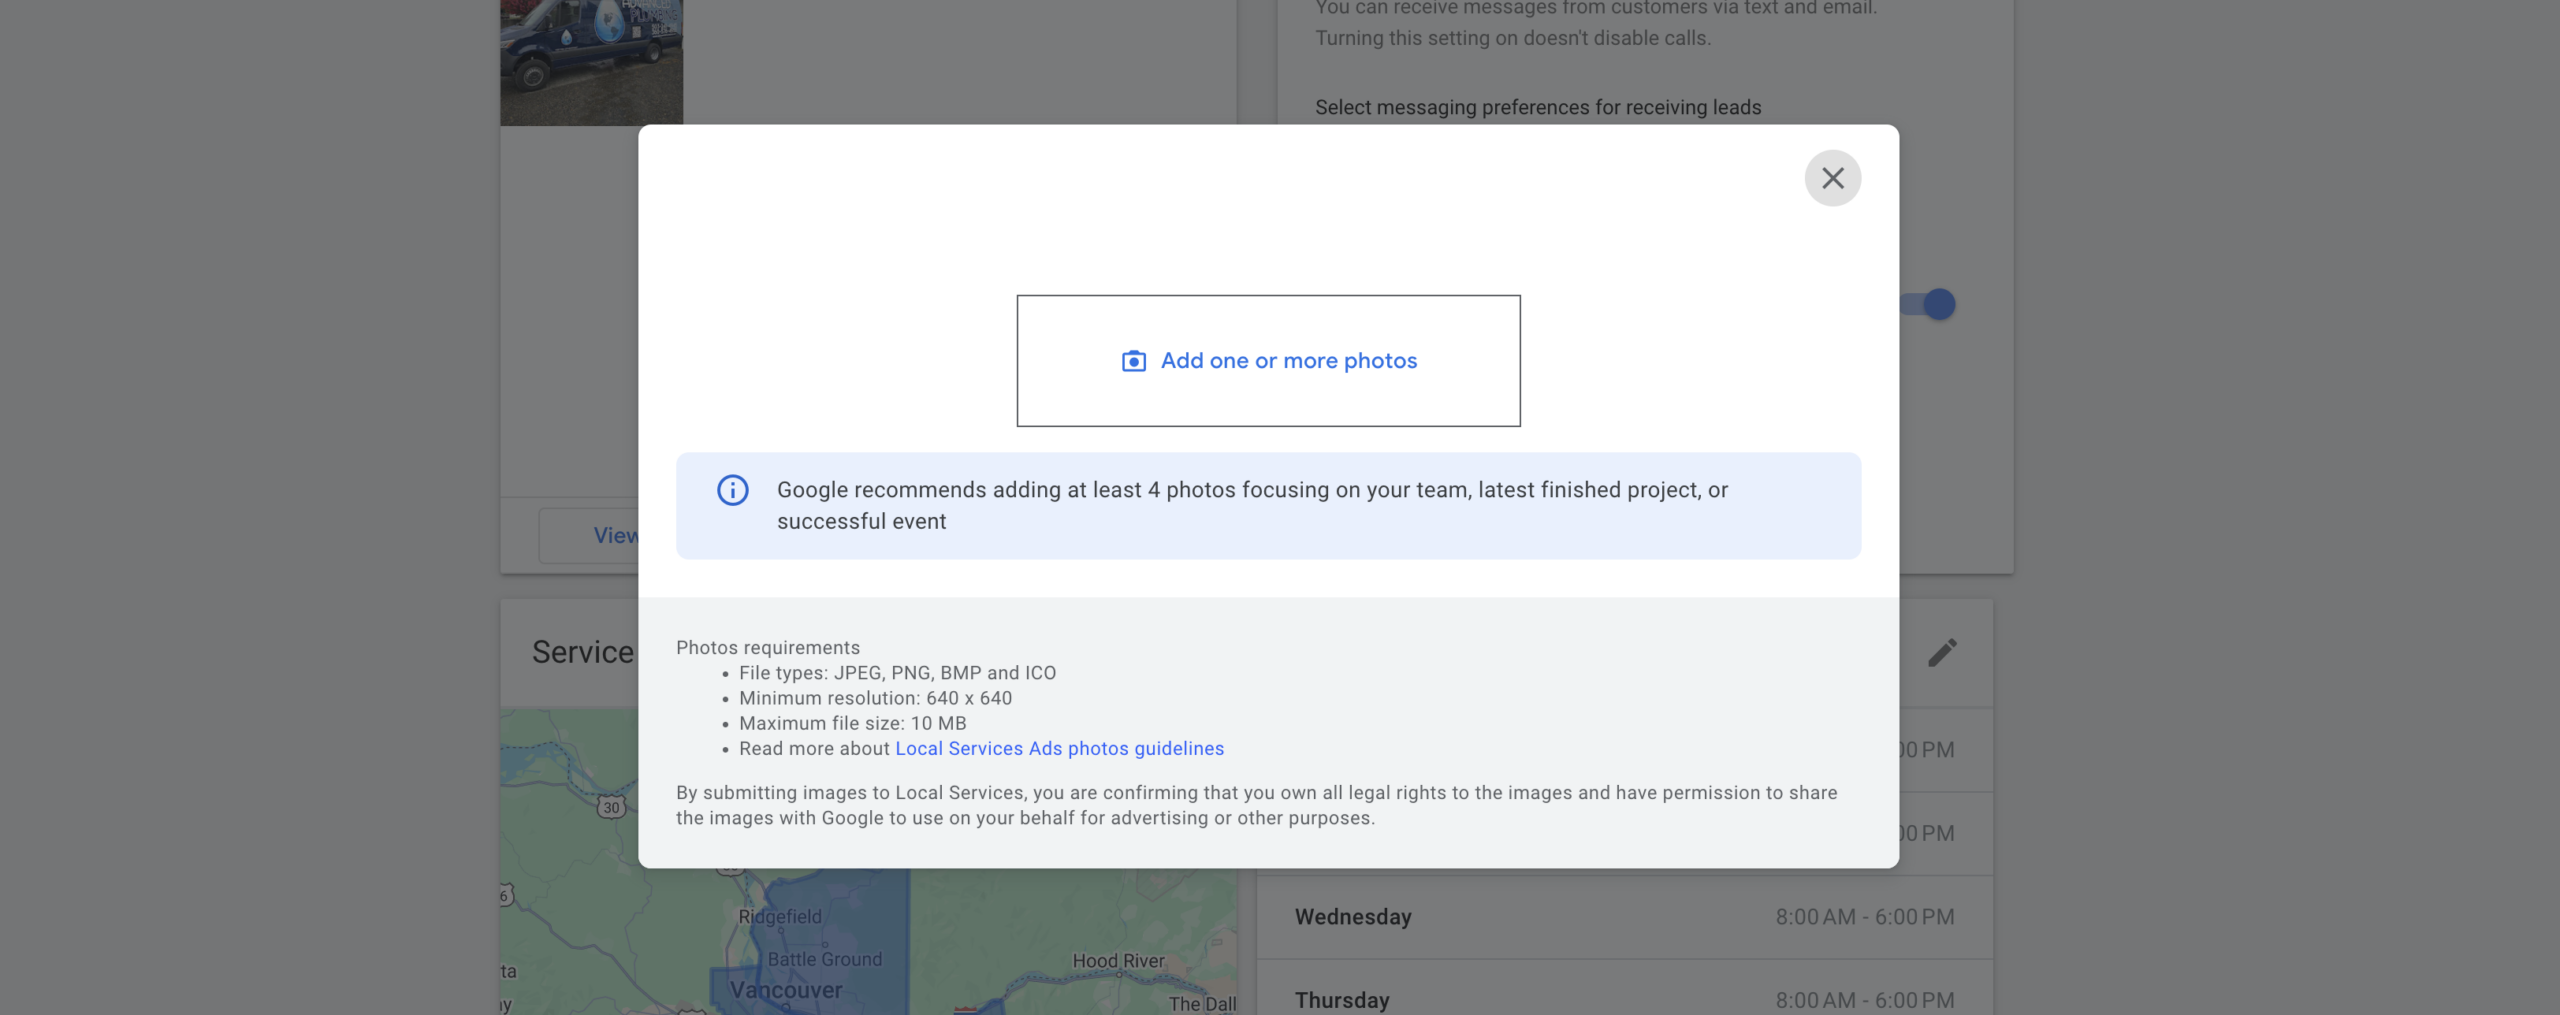
Adding photos to your Google Local Services Ads (LSA) account is a crucial step for home-service businesses aiming to enhance their online presence and attract more customers. In the “How to Add Photos to Your Google Local Services Ads Account” video, you learn the importance of consistently uploading relevant images to your LSA profile. This comprehensive guide will expand on those instructions, providing you with detailed steps, best practices, and additional insights to maximize the effectiveness of your photo uploads and improve your local SEO.
Why Adding Photos to Your Google Local Services Ads Account Matters
Photos play a significant role in how potential customers perceive your business online. They provide a visual representation of your services, team, and operations, helping to build trust and credibility. Here’s why adding photos to your Google Local Services Ads account is essential:
Enhance Visual Appeal
Visual content is more engaging than text alone. High-quality photos can capture the attention of potential customers, making your ads stand out among competitors. Even simple, well-taken images can significantly improve the attractiveness of your profile.
Build Trust and Credibility
Photos of your team, equipment, and completed projects showcase your professionalism and the quality of your services. They provide tangible proof of what you offer, helping to build trust with potential customers who are considering your services.
Improve Local SEO
Google values businesses that provide rich, engaging content. Regularly updating your LSA account with photos can improve your local SEO rankings, making it easier for customers in your service areas to find you.
Showcase Your Services and Expertise
Photos allow you to highlight specific aspects of your services, such as before-and-after shots of projects, the tools you use, and the environments in which you work. This detailed visual information can help customers understand the scope and quality of your offerings.
Step-by-Step Guide to Adding Photos to Your Google Local Services Ads Account
Follow these steps to effectively add photos to your Google Local Services Ads account, ensuring that your business stands out and attracts the right customers.
Step 1: Access Your Google Local Services Ads Account
- Sign In to Your Google Local Services Ads Account
- Navigate to Google Local Services Ads and click on “Sign in” at the top right corner.
- Enter the Gmail account credentials associated with your LSA account.
- Select the Correct Business Profile
- If you manage multiple business profiles, ensure you select the one where you want to add photos. This guarantees that your updates are made to the appropriate profile.
Step 2: Navigate to the Profile and Budget Tab
- Open the Dashboard
- Once signed in, you’ll be directed to your LSA dashboard. This is where you manage various aspects of your ads, including settings, budget, and service areas.
- Locate the “Profile and Budget” Tab
- In the dashboard menu, find and click on the “Profile and Budget” tab. This section allows you to manage your business information and advertising budget.
Step 3: Add Photos to Your LSA Account
- Scroll Down to the Photos Section
- Within the “Profile and Budget” tab, scroll down until you find the “Photos” section. This is where you can upload images to your LSA profile.
- Click on the “Add Photos” Button
- Click the “Add Photos” button to open the upload interface.
- Upload Relevant Photos
- Choose Your Photos: Select one or more photos that best represent your business. Recommended types include:
- Van or Service Vehicles: Showcasing your branded vehicles helps customers recognize your business in their area.
- Team Members: Photos of your team can personalize your business and build trust.
- Office or Workspace: Displaying your office or work environment gives customers a sense of your professionalism.
- Equipment and Tools: Highlighting the tools you use emphasizes your expertise and the quality of your services.
- Completed Projects: Before-and-after photos of your work demonstrate your capabilities and the results customers can expect.
- Choose Your Photos: Select one or more photos that best represent your business. Recommended types include:
- Upload and Save
- After selecting the appropriate photos, upload them to your LSA account. Once uploaded, click “Save” to ensure the photos are added to your profile.
Step 4: Maintain a Consistent Photo Upload Schedule
- Initial Uploads
- When setting up your LSA account, upload a substantial number of photos to provide a comprehensive view of your business from the outset.
- Regular Updates
- Aim to add new photos at least once a week. If weekly uploads are not feasible, strive to update your photo gallery monthly. Consistent additions keep your profile fresh and engaging.
Best Practices for Adding Photos to Your Google Local Services Ads Account
Implementing best practices ensures that your photo uploads are effective and contribute positively to your online presence.
Use High-Quality Images
- Clarity and Resolution: Ensure that your photos are clear and have a high resolution. Blurry or pixelated images can create a negative impression of your business.
- Proper Lighting: Good lighting enhances the quality of your photos. Natural light is ideal, but if that’s not possible, use well-lit indoor settings.
- Professional Composition: Arrange your subjects thoughtfully. For example, team photos should show everyone clearly, and project photos should highlight the most impressive aspects.
Showcase a Variety of Content
- Diverse Perspectives: Include different types of photos to provide a well-rounded view of your business. Avoid repeating the same type of image too often.
- Action Shots: Photos of your team in action performing services can illustrate your expertise and dedication.
- Customer Interactions: Images that show your team interacting with customers can build a sense of trust and reliability.
Optimize File Sizes and Formats
- Appropriate File Sizes: Ensure that your photos are not too large, which can slow down loading times, or too small, which can reduce their impact. Google typically recommends using images with a resolution of at least 720 x 720 pixels.
- Compatible Formats: Use common image formats such as JPEG or PNG to ensure compatibility with Google’s upload system.
Use Descriptive File Names
- SEO Benefits: Name your photo files descriptively using relevant keywords. For example, “plumbing-service-van.jpg” is more effective than “IMG1234.jpg.”
- Organization: Descriptive names help you keep track of your photos and make it easier to manage your image library.
Align Photos with Your Brand
- Consistent Branding: Ensure that your photos reflect your brand’s colors, style, and values. This consistency helps in building brand recognition and trust.
- Professional Appearance: Even if photos don’t have to be taken by a professional, ensure they represent your business in a positive and professional manner.
Monitor and Refresh Your Photo Gallery
- Regular Audits: Periodically review your photo gallery to remove outdated or irrelevant images. Keep your profile updated with the latest representations of your business.
- Seasonal Updates: Add photos that reflect seasonal changes or special promotions to keep your profile relevant and engaging throughout the year.
Common Mistakes to Avoid
Avoiding these common mistakes can help ensure that your photo uploads contribute positively to your Google Local Services Ads performance.
Uploading Low-Quality Photos
- Impact: Low-quality images can harm your business’s credibility and deter potential customers.
- Solution: Always use clear, high-resolution photos that accurately represent your services and business environment.
Overloading Your Profile with Irrelevant Images
- Impact: Irrelevant photos can confuse customers and dilute the effectiveness of your profile.
- Solution: Focus on uploading images that are directly related to your services, team, and business operations.
Inconsistent Photo Uploads
- Impact: Irregular updates can make your profile appear inactive or neglected.
- Solution: Establish a consistent photo upload schedule to keep your profile fresh and engaging.
Ignoring Mobile Optimization
- Impact: Many users access Google Local Services Ads via mobile devices. Non-optimized photos can lead to a poor user experience.
- Solution: Ensure all photos are optimized for mobile viewing by maintaining appropriate resolutions and clear compositions.
Neglecting to Update Photos Regularly
- Impact: Outdated photos can misrepresent your current services and business status.
- Solution: Regularly refresh your photo gallery to reflect the latest developments in your business.
Frequently Asked Questions
Do I Need Professional Photos to Add to My Google Local Services Ads Account?
No, professional photos are not mandatory. While high-quality images can enhance your profile, photos taken with a smartphone can also be effective as long as they are clear, well-lit, and relevant to your business.
How Many Photos Should I Add Initially?
It’s recommended to upload a substantial number of photos when setting up your LSA account, such as 10-20 images, to provide a comprehensive view of your business. This initial upload sets a strong foundation for your profile.
Can I Remove Photos After Uploading Them?
Yes, you can remove photos from your LSA account at any time. Navigate to the “Photos” section in your profile and select the photos you wish to delete. Click on the delete option to remove them from your profile.
Are There Any Restrictions on the Types of Photos I Can Upload?
Google prefers photos that accurately represent your business and services. Avoid uploading misleading or inappropriate images. Ensure that all photos comply with Google’s content policies and guidelines.
How Often Should I Update My Photo Gallery?
Aim to add new photos at least once a week. If weekly updates are not feasible, strive to update your gallery monthly. Consistent updates keep your profile engaging and show that your business is active.
Maximizing the Impact of Your Photos
To fully leverage the benefits of adding photos to your Google Local Services Ads account, integrate these strategies into your broader marketing efforts.
Promote Your Photos on Social Media
Share your LSA photos on your social media platforms to increase visibility and drive traffic to your Google profile. Encourage your followers to check out your services through your LSA account.
Use Photos to Highlight Special Offers
Incorporate images that showcase special promotions, discounts, or seasonal services. Visual representations of your offers can attract more attention and encourage bookings.
Incorporate Photos into Your Website
Ensure that the photos you upload to your LSA account are also featured on your website. This consistency across platforms reinforces your brand and provides a seamless experience for customers.
Encourage Customer-Generated Photos
Ask satisfied customers to share photos of your work or their experiences with your services. User-generated content can add authenticity and provide diverse perspectives on your business.
Leverage Before-and-After Shots
Showcase the quality of your services by including before-and-after photos of your projects. This visual proof of your expertise can persuade potential customers to choose your services.
Conclusion
Adding photos to your Google Local Services Ads account is a powerful way to enhance your online presence, build trust with potential customers, and improve your local SEO. By following the step-by-step guide outlined in this post, implementing best practices, and avoiding common mistakes, you can ensure that your photo uploads effectively showcase your business and attract the right clientele. Regularly updating your photo gallery and maintaining a consistent upload schedule will keep your profile fresh and engaging, ultimately driving business growth and success in the competitive home-service market.
How to Change Business Hours & Ad Schedule in Google Local Services Ads
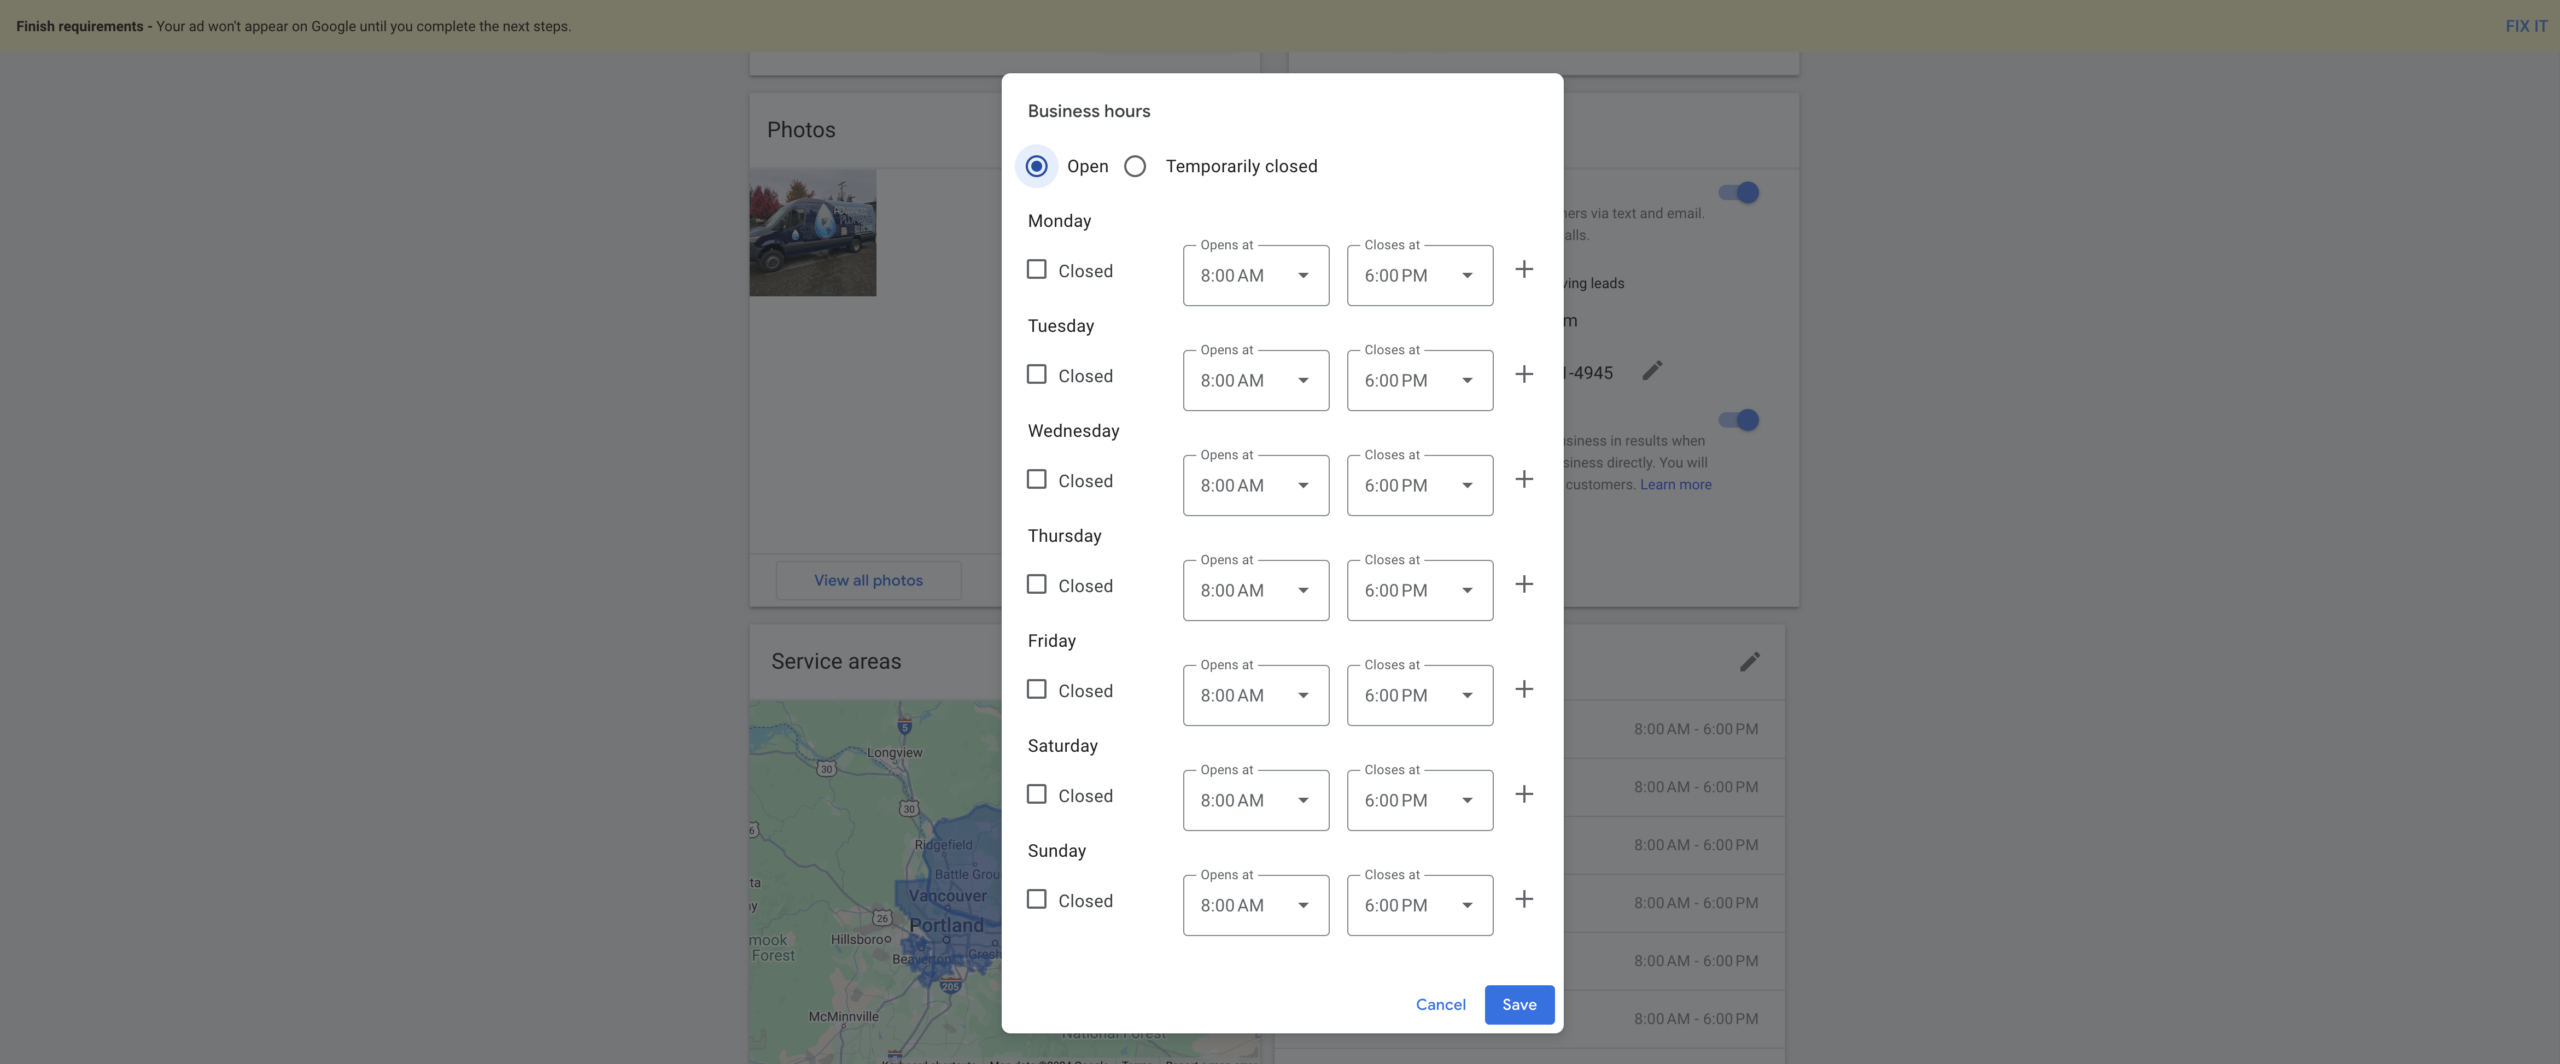
Managing your business hours and ad schedule in Google Local Services Ads (LSA) is essential for home-service businesses aiming to optimize their online presence and attract the right customers. In the “How to Change Business Hours & Ad Schedule in Google Local Services Ads” video, you learn how to effectively adjust your operating hours and ad timings to ensure that your business remains visible and responsive during peak times. This comprehensive guide will expand on those instructions, providing you with detailed steps, best practices, and additional insights to help you manage your business hours and ad schedule efficiently.
Why Managing Business Hours & Ad Schedule Matters
Properly managing your business hours and ad schedule in Google Local Services Ads is crucial for several reasons:
Enhance Customer Experience
Ensuring that your business hours are accurately reflected in your LSA ensures that customers can reach you when they need your services. This alignment prevents frustration from missed calls and increases the likelihood of converting leads into customers.
Optimize Ad Performance
Running your ads during hours when your business is operational maximizes the effectiveness of your advertising spend. It ensures that leads generated by your ads can be promptly addressed, improving conversion rates and return on investment (ROI).
Improve Local SEO
Google considers user engagement and responsiveness as factors in local SEO rankings. Accurate business hours and an optimized ad schedule signal to Google that your business is active and reliable, potentially boosting your visibility in local search results.
Step-by-Step Guide to Changing Business Hours & Ad Schedule
Follow these steps to effectively update your business hours and ad schedule in your Google Local Services Ads account.
Step 1: Access Your Google Local Services Ads Account
- Sign In to Your Account
- Navigate to Google Local Services Ads and click on “Sign in” at the top right corner.
- Enter the Gmail account credentials associated with your LSA account.
- Select the Correct Business Profile
- If you manage multiple business profiles, ensure you select the one you want to update. This guarantees that changes are made to the appropriate profile.
Step 2: Navigate to the Profile and Budget Tab
- Open the Dashboard
- Once signed in, you’ll be directed to your LSA dashboard where you can manage various aspects of your ads and business information.
- Locate the “Profile and Budget” Tab
- In the dashboard menu, find and click on the “Profile and Budget” tab. This section allows you to manage your business information, advertising budget, and other settings.
Step 3: Update Business Hours
- Scroll Down to the Business Hours Section
- Within the “Profile and Budget” tab, scroll down until you find the “Business Hours” section. This area displays your current operating hours.
- Click on “Edit Business Hours”
- Click the “Edit” button to modify your business hours. Ensure that these hours match those on your Google Business Profile (GBP) to maintain consistency.
- Set Your Operating Hours
- Enter your standard business hours. For example, if your business operates from 8 AM to 6 PM, input these times accurately.
- Temporary Closures: If your business will be temporarily closed (e.g., holidays or maintenance), use the “Temporary Close” option to inform customers accordingly.
- Save Your Changes
- After updating your hours, click “Save” to apply the changes to your LSA account.
Step 4: Adjust the Ad Schedule
- Locate the Ad Schedule Section
- Still within the “Profile and Budget” tab, find the “Ad Schedule” section. This feature allows you to specify when your ads should run.
- Edit the Ad Schedule
- Click on “Edit Ad Schedule” to customize the times and days your ads will be active.
- Match Business Hours: Ideally, set your ad schedule to align with your business hours. This ensures that leads generated by your ads can be promptly addressed.
- Custom Scheduling: If you want your ads to run outside of standard business hours for specific reasons (e.g., capturing early morning or late evening customers), adjust the schedule accordingly.
- Save the Ad Schedule
- Once you’ve configured the desired ad timings, click “Save” to implement the new schedule.
Step 5: Verify Your Changes
- Review Updated Settings
- After saving, review your business hours and ad schedule to ensure they are correctly set.
- Consistency Check: Confirm that your business hours in LSA match those in your GBP to avoid confusion and enhance customer trust.
- Monitor Ad Performance
- Keep an eye on your ad performance metrics to assess the impact of the changes. Look for improvements in lead generation and conversion rates.
Best Practices for Managing Business Hours & Ad Schedule
Implementing best practices ensures that your business hours and ad schedule are optimized for maximum effectiveness.
Ensure Consistency Across Platforms
- Uniform Hours: Make sure that your business hours are consistent across all platforms, including GBP, LSA, your website, and social media profiles. Inconsistencies can confuse customers and negatively impact your SEO.
- Centralized Management: Use a centralized system or calendar to manage and update your business hours across all platforms simultaneously.
Optimize for Customer Behavior
- Analyze Peak Times: Use analytics tools to identify when your customers are most active and schedule your ads to run during these peak periods.
- Flexible Scheduling: Adjust your ad schedule based on seasonal trends or special events to capture increased demand during specific times.
Keep Your Hours Updated
- Regular Audits: Periodically review your business hours and ad schedule to ensure they remain accurate and reflect any changes in your operations.
- Prompt Updates: Update your hours immediately if there are any changes, such as extended hours for a special promotion or reduced hours during holidays.
Utilize Temporary Closures Effectively
- Inform Customers: Use the temporary closure feature to inform customers about upcoming closures. This transparency helps manage customer expectations and maintains trust.
- Plan Ahead: Schedule temporary closures in advance to ensure that your ad schedule and business hours reflect the changes accurately.
Leverage Automation Tools
- Scheduling Tools: Use automation tools to manage your ad schedule efficiently. Tools like Google Ads Scheduler can help you plan and automate your ad timings based on your business needs.
- Integration with CRM: Integrate your ad scheduling with your Customer Relationship Management (CRM) system to streamline lead management and follow-ups.
Common Mistakes to Avoid
Avoiding these common mistakes can ensure that your business hours and ad schedule management is effective and beneficial to your business.
Mismatching Business Hours
- Impact: Inconsistent business hours across platforms can lead to customer confusion and missed opportunities.
- Solution: Regularly audit your business hours to ensure they are consistent across all platforms, including GBP and LSA.
Overcomplicating the Ad Schedule
- Impact: Creating an overly complex ad schedule can lead to inefficiencies and wasted ad spend.
- Solution: Keep your ad schedule simple and aligned with your core business hours, adjusting only for specific needs or trends.
Ignoring Customer Feedback
- Impact: Failing to adjust your business hours and ad schedule based on customer behavior can result in lost leads and reduced customer satisfaction.
- Solution: Actively monitor customer interactions and feedback to inform adjustments to your business hours and ad schedule.
Neglecting to Update Temporary Closures
- Impact: Not updating temporary closures can result in customer frustration and missed appointments.
- Solution: Use the temporary closure feature to inform customers about any short-term changes in your operating hours.
Overlooking Mobile Optimization
- Impact: Many customers access your business information via mobile devices. If your business hours and ad schedule are not optimized for mobile, you may miss out on potential leads.
- Solution: Ensure that your business hours and ad schedule are clearly visible and easily accessible on mobile devices.
Frequently Asked Questions
How Do I Ensure My Business Hours in LSA Match My Google Business Profile?
To ensure consistency, always update your business hours in your Google Business Profile first. Then, replicate the same hours in your Google Local Services Ads account by following the steps outlined in this guide.
Can I Set Different Business Hours for Different Days?
Yes, you can set specific business hours for each day of the week in your Google Local Services Ads account. This flexibility allows you to accommodate varying customer demands and operational needs.
What Should I Do If I Receive Leads Outside My Business Hours?
If you receive leads outside your set business hours, consider adjusting your ad schedule to include additional times when you can respond. Alternatively, set up automated responses to inform customers when you will be available to assist them.
How Often Should I Review and Update My Ad Schedule?
It’s recommended to review your ad schedule at least once a month or whenever there are significant changes in your business operations. Regular reviews help ensure that your ad schedule remains aligned with your business needs and customer behavior.
Can I Temporarily Disable My Ads?
Yes, you can temporarily disable your ads by pausing your campaign in the Google Local Services Ads dashboard. This is useful during periods of temporary closures or significant operational changes.
Maximizing the Impact of Business Hours & Ad Schedule Management
To fully leverage the benefits of managing your business hours and ad schedule in Google Local Services Ads, integrate these strategies into your broader marketing and operational plans.
Align with Marketing Campaigns
- Seasonal Promotions: Adjust your ad schedule to coincide with seasonal promotions or special events. For example, extend your business hours and ad schedule during holiday seasons when demand may increase.
- New Service Launches: Promote new services by ensuring your ad schedule aligns with launch events or peak interest times.
Coordinate with Offline Operations
- Staff Scheduling: Ensure that your staff schedule aligns with your business hours and ad schedule to handle incoming leads efficiently.
- Customer Support: Provide adequate customer support during your advertised hours to maximize lead conversion and customer satisfaction.
Utilize Analytics for Continuous Improvement
- Monitor Performance Metrics: Use Google’s analytics tools to track the performance of your ads based on different business hours and ad schedules. Identify trends and adjust your strategies accordingly.
- A/B Testing: Experiment with different ad schedules to determine which timings yield the highest conversion rates. Use A/B testing to find the optimal schedule for your business.
Foster Communication Within Your Team
- Internal Coordination: Ensure that all team members are aware of your business hours and ad schedule. This coordination helps maintain consistency in customer interactions and service delivery.
- Feedback Loop: Create a feedback loop where team members can report on lead quality and conversion rates based on different ad schedules. Use this feedback to refine your strategies.
Enhance Customer Engagement
- Personalized Communication: Use the information from your ad schedule to personalize customer communications. For example, follow up on leads promptly during your active hours to increase conversion rates.
- Customer Convenience: Offer flexible booking options that align with your business hours, making it easier for customers to schedule services at their convenience.
Conclusion
Effectively managing your business hours and ad schedule in Google Local Services Ads is a powerful strategy for home-service businesses seeking to optimize their online presence and attract the right customers. By ensuring that your business hours are consistent across all platforms and aligning your ad schedule with your operational capabilities, you can enhance customer experience, improve ad performance, and boost your local SEO. Follow the step-by-step guide provided in this post, implement best practices, and avoid common mistakes to maximize the benefits of your Google Local Services Ads. Regularly review and adjust your settings to stay aligned with your business goals and market trends, ensuring sustained growth and success in a competitive landscape.
How to Add, Remove, & Exclude Service Areas in Google Local Services Ads
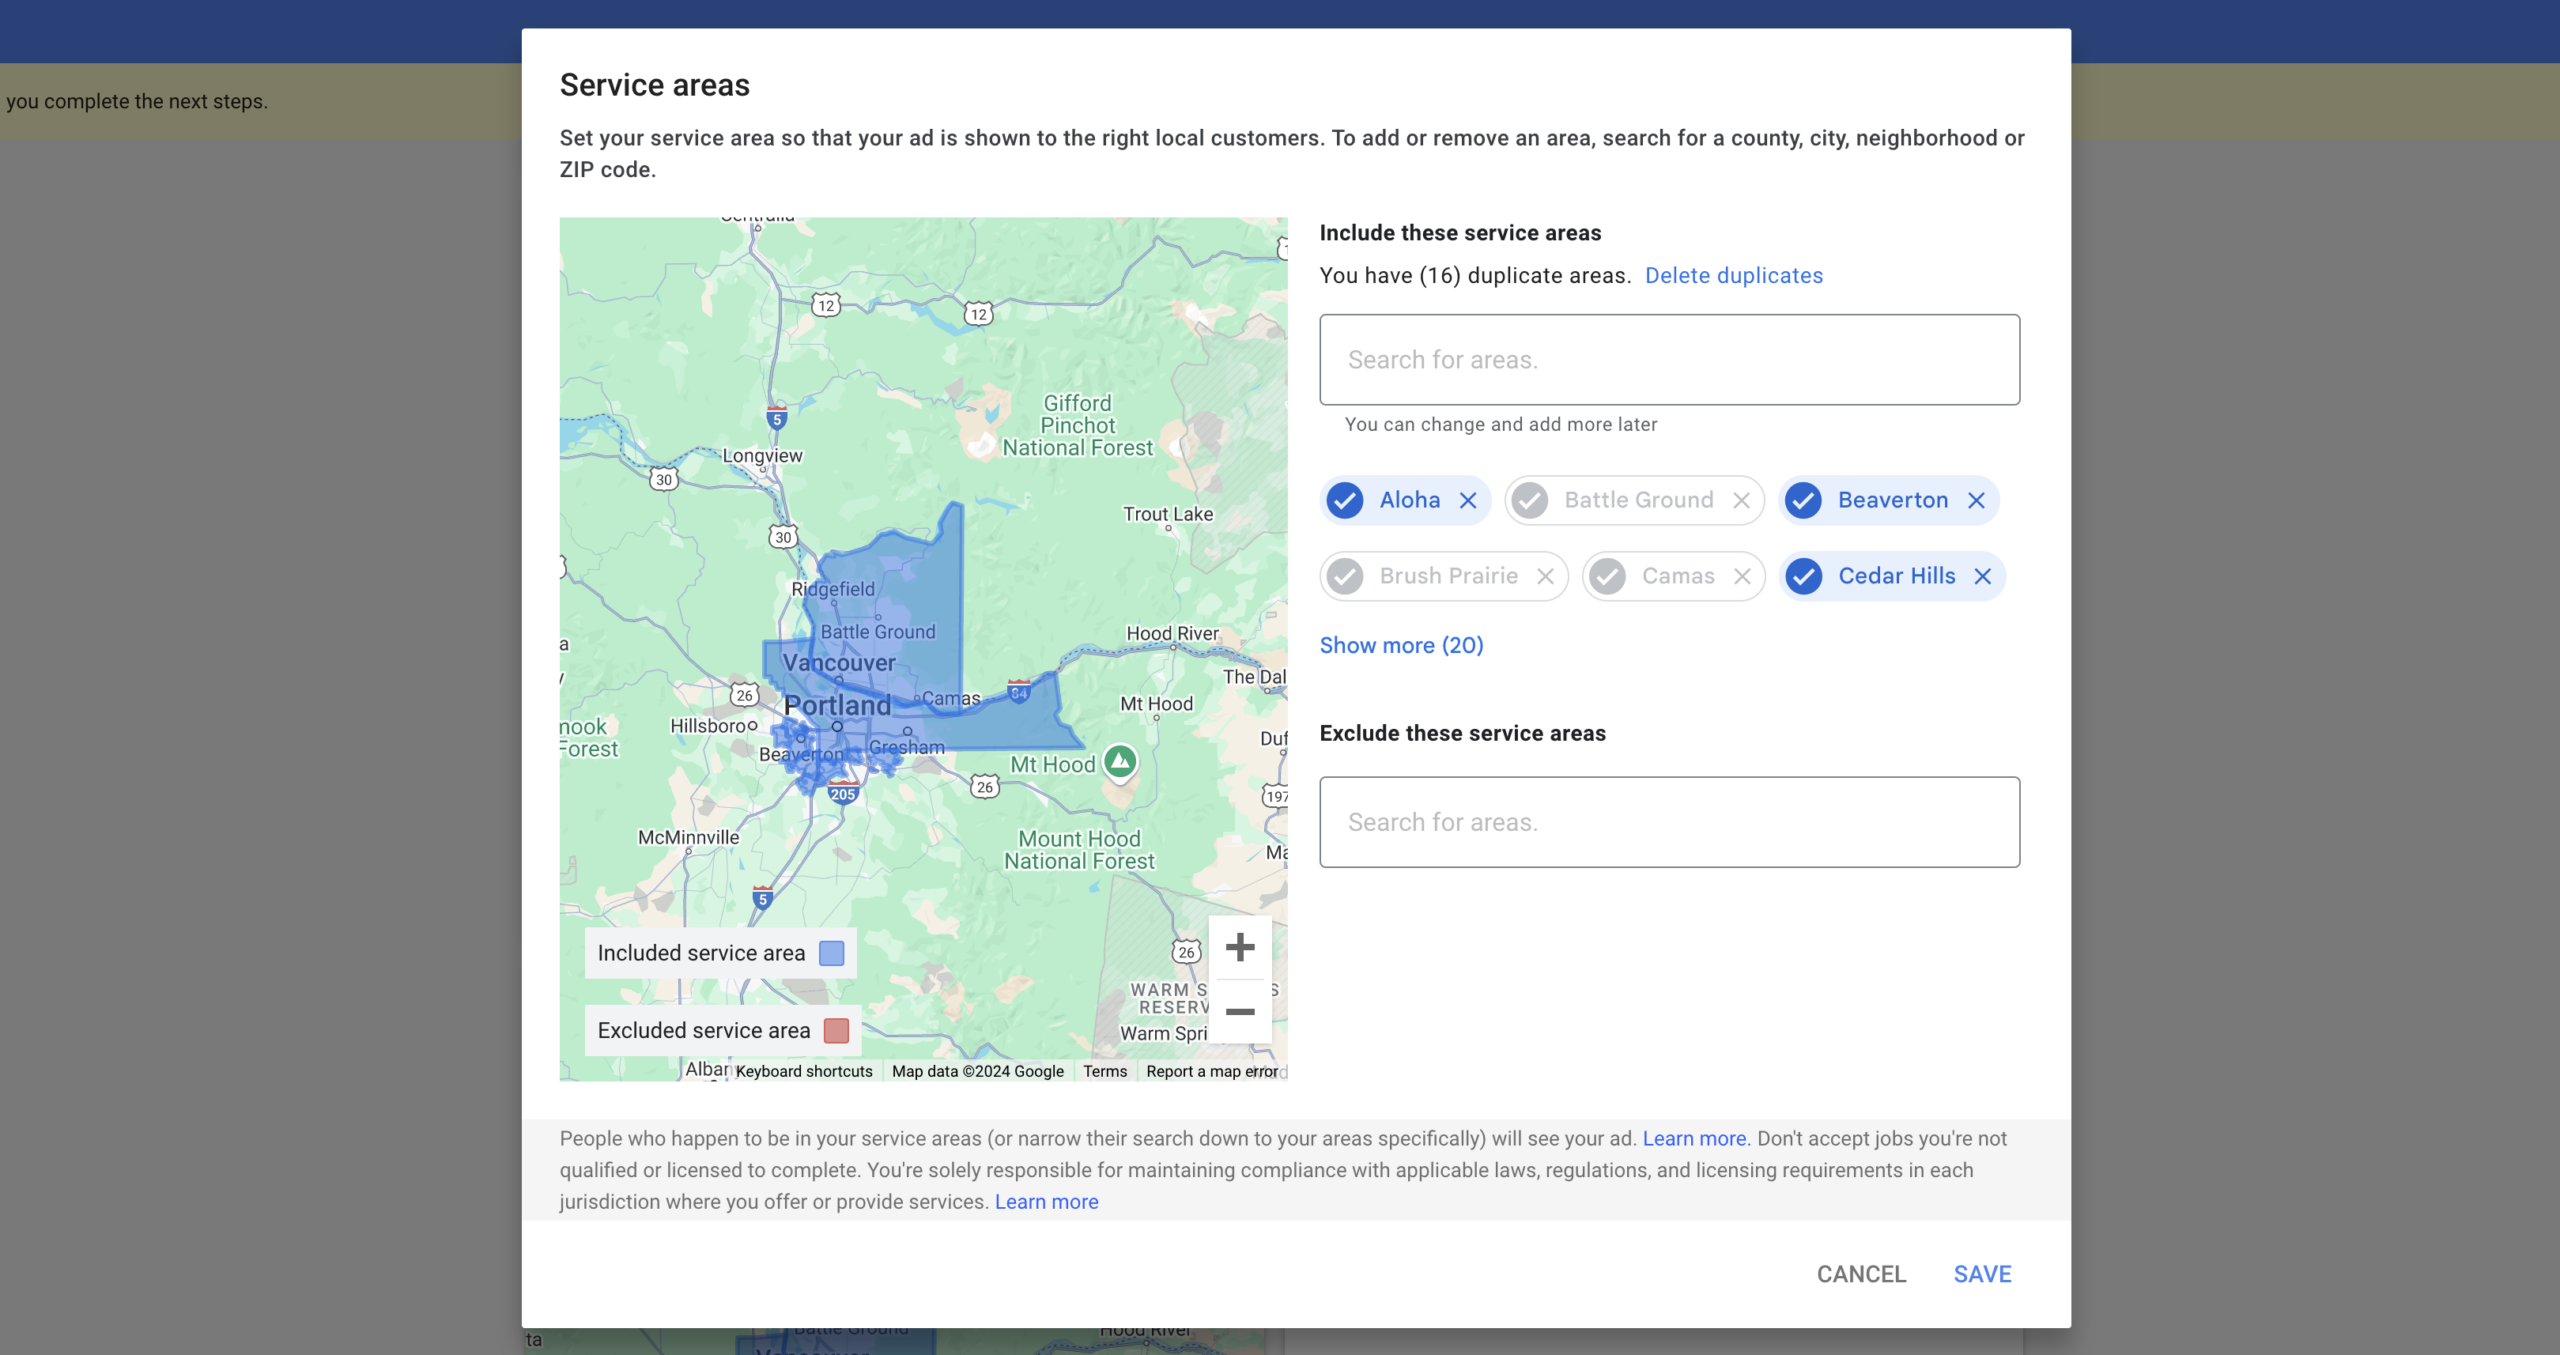
Managing your service areas in Google Local Services Ads is crucial for home-service businesses aiming to optimize their online presence and attract the right customers. In the “How to Add, Remove, & Exclude Service Areas in Google Local Services Ads” video, you learn effective strategies to fine-tune your service areas, ensuring that your business ranks appropriately and reaches your target audience. This comprehensive guide will delve deeper into those instructions, providing you with detailed steps, best practices, and additional insights to help you manage your service areas efficiently.
Why Managing Service Areas Matters
Properly managing your service areas in Google Local Services Ads can significantly impact your business’s visibility and lead generation. Here’s why it’s essential:
Enhance Local Visibility
By accurately defining your service areas, you ensure that your ads appear to customers who are genuinely looking for the services you offer in specific locations. This targeted approach increases the likelihood of attracting qualified leads and reduces wasted ad spend on irrelevant searches.
Improve Ad Performance
When your service areas are well-defined, Google can better match your ads with customer searches. This alignment can lead to higher click-through rates (CTR) and conversion rates, as your ads are shown to users who are more likely to require your services.
Optimize Budget Allocation
Focusing your ads on areas where you can effectively serve customers allows you to allocate your advertising budget more efficiently. By excluding regions where you don’t operate, you prevent unnecessary expenditures and ensure that your resources are directed towards areas with the highest potential for returns.
Step-by-Step Guide to Managing Service Areas
Follow these steps to add, remove, and exclude service areas in your Google Local Services Ads account effectively.
Step 1: Access Your Google Local Services Ads Account
- Sign In to Your Account
- Navigate to Google Local Services Ads and sign in using your business’s Google account credentials.
- Select the Correct Business Profile
- If you manage multiple business profiles, ensure you select the one you want to update. This guarantees that changes are made to the appropriate profile.
Step 2: Navigate to the Service Areas Section
- Open the Dashboard
- Once logged in, you’ll be directed to your account dashboard where you can manage various aspects of your ads and business information.
- Locate the “Service Areas” Tab
- Find and click on the “Service Areas” tab. This section allows you to add, remove, and exclude specific areas where you offer services.
Step 3: Add Service Areas
- Choose to Add by City Name
- It’s highly recommended to add service areas by city name rather than zip codes. Adding cities like “Gresham, Oregon” ensures broader visibility and better ranking in search results.
- Enter the City Name
- Type in the name of the city you want to add. For example, enter “Gresham, Oregon” instead of multiple zip codes within Gresham.
- Review and Confirm
- After entering the city name, review the information and click “Add.” The city will now be included in your active service areas, highlighted in blue on the map interface.
Step 4: Remove or Exclude Service Areas
- Identify Areas to Exclude
- Determine which areas you no longer want to target or serve. For instance, if you want to exclude “Malala, Oregon,” ensure it’s accurately identified.
- Add to Excluded Areas
- In the “Service Areas” section, select the option to exclude an area. Enter the city name you wish to exclude, such as “Malala, Oregon.”
- Confirm Exclusion
- Once added, the excluded area will be highlighted in red on the map. This ensures that your ads won’t appear to users searching in these regions.
Step 5: Utilize Both City Names and Zip Codes
- Combine Approaches for Maximum Coverage
- While city names are effective, adding relevant zip codes can further refine your targeting. Ensure you add both city names and associated zip codes to cover all potential search queries.
- Monitor Ad Performance
- Regularly check the performance of your service areas. If you notice leads coming from excluded areas, consider adjusting your exclusions or adding new areas based on demand.
Best Practices for Managing Service Areas
Implementing best practices can enhance the effectiveness of your service area management in Google Local Services Ads.
Add Relevant and Specific Locations
- Be Precise: Only add areas where you can reliably provide services. Overextending can lead to negative customer experiences and wasted ad spend.
- Research Demand: Focus on areas with high demand for your services to maximize lead generation and return on investment (ROI).
Regularly Update Service Areas
- Stay Current: Business operations and market demands can change. Regularly review and update your service areas to reflect any shifts in your service capabilities or target markets.
- Adapt to Feedback: Use customer feedback and lead sources to identify new areas of opportunity or regions to exclude.
Optimize for Local SEO
- Consistent NAP Information: Ensure that your Name, Address, and Phone number (NAP) are consistent across all online platforms to improve local SEO.
- Localized Content: Incorporate localized keywords in your ad copy and website content to enhance relevance and searchability within your service areas.
Monitor and Analyze Performance
- Use Analytics Tools: Leverage Google’s analytics tools to track the performance of your service areas. Monitor metrics like CTR, conversion rates, and lead quality to assess effectiveness.
- Adjust Strategies: Based on performance data, make informed decisions to add or exclude service areas, optimize ad spend, and refine targeting strategies.
Common Mistakes and How to Avoid Them
Avoiding common pitfalls can ensure that your service area management is effective and beneficial to your business.
Relying Solely on Zip Codes
- Limited Reach: Using only zip codes can limit your visibility and make it harder for customers searching by city name to find your services.
- Solution: Combine zip codes with city names to broaden your reach and improve ranking in diverse search queries.
Overcomplicating Service Areas
- Confusion and Inefficiency: Adding too many service areas or overly specific locations can complicate management and dilute your ad effectiveness.
- Solution: Focus on key areas where you have a strong presence and demand. Keep your service areas streamlined and manageable.
Ignoring Excluded Areas
- Wasted Ad Spend: Failing to exclude areas where you don’t provide services can lead to wasted ad spend and irrelevant leads.
- Solution: Regularly review and update your excluded areas to ensure your ads target only the regions where you offer services.
Neglecting Regular Updates
- Outdated Information: Not updating your service areas can result in missed opportunities and inefficiencies.
- Solution: Set a schedule to periodically review and adjust your service areas based on business changes and market trends.
Frequently Asked Questions
How Many Service Areas Can I Add to My Google Local Services Ads?
There’s no strict limit on the number of service areas you can add. However, it’s best to focus on areas where you can effectively serve customers to maintain ad relevance and manage your budget efficiently.
Can I Use Both City Names and Zip Codes?
Yes, you can use both city names and zip codes to define your service areas. Combining both can enhance your coverage and ensure that your ads appear in a wider range of relevant searches.
What Happens If I Don’t Exclude Certain Areas?
If you don’t exclude areas where you don’t provide services, your ads may appear to customers in those regions. This can lead to irrelevant leads and wasted ad spend. It’s important to exclude non-serving areas to optimize your ad performance.
How Long Does It Take for Changes to Service Areas to Reflect?
Changes to service areas typically take a few days to process and reflect in your ads. It’s advisable to monitor your account regularly after making adjustments to ensure they are implemented correctly.
Can I Change My Service Areas Anytime?
Yes, you can add, remove, or exclude service areas at any time. However, frequent changes should be managed carefully to avoid confusion and ensure consistency in your ad performance.
Maximizing the Impact of Service Area Management
To fully leverage the benefits of managing your service areas in Google Local Services Ads, integrate these strategies into your broader marketing and operational plans.
Align with Business Expansion
- New Locations: When expanding your business to new areas, promptly add these locations to your service areas to start attracting customers from day one.
- Service Diversification: If you introduce new services, adjust your service areas to target regions where there’s demand for these offerings.
Coordinate with Offline Marketing
- Local Promotions: Sync your online service area management with offline marketing efforts like local events, sponsorships, and community engagements to boost visibility.
- Referral Programs: Encourage satisfied customers in your target areas to refer your services, reinforcing your presence and reputation within those regions.
Enhance Customer Engagement
- Localized Content Marketing: Create content tailored to the specific needs and interests of customers in your service areas. This can include blog posts, social media updates, and localized offers.
- Personalized Customer Service: Offer personalized service experiences based on the unique characteristics and preferences of customers in different service areas.
Utilize Advanced Targeting Options
- Seasonal Adjustments: Modify your service areas based on seasonal demands. For example, increase focus on areas prone to winter plumbing issues during colder months.
- Event-Based Targeting: Adjust your service areas temporarily to cater to special events or emergencies in specific regions.
Conclusion
Effectively managing your service areas in Google Local Services Ads is a powerful strategy for home-service businesses aiming to optimize their online presence and attract the right customers. By adding relevant cities, excluding non-serving areas, and following best practices, you can enhance your local SEO, improve ad performance, and drive business growth. Avoid common mistakes by maintaining accurate and up-to-date service areas, and leverage analytics to continuously refine your targeting strategies. Implementing these steps will ensure that your Google Local Services Ads are both efficient and effective, helping your business thrive in a competitive market.
How to Use Google Business Profile Products if You’re a Home-Service Business
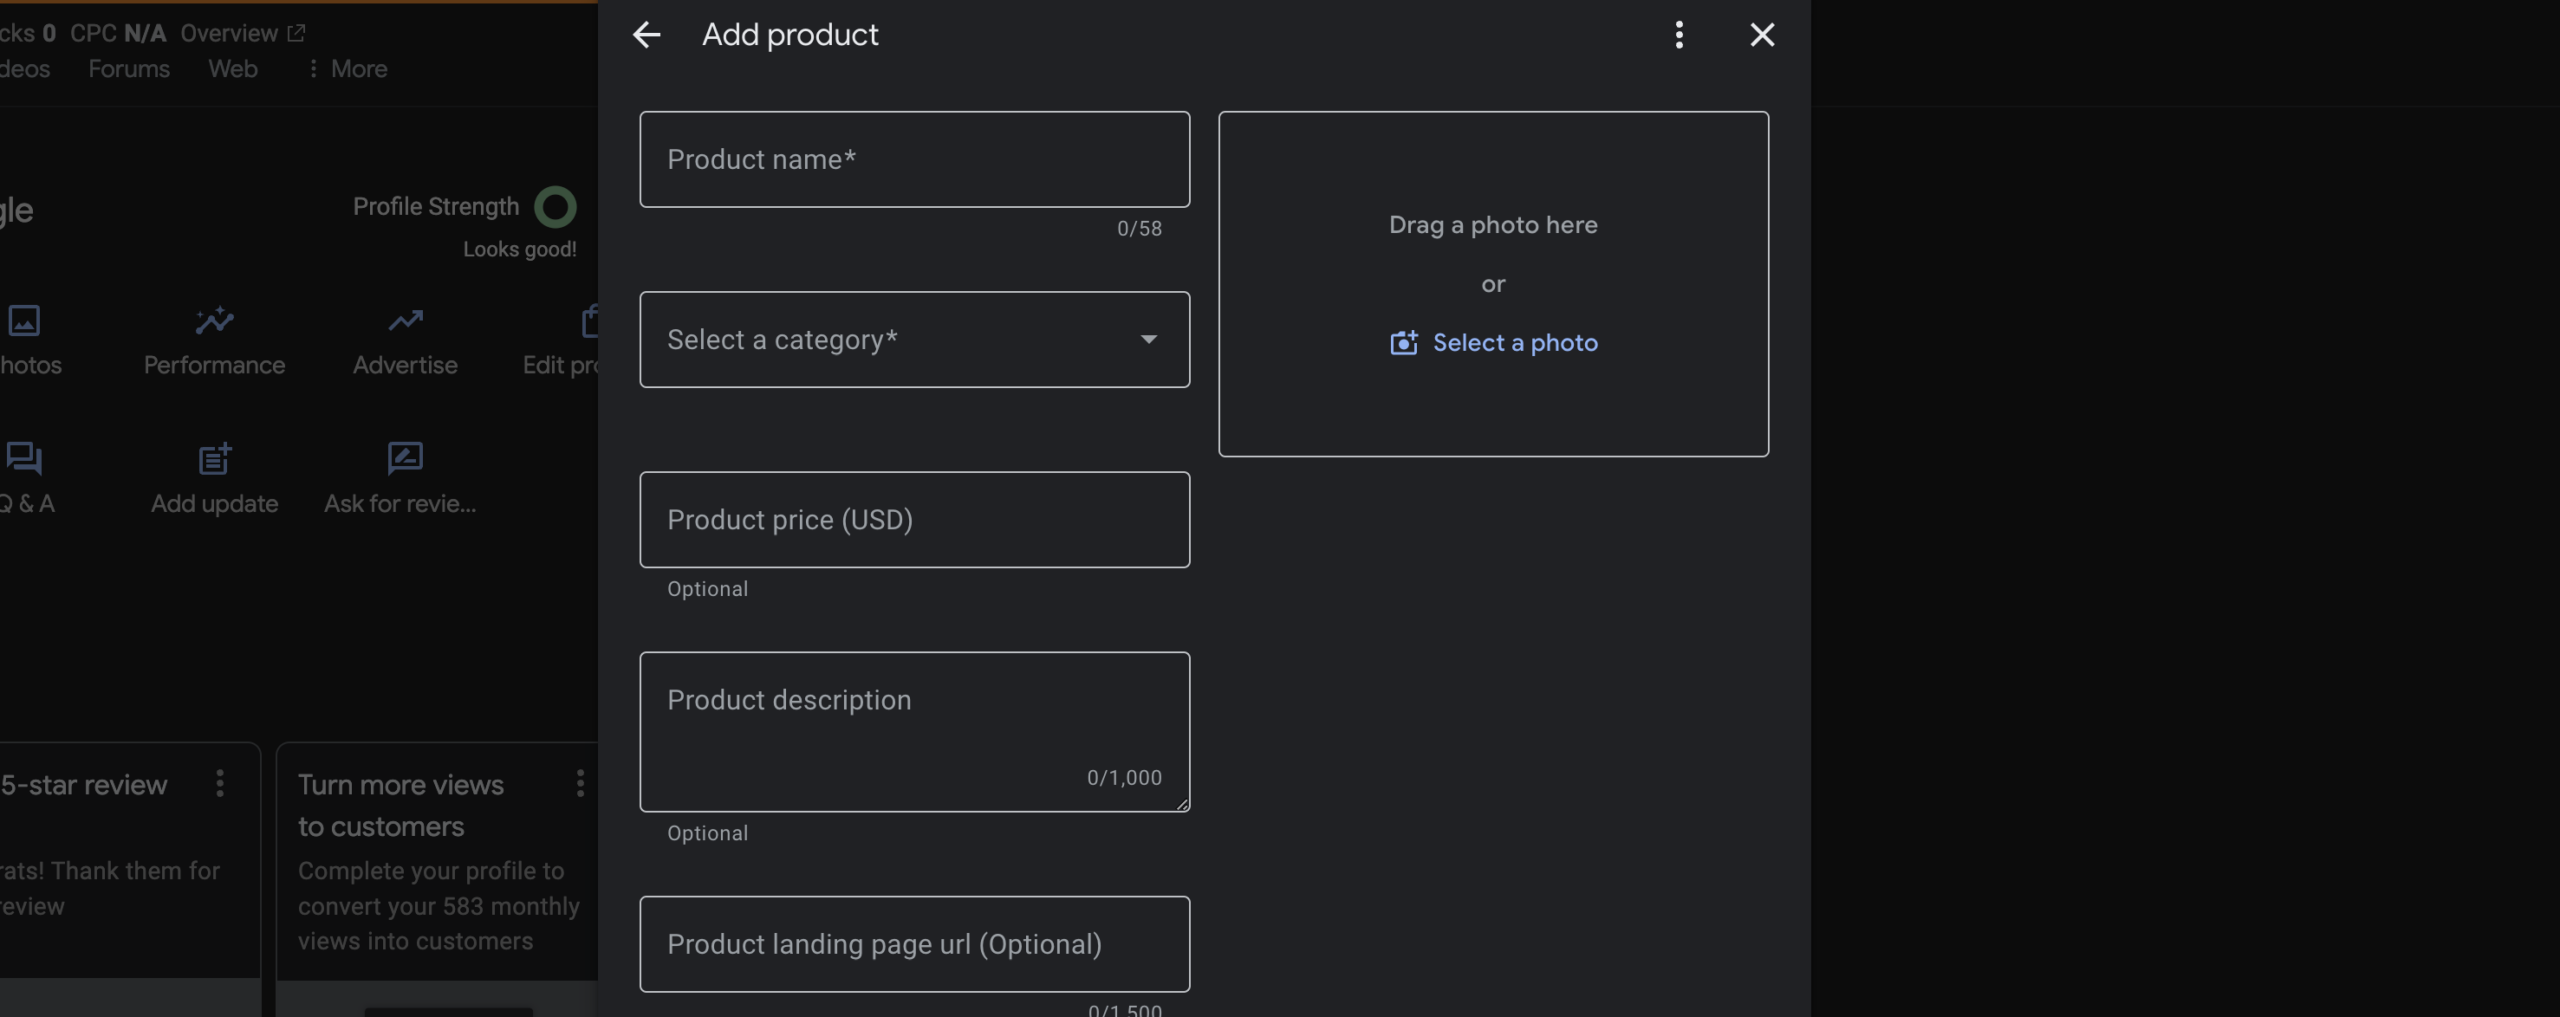
If you’re a home-service business owner, understanding how to use Google Business Profile products can significantly enhance your online presence and attract more customers. The How to Use Google Business Profile Products if You’re a Home-Service Business video provides a straightforward guide on leveraging this feature effectively. This comprehensive blog post will delve deeper into those instructions, offering additional insights and best practices tailored specifically for home-service businesses like plumbing, electrical, landscaping, and more.
Why Google Business Profile Products Matter for Home-Service Businesses
Google Business Profile (GBP) products allow businesses to showcase their offerings directly on their Google listing. For home-service businesses, this feature can bridge the gap between offering services and providing detailed information about those services, making it easier for potential customers to understand what you offer and how you can help them.
Enhance Visibility and Credibility
Adding products to your GBP can increase your visibility in local search results. When potential customers search for services you offer, having detailed product listings can help your business stand out from competitors. It also adds a layer of credibility, showing that you are organized and transparent about your services.
Improve Customer Experience
By listing your services as products, you provide potential customers with clear, concise information about what you offer. This can help them make informed decisions without needing to visit your website, enhancing their overall experience and increasing the likelihood of them choosing your business.
Boost Local SEO
Google considers various factors when ranking businesses in local search results, and having a well-maintained GBP with detailed product listings can positively impact your local SEO. This means your business is more likely to appear at the top of search results when customers look for services you provide in your area.
Step-by-Step Guide to Adding Products to Your Google Business Profile
The process of adding products to your GBP is simple and can be done in just a few steps. Here’s a detailed guide based on the methods shown in the video, supplemented with additional tips to ensure you make the most out of this feature.
Step 1: Access Your Google Business Profile
- Sign In to Your GBP Account
- Go to Google Business Profile and sign in using the Gmail account associated with your business profile. Ensure you have administrative access to manage your profile effectively.
- Select the Appropriate Business Profile
- If you manage multiple business profiles, select the one for which you want to add products. This ensures you’re updating the correct profile with relevant information.
Step 2: Navigate to the Products Section
- Locate the “Products” Tab
- In your GBP dashboard, find the “Products” section. This is where you can manage all the products or services you offer.
- Click on “Add Product”
- Initiate the process by clicking the “Add Product” button. This will open a form where you can input detailed information about the service you want to list.
Step 3: Create a New Product Listing
- Choose a Category for Your Service
- Start by creating a new category that best fits the service you’re offering. For example, if you’re a plumbing business, you might create a category called “Plumbing.”
- Name Your Service
- Enter a clear and descriptive name for your service, such as “Plumbing Repair.” If you offer specialized services, consider being more specific, like “Emergency Plumbing Repair” or “Residential Plumbing Services.”
- Add a Detailed Description
- Provide a concise and informative description of the service. Explain what the service entails, its benefits, and any unique selling points. For example:“Our Plumbing Repair service ensures that all your plumbing issues are addressed promptly and efficiently. From fixing leaks to repairing pipes, our experienced technicians are equipped to handle all types of plumbing problems, ensuring your home remains safe and functional.”
- Link to the Relevant Service Page on Your Website
- It’s crucial to link the product to the corresponding service page on your website. This not only drives traffic to your site but also provides customers with more detailed information about the service.For example, if you’re adding “Plumbing Repair in Portland, Oregon,” link it to your dedicated service page: Plumbing Repair in Portland, Oregon.
- Add High-Quality Images
- Upload clear and relevant images that represent the service. While the video suggests using logos, consider using photos that showcase your team in action, before-and-after shots of completed work, or other visuals that highlight the quality of your services.
Step 4: Customize and Publish Your Product
- Optimize Image Resolution
- Google recommends a resolution of 720 x 720 pixels for product images to ensure they display correctly across all devices. Use tools like Canva to create or resize your images accordingly.
- Review and Edit Your Listing
- Double-check all the information you’ve entered to ensure accuracy and professionalism. Make sure the descriptions are free of errors and that the images are appropriately placed and clear.
- Publish Your Product
- Once you’re satisfied with the listing, click “Post” to publish it on your GBP. Repeat the process for each service you want to add, ensuring all your offerings are well-represented.
Best Practices for Using Google Business Profile Products
To maximize the effectiveness of your GBP products, follow these best practices tailored for home-service businesses.
Be Specific and Detailed
While it might be tempting to keep your service listings broad, being specific can help attract the right customers. For instance, instead of just listing “Plumbing,” specify the type of plumbing services you offer, such as “Leak Detection and Repair” or “Drain Cleaning Services.”
Use High-Quality Visuals
Visuals play a significant role in attracting customers. Use high-quality images that accurately represent your services. Avoid blurry or low-resolution photos, as they can give a poor impression of your business.
Keep Descriptions Clear and Concise
Your service descriptions should be easy to read and understand. Avoid jargon and focus on explaining the benefits and value your services provide. Highlight what sets your business apart from competitors.
Link to Relevant Pages
Ensure each product links to a relevant page on your website where customers can find more detailed information. This not only improves user experience but also helps with SEO by driving traffic to specific service pages.
Regularly Update Your Listings
Keep your product listings up-to-date with any changes in your services, pricing, or offerings. Regular updates show that your business is active and responsive to customer needs.
Advanced Strategies for Home-Service Businesses
To further leverage GBP products, consider implementing advanced strategies that align with your business goals and customer needs.
Create Location-Specific Service Pages
If your business operates in multiple locations, create separate service pages for each area. For example, “Plumbing Repair in Portland, Oregon” and “Plumbing Repair in Gresham, Oregon.” This allows you to tailor your offerings to each location and improves your local SEO.
Utilize Seasonal Promotions
Highlight seasonal services or promotions through your GBP products. For instance, during winter, you might promote “Frozen Pipe Prevention and Repair” services. Seasonal updates can attract customers looking for timely solutions.
Showcase Customer Testimonials
Incorporate customer testimonials within your product descriptions or as separate product listings. Positive feedback from satisfied customers can build trust and encourage others to choose your services.
Integrate with Other Google Features
Combine your GBP products with other Google features like Posts and Q&A to provide a comprehensive view of your services. This integration ensures that all relevant information is easily accessible to potential customers.
Monitor and Analyze Performance
Use Google’s analytics tools to track the performance of your product listings. Pay attention to metrics like views, clicks, and conversions to understand which services are most popular and where there might be room for improvement.
Common Mistakes to Avoid
While adding products to your GBP is straightforward, avoiding common mistakes can ensure you get the most out of this feature.
Incomplete Listings
Ensure every product listing is complete with a name, description, image, and link. Incomplete listings can appear unprofessional and may deter potential customers.
Using Irrelevant Images
Avoid using images that do not accurately represent the service. For example, using a logo when a photo of your team at work would be more appropriate can mislead customers.
Overloading with Information
While it’s important to be detailed, avoid overwhelming customers with too much information. Keep descriptions focused on the key benefits and essential details of the service.
Neglecting to Update Listings
Failing to regularly update your product listings can result in outdated information, which can frustrate customers and harm your reputation. Make it a habit to review and update your listings periodically.
Ignoring SEO Best Practices
Don’t overlook the importance of SEO when creating product listings. Incorporate relevant keywords naturally within your descriptions to improve searchability and visibility.
Maximizing the Impact of Your GBP Products
To fully harness the power of GBP products, integrate them into your broader marketing and customer engagement strategies.
Promote Your Listings Across Channels
Share your GBP product listings on your website, social media, email newsletters, and other marketing channels. This cross-promotion can drive more traffic to your GBP and increase the visibility of your services.
Encourage Customer Reviews
Positive reviews can complement your GBP products by providing social proof of your services’ quality. Encourage satisfied customers to leave reviews, and make it easy for them by including your review link in communications.
Use GBP Products in Your Sales Process
Integrate your GBP products into your sales process by referencing them in proposals, quotes, and consultations. This ensures consistency in how you present your services to potential customers.
Leverage Data for Decision-Making
Analyze the data from your GBP product listings to make informed business decisions. Identify which services are in high demand and consider expanding or refining those offerings based on customer feedback and trends.
Collaborate with Your Team
Ensure that your team is aware of the GBP products and understands how to use them effectively. Train your staff on how to refer customers to your GBP for more information about your services.
Frequently Asked Questions
Can I Add Services Instead of Products on My Google Business Profile?
Yes, Google allows you to add services to your GBP. However, using the products feature can provide more detailed information and better alignment with your website’s service pages. It ultimately depends on how you want to present your offerings to customers.
How Many Products Can I Add to My Google Business Profile?
Google doesn’t impose a strict limit on the number of products you can add. However, it’s advisable to focus on the most relevant and frequently requested services to keep your profile organized and user-friendly.
Are There Any Costs Associated with Adding Products to GBP?
No, adding products to your Google Business Profile is free. This feature is available to all businesses with a verified GBP, allowing you to showcase your services without any additional costs.
Can I Edit or Delete Products Once They Are Added?
Yes, you can edit or delete products at any time through your GBP dashboard. This flexibility allows you to keep your listings up-to-date with your current offerings and make necessary adjustments as your business evolves.
How Do GBP Products Affect My Business’s SEO?
GBP products can positively impact your local SEO by providing more detailed information about your services, increasing the relevancy of your profile in search results. Additionally, linking to service pages on your website can drive traffic and improve your site’s SEO performance.
Common Mistakes to Avoid
Using Generic Service Names
Avoid using vague or generic service names that don’t clearly communicate what you offer. Specific names help customers quickly understand your services and improve your search visibility.
Ignoring Mobile Users
Ensure that your product listings are mobile-friendly, as many customers will access your GBP through their smartphones. Use high-resolution images and concise descriptions that are easy to read on smaller screens.
Overcomplicating Categories
While it’s important to be specific, don’t overcomplicate your categories. Create clear and logical categories that make it easy for customers to navigate your offerings without confusion.
Neglecting to Link to Service Pages
Always link your products to the relevant service pages on your website. This not only enhances SEO but also provides customers with more comprehensive information about your services.
Failing to Optimize Descriptions
Optimize your service descriptions with relevant keywords and clear information. Avoid keyword stuffing and focus on creating informative, engaging content that accurately represents your services.
Best Practices for Managing GBP Products
Regularly Update Your Listings
Keep your product listings current by regularly updating them with new services, promotions, or changes in existing services. This ensures that customers always have access to the latest information about your offerings.
Use Consistent Branding
Maintain consistent branding across all your product listings by using uniform colors, logos, and language. Consistent branding reinforces your business identity and makes your listings more recognizable.
Monitor Customer Feedback
Pay attention to the feedback and reviews related to your GBP products. Customer insights can help you refine your services and improve your offerings based on real-world experiences and needs.
Integrate with Your Marketing Strategy
Align your GBP product listings with your overall marketing strategy. Use them to highlight seasonal promotions, new services, or special deals that complement your broader marketing campaigns.
Leverage Visual Storytelling
Use images and videos to tell a story about your services. Visual storytelling can make your listings more engaging and help customers better understand the value you provide.
How GBP Products Support Local Services Ads
Integrating GBP products with Local Services Ads can enhance your advertising efforts by providing detailed information about your services directly within your ads. This integration ensures that potential customers see relevant and comprehensive information about what you offer, increasing the likelihood of clicks and conversions.
Increase Ad Relevance
When your Local Services Ads include detailed GBP products, they become more relevant to customer searches. This relevancy can lead to higher click-through rates (CTR) as customers find exactly what they’re looking for.
Improve Ad Quality Score
Google’s ad algorithms consider the quality and relevance of your listings when determining your ad quality score. Well-maintained GBP products with detailed descriptions and relevant links can improve your quality score, leading to better ad placements and lower costs per click.
Enhance Customer Trust
Including GBP products in your Local Services Ads provides customers with clear, concise information about your services, fostering trust and credibility. When customers see that your business is transparent and organized, they’re more likely to choose your services over competitors.
Final Thoughts
Using Google Business Profile products is a powerful tool for home-service businesses looking to enhance their online presence and attract more customers. By following the step-by-step guide and implementing best practices outlined in this post, you can effectively showcase your services, improve your local SEO, and build stronger relationships with your customers. Remember to keep your listings updated, use high-quality visuals, and personalize your descriptions to make the most out of this feature. As your business grows, regularly reviewing and optimizing your GBP products will ensure that you continue to meet the needs of your customers and stay ahead of the competition.
How to Add an Update on Your Google Business Profile
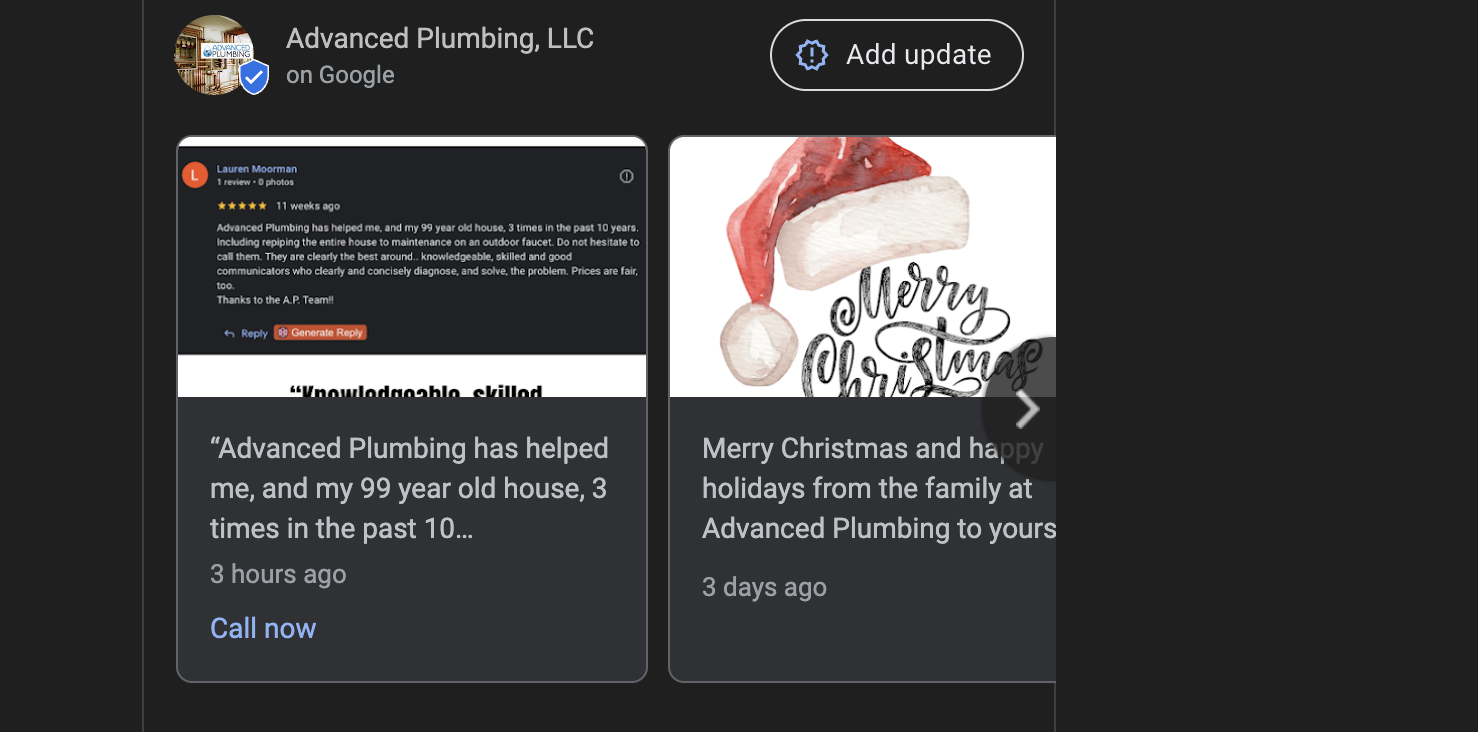
Adding updates to your Google Business Profile is a simple yet effective way to keep your audience informed and engaged. In the “How to Add an Update on Your Google Business Profile” video, you learn how to effortlessly post updates that showcase your business’s latest news, promotions, or customer testimonials. This guide will expand on those instructions, providing you with a comprehensive understanding of the process and additional tips to maximize the impact of your updates.
Why Regular Updates Matter
Keeping your Google Business Profile updated is crucial for maintaining an active online presence. Regular updates signal to both Google and your customers that your business is active and engaged, which can positively influence your local SEO rankings and customer trust.
Enhance Visibility and Engagement
Frequent updates keep your profile fresh, making it more likely to appear in local search results. Engaging content such as photos, videos, and customer reviews can attract more attention and encourage potential customers to choose your services over competitors.
Showcase Your Business’s Personality
Updates allow you to highlight your business’s unique personality and values. Whether you’re celebrating a milestone, launching a new product, or sharing a customer testimonial, updates help convey your brand’s story and build a stronger connection with your audience.
Drive Customer Interaction
By posting updates regularly, you provide customers with reasons to interact with your profile. This interaction can lead to increased reviews, higher engagement rates, and ultimately, more conversions as customers feel more connected to your business.
Step-by-Step Guide to Adding an Update
Following the process outlined in the video, here’s a detailed, step-by-step guide to adding updates to your Google Business Profile.
Step 1: Access Your Google Business Profile
- Open Google and Search for “Google Business Profile”
Start by typing “Google Business Profile” into the Google search bar. Click on the link that directs you to the Google Business Profile management page. - Sign In with Your Gmail Account
Ensure you’re signing in with the Gmail account that is connected to your Google Business Profile. This account should have administrative access to manage updates and other profile settings.
Step 2: Navigate to the Updates Section
- Locate the “Ask for Reviews” Button
Once you’re logged into your Google Business Profile dashboard, look for the “Ask for reviews” button. This section is where you can manage your review requests and updates. - Select the Appropriate Option
Depending on your needs, you can choose to add photos, videos, or descriptions to your updates. For this guide, we’ll focus on adding a photo update.
Step 3: Create Your Update
- Choose Photos or Videos
Click on the option to add photos or videos. Google recommends using a resolution of 720 x 720 pixels for photos to ensure they display correctly across all devices. - Design Your Update
Create a visually appealing update using tools like Canva. In the video, a template was created with a customer review and the business logo. Ensure your update is clear, professional, and relevant to your audience.- Photo Example: A 720 x 720 template featuring a customer review and your business logo.
- Video Example: Short clips showcasing your services, customer testimonials, or behind-the-scenes looks at your business.
- Add a Description
Write a concise and engaging description to accompany your photo or video. In the video, the description included a thank-you message to a loyal customer, highlighting the positive feedback.- Example Description: “Thank you for trusting us with your home for the last 10 years, Lauren! We appreciate your kind words.”
Step 4: Post Your Update
- Copy and Paste the Content
Once your photo or video and description are ready, copy and paste them into the designated fields in your Google Business Profile update section. - Add a Call to Action (CTA)
Including a CTA encourages customers to take further action, such as visiting your website or contacting you for services.- Example CTA: “Call now” with your business phone number or “Visit our website” with a link to your site.
- Review and Post
Double-check your update for accuracy and clarity. Once satisfied, click “Post” to publish the update to your Google Business Profile.
Step 5: Maintain Consistency
To maximize the benefits of updates, aim to post at least once a week. Regular updates keep your profile active and demonstrate to Google and your customers that your business is thriving.
Additional Tips for Effective Updates
Use High-Quality Visuals
While the video emphasizes that you don’t need perfect quality for updates, using high-quality images and videos can make your updates more attractive and professional. Clear visuals help convey your message effectively and leave a positive impression on viewers.
Highlight Customer Testimonials
Featuring positive customer reviews in your updates is a great way to build trust and credibility. It showcases real experiences and demonstrates your commitment to customer satisfaction.
Promote Special Offers and Events
Use updates to inform customers about special promotions, discounts, or upcoming events. This can drive immediate engagement and encourage customers to take advantage of your offers.
Share Behind-the-Scenes Content
Giving customers a glimpse behind the scenes of your business humanizes your brand and fosters a deeper connection. Share photos or videos of your team, your workspace, or the process behind your services.
Monitor and Respond to Feedback
After posting updates, keep an eye on the feedback and interactions they generate. Responding to comments and reviews promptly shows that you value customer input and are dedicated to providing excellent service.
Maximizing the Impact of Your Updates
Adding updates is just the first step. To truly harness their power, implement strategies that encourage engagement and leverage the updates to enhance your overall online presence.
Integrate Updates with Other Marketing Channels
Promote your Google Business Profile updates across your other marketing channels, such as social media, email newsletters, and your website. This cross-promotion can increase visibility and drive more traffic to your profile.
Track Performance Metrics
Use Google’s analytics tools to monitor the performance of your updates. Pay attention to metrics like views, clicks, and customer interactions to understand what types of content resonate most with your audience.
Encourage Customer Participation
Invite customers to share their own updates and experiences. User-generated content can add authenticity and provide a diverse range of perspectives about your business.
Stay Current with Trends
Keep your updates relevant by aligning them with current trends, seasonal events, or industry news. This relevance can make your updates more engaging and timely.
Frequently Asked Questions
How Often Should I Post Updates on My Google Business Profile?
It’s recommended to post updates at least once a week to keep your profile active and engaging. However, the frequency can vary based on your business needs and the amount of content you have to share.
What Types of Content Should I Share in Updates?
You can share a variety of content, including photos, videos, customer testimonials, special offers, event announcements, and behind-the-scenes glimpses of your business.
Can I Schedule Updates in Advance?
Currently, Google Business Profile does not offer a built-in scheduling feature. However, you can use third-party tools or set reminders to ensure you post updates consistently.
Will Adding Updates Improve My Local SEO?
Yes, regular updates can positively impact your local SEO by signaling to Google that your business is active and engaged. This can help improve your visibility in local search results.
Can I Edit or Delete an Update Once It’s Posted?
Yes, you can edit or delete updates after they’ve been posted. Simply navigate to the update you want to modify, make the necessary changes, and save or delete as needed.
Common Mistakes to Avoid
Ignoring Update Guidelines
Ensure your updates adhere to Google’s guidelines, including image resolution and content policies. Non-compliance can result in updates being removed or your profile being penalized.
Posting Irrelevant Content
Keep your updates relevant to your business and your customers. Irrelevant content can confuse or disengage your audience and dilute your brand message.
Overposting or Underposting
Balance is key. Overposting can overwhelm your audience, while underposting can make your profile seem inactive. Aim for a consistent, manageable posting schedule.
Neglecting to Engage
Posting updates is only part of the equation. Engage with your audience by responding to comments and reviews to build relationships and foster loyalty.
Failing to Monitor Performance
Without tracking the performance of your updates, you won’t know what’s working and what’s not. Regularly review analytics to refine your content strategy.
Best Practices for Adding Updates
Plan Your Content in Advance
Create a content calendar to plan your updates ahead of time. This helps ensure consistency and allows you to align your updates with business goals and seasonal events.
Use Clear and Concise Language
Keep your descriptions short and to the point. Clear language makes your updates easy to understand and more likely to engage readers.
Incorporate Keywords Strategically
Include relevant keywords in your update descriptions to improve visibility in search results. However, avoid keyword stuffing and focus on natural, reader-friendly language.
Highlight Unique Selling Points
Use updates to emphasize what sets your business apart. Whether it’s exceptional customer service, unique products, or innovative solutions, showcasing your strengths can attract more customers.
Test Different Formats
Experiment with different types of content, such as photos, videos, and text updates, to see what resonates best with your audience. Diversifying your content can keep your updates interesting and engaging.
How Updates Benefit Local Services Ads
Regular updates not only enhance your Google Business Profile but also support your local services ads. Active profiles with frequent updates are more likely to perform well in advertising campaigns, leading to better visibility and higher engagement rates.
Improve Ad Relevance
Active profiles with up-to-date information are more relevant to potential customers, increasing the effectiveness of your ads. Relevant ads are more likely to attract clicks and conversions.
Boost Ad Performance
Frequent updates can lead to higher engagement rates, which can improve your ad performance metrics such as click-through
How to Get Your Google Business Profile Review Link
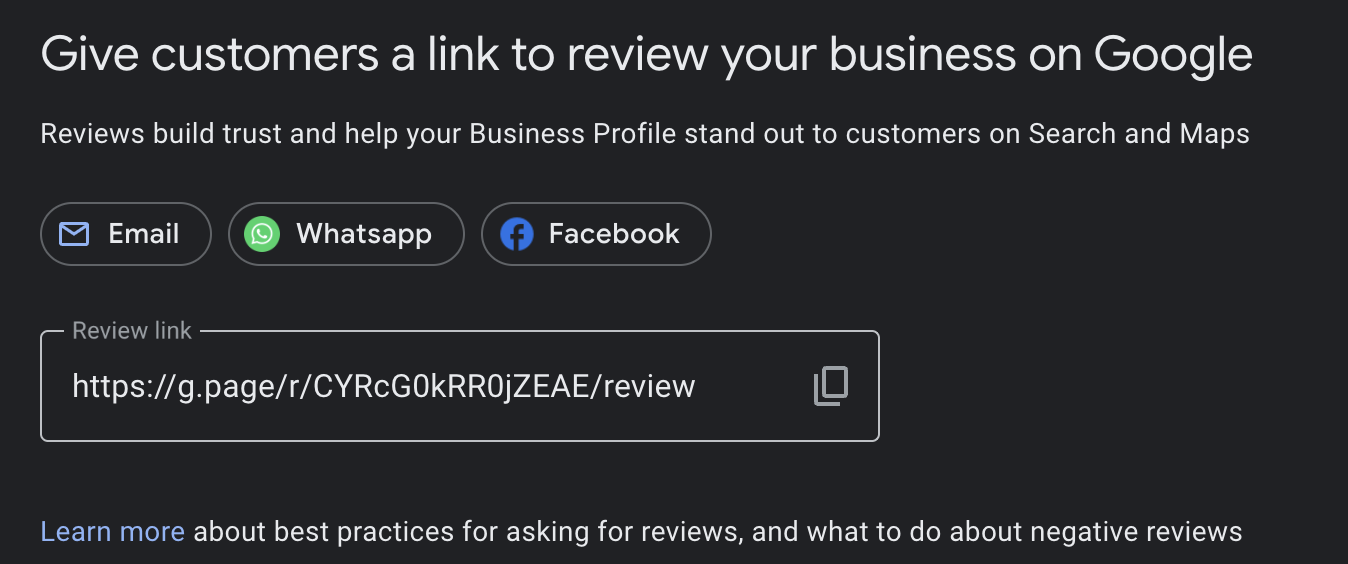
How to Get Your Google Business Profile Review Link is an essential step for any local home-service business looking to improve customer engagement and boost online credibility. In this comprehensive guide, we’ll walk through exactly how to find and share your review link, along with tips and best practices for encouraging more reviews and making the most of your Google Business Profile presence. Whether you’re planning to generate QR codes or simply want to send the link directly to happy customers, following these steps will help you streamline the review-gathering process.
Why Your Google Business Profile Review Link Matters
Customer reviews can strongly influence your reputation in the local marketplace. When prospective clients search online for services, they often glance at how many reviews you have, along with your average star rating. Making it as easy as possible for customers to leave feedback is a sure way to amplify the quality, quantity, and variety of your reviews.
Enhances Credibility and Trust
A direct review link removes any friction for clients who are ready to share their feedback. Instead of requiring them to look up your business, find the right listing, and click the review button, you provide a single click that leads them straight to where they can write their comments. This streamlined approach encourages more people to share their experiences, boosting your overall review count and credibility.
Improves Local SEO
Search engines, especially Google, use review signals—like frequency, quality, and quantity—to decide how prominently to list a local business. The more reviews you have (and the more positive they are), the better your chances of appearing at the top of relevant local searches. A direct review link can help increase the volume of reviews, indirectly improving your local search rankings.
Saves Time for Both You and Your Customers
Typing instructions or explaining how someone can leave a review takes valuable time, and is prone to errors or confusion. Providing a direct link solves that problem. Customers appreciate simplicity, and you’ll benefit from a faster way to gather valuable feedback.
Step-by-Step Guide to Getting Your Google Business Profile Review Link
Below is a simple walkthrough based on the process shown in the video, with added details to ensure you don’t miss any steps.
- Sign in to Your Google Business Profile
- Go to Google and type “Google Business Profile” in the search bar.
- Click on the link that says “Google Business Profile” or “Manage now.”
- Make sure you sign in with the Gmail account that has admin access to your Google Business Profile. If you’re not logged in, you’ll be prompted to do so.
- Select the Appropriate Business
- If you have multiple businesses under the same Google account, you may see a list of profiles.
- Choose the specific business for which you’d like to retrieve the review link.
- Access the “Ask for Reviews” Section
- Once you’re in your Google Business Profile dashboard, look for a button or tab that says “Ask for reviews.” Sometimes, you may see a “Get more reviews” prompt or an icon that opens a shareable review link.
- Click on this option, and Google will generate your unique link.
- Copy the Link
- A pop-up or a separate section will display your direct Google review link.
- Select “Copy” to place it on your clipboard.
- Share the Link
- You can now paste this link in an email, a text message, a social media post, or anywhere else you’d like to gather reviews.
- Google may also present quick-share buttons, such as for WhatsApp, Facebook, or Email, making it even easier to send your link directly.
Creating a QR Code
One of the clever uses for your Google Business Profile review link is generating a QR code. You can place that QR code on business cards, flyers, brochures, or even in-store signage, so all your customers have to do is scan it with their smartphones to be taken directly to your Google review form.
- Generate a QR Code: You can find various free QR code generators online. Simply paste your review link into the generator, download the resulting image, and incorporate it wherever you like.
Tips for Sending the Link to Your Customers
- Personalize Your Request: Rather than sending a generic “Please review us” message, try personalizing your note. Mention the customer by name (if appropriate) and reference the specific service they purchased or enjoyed.
- Offer Guidance: Some customers may not be familiar with leaving Google reviews. Provide a brief note along the lines of, “Click the link, select the star rating, and share any details about your experience.”
- Time It Well: Send review requests shortly after a successful service or transaction, when satisfaction levels are usually highest. This approach increases the likelihood of getting a positive review.
Maximizing the Impact of Your Review Link
Simply having a direct link to your Google reviews isn’t enough—you also need to harness best practices to encourage customers to actually use it. Below are some strategies to make the most of your new link.
Place It in Your Email Signature
By putting the review link in your email signature, you subtly encourage contacts to think about leaving a review after every interaction. Whenever you communicate with existing or potential customers, they’ll see the invitation to rate your business without feeling pressured or inconvenienced.
Leverage Social Media
Social platforms are an excellent resource for gathering reviews. A short post, paired with your direct review link, can reach a wide audience, especially if you’ve built up an active Facebook, Instagram, or LinkedIn community. You can even pin a post with the link at the top of your social feed, ensuring it’s the first thing visitors see.
Send Follow-Up Messages
After a service call or product sale, consider sending a polite follow-up message. If customers reply that they were happy with their experience, share your review link. If they mention problems, resolve those issues first to ensure they’re satisfied, and then you can invite them to leave a review later.
Reward Customer Feedback
While you can’t pay people to leave reviews or offer discounts in exchange (as this violates Google’s guidelines), you can express genuine appreciation for their time and effort. A heartfelt thank you goes a long way and helps nurture an ongoing relationship with the customer.
Frequently Asked Questions About Google Business Profile Review Links
Do I Need a Verified Google Business Profile to Get a Review Link?
Yes, you must have a verified Google Business Profile to manage it and retrieve the review link. Verifying usually involves receiving a postcard at your business address or using other verification methods provided by Google.
Can I Customize My Review Link?
Unfortunately, Google doesn’t allow you to change the actual URL. However, you can shorten it using a reputable URL shortener. This is optional but might make the link more visually appealing or easier to fit on certain promotional materials.
Will My Review Link Ever Change?
In most cases, your review link remains consistent. If you make drastic changes to your Google Business Profile (like renaming your business, moving locations, or transferring ownership), it’s a good idea to re-check the link to ensure it still functions properly.
Is It Safe to Post My Review Link Publicly?
Generally, yes. The link directs people to your public business listing. However, keep in mind that anyone with the link can leave a review, so be prepared for all forms of feedback—both positive and negative.
How Many Reviews Can I Get Through This Link?
There’s no set limit on the number of reviews a business can receive. As long as customers use the link and have a Google account, they can post feedback. The real challenge is ensuring you consistently provide excellent service that encourages glowing reviews.
Common Mistakes to Avoid
Not Using the Right Account
Make sure you’re signing in to the Gmail associated with your Google Business Profile. If you log in with another account, you may not see the correct dashboard or might not have permission to manage your profile.
Neglecting to Prompt Customers
If you simply generate your review link and never share it, you won’t see results. Consistently remind customers—politely, of course—that their feedback is valuable to you.
Sending the Link Too Soon or Too Late
Timing matters. Don’t ask for a review before the customer has experienced your product or service. Likewise, don’t wait so long that their experience becomes a distant memory. The sweet spot is generally a day or two after successful completion of the service.
Ignoring Negative Feedback
Some businesses only focus on collecting positive reviews. However, negative reviews can be an opportunity to learn and improve. Respond promptly, and if possible, offer to resolve the issue. A transparent approach to criticism helps show prospective customers you care about quality and customer satisfaction.
Spamming Customers
While follow-ups are good, bombarding customers with constant reminders can backfire. If a client chooses not to leave a review after one or two nudges, respect their decision. Over-promotion might lead to annoyance or even negative feedback out of frustration.
Best Practices for Leveraging the Review Link
Display It Everywhere (Thoughtfully)
Add your Google review link to invoices, email newsletters, digital receipts, or any other customer touchpoints. Just be mindful not to overwhelm or irritate potential reviewers.
Train Your Team
If you have employees who interact with customers, train them on how to guide clients to leave reviews. They can mention the review link or show them how to scan the QR code. This ensures a seamless experience for the customer.
Combine It with Other Review Strategies
Your Google Business Profile might be the primary platform for collecting reviews, but consider other spaces like industry-specific directories. Cross-promote your review links to diversify your feedback sources. Having more than one review platform can strengthen your online reputation and allow different audiences to share their opinions.
Monitor and Respond
When people do start leaving reviews, take the time to check them and respond—especially if they mention specific staff members or unique services. Even a simple “Thank you for sharing your feedback!” can make a customer feel appreciated. If someone leaves a negative comment, address it respectfully, offering a way to resolve their concerns.
How to Use Your Review Link to Generate a QR Code
As mentioned, turning your Google review link into a QR code is an effective way to encourage feedback in face-to-face interactions or at events. Here’s a quick breakdown:
- Find a Reputable QR Code Generator: There are numerous free and paid tools online.
- Paste Your Review Link: Look for a field where you can input a URL.
- Customize the QR Code (If Desired): Some tools let you change colors, shapes, or add a logo.
- Download and Test: Download the QR code, then scan it with your smartphone to verify it points to your Google review page.
- Print and Display: Add the QR code to signs, brochures, or business cards.
Why Positive Reviews Are Crucial for Home-Service Businesses
Local home-service businesses, such as plumbers, landscapers, electricians, and cleaners, thrive on positive word-of-mouth. Online reviews are an extension of that principle. Satisfied customers can become your ambassadors, sharing their experiences with neighbors, friends, or online communities. Here’s what strong reviews can do for you:
- Increase conversion rates: Potential clients are more likely to choose you if they see numerous glowing testimonials.
- Build loyalty: People who leave positive reviews tend to feel more connected to your business and may become repeat customers.
- Provide constructive feedback: Even neutral or negative reviews can spotlight areas of improvement, allowing you to adapt your services for greater success in the future.
Final Thoughts
Getting your Google Business Profile review link is just the beginning. The real benefits come from consistently sharing it, encouraging happy customers to leave feedback, and responding thoughtfully to all reviews. In today’s digital age, these positive reflections of your business serve as powerful endorsements that can persuade prospects to choose you over competitors.
Remember, the entire process revolves around transparency and convenience: you’re making it as easy as possible for customers to share genuine opinions. When managed properly, customer reviews can be one of your most valuable marketing tools, driving referrals, improving local SEO, and shaping a strong online presence.
How to Maximize Google Local Services Ads Results by Properly Managing Leads
Google Local Services Ads (LSAs) are a powerful way for local businesses to connect with potential customers. However, many companies fail to make the most of this tool simply because they don’t manage their leads effectively. In this guide, we’ll walk you through the key lead management practices and tools within LSAs to help you boost your ad performance and get better results.
We’ll also include five video tutorials that explain how to work with the various lead tabs in detail, making it easier for you to take action and see improvements quickly.
The Importance of the Leads Tab
The Leads tab is the backbone of your success with LSAs, accounting for 90% of your results. Companies that mark their leads accurately and in a timely manner consistently outperform competitors, ranking higher and receiving more leads.
By marking leads as soon as they come in—whether responding to message leads or answering phone calls—you train Google’s algorithm to deliver better-quality leads to your business. Neglecting this crucial step can cause leads to pile up, costing you valuable opportunities.
Overview of the Lead Tabs
The Leads tab includes several sub-tabs, each serving a distinct purpose:
- New
- Active
- Booked
- Completed
Each tab plays a role in the lead management process, and understanding how to navigate and update them is vital. Below, we break down the function of each tab and how to use them effectively.
1. New Tab
The New tab is where all new leads first appear. This includes incoming phone calls and message inquiries. Here’s how to handle leads in the New tab:
- Review Each Lead:
- For message leads, review the content of the message.
- For phone call leads, listen to the call recording (calls longer than 60 seconds typically indicate meaningful interactions).
- Rate Leads: Mark each lead as “Very Satisfied,” “Satisfied,” or “Very Dissatisfied.”
- For satisfied leads, indicate why they are relevant to your business.
- For bad leads, specify the reason (e.g., wrong service type, job inquiry, etc.). This helps train Google’s algorithm to refine lead quality.
- Action Steps:
- Archive leads that don’t qualify.
- Mark good leads as “Booked” or “Upcoming” to move them through the pipeline.
2. Active Tab
The Active tab is the most critical section to manage. Leads often “hide” here, causing businesses to miss opportunities. Clearing this tab regularly is essential to maintaining a high lead volume.
- Clear Out Backlogs:
- Go through each lead in the Active tab.
- Listen to phone calls or review messages.
- Mark leads as “Booked,” “Archived,” or “Completed” as appropriate.
- Consistency is Key:
- Make it a habit to review and clear the Active tab daily. This real-time management keeps your leads organized and ensures Google sees your business as responsive.
- Pro Tip: If you have a significant backlog, prioritize clearing it out quickly rather than being overly meticulous about rating every lead.
3. Booked Tab
The Booked tab stores jobs that you’ve scheduled as “Upcoming.” Once the scheduled time has passed, these leads automatically move to the Completed tab.
- What to Do Here:
- Edit appointment times or details if there are changes.
- Keep an eye on this tab to ensure appointments are accurate, but it requires less frequent management compared to New and Active tabs.
4. Completed Tab
The Completed tab serves as a log of past jobs. Leads automatically move here after their scheduled time in the Booked tab has passed.
- Minimal Interaction Needed:
- Use this tab to review call recordings or messages for analysis.
- No significant action is required here.
Tips for Success
- Mark Leads Accurately: Properly rate leads and mark them as booked, archived, or completed. This helps Google’s algorithm deliver more relevant leads over time.
- Clear Tabs Daily: Keeping tabs like Active and New clear ensures you’re not missing opportunities.
- Be Proactive: Respond to leads in real-time whenever possible. Speed and consistency are key to staying ahead of competitors.
- Train the Algorithm: By accurately marking bad leads, you’re “training” Google to avoid sending similar low-quality leads.
Final Thoughts
Managing your leads effectively within Google Local Services Ads is the single most important factor in improving your ad performance. By mastering the use of the New, Active, Booked, and Completed tabs, you’ll not only increase your lead volume but also enhance the quality of leads over time. If you need help with setting up or optimizing your Google Local Services Ads account, feel free to contact us today so we can help you get started!
Take the time to set up a daily routine for lead management, and you’ll see noticeable improvements in your results. Watch the embedded videos for step-by-step guidance, and start implementing these tips today!