
Tag: Call Tracking Tools
How to Install a CallRail JavaScript Snippet on Website Using Google Tag Manager

Effective call tracking is essential for businesses aiming to understand their customer interactions and optimize their marketing strategies. CallRail provides a robust solution for tracking phone calls, allowing you to gain insights into where your calls are coming from and how your marketing efforts are performing. Integrating CallRail with your website using Google Tag Manager (GTM) streamlines the installation process and ensures accurate tracking without the need for direct code modifications. This comprehensive guide will walk you through the steps to install the CallRail JavaScript snippet on your website using Google Tag Manager, ensuring seamless integration and optimal call tracking.
Why Install the CallRail JavaScript Snippet Using Google Tag Manager?
Google Tag Manager is a powerful tool that simplifies the process of managing and deploying marketing tags (snippets of code) on your website without requiring direct code edits. By using GTM to install the CallRail JavaScript snippet, you can efficiently manage your call tracking setup, reduce the risk of errors, and maintain better control over your website’s tagging infrastructure.
Benefits of Using Google Tag Manager for CallRail Integration
- Ease of Implementation: Deploy the CallRail snippet without modifying your website’s code directly.
- Centralized Tag Management: Manage all your tracking codes in one place, simplifying updates and maintenance.
- Enhanced Flexibility: Easily add, remove, or update tags as your tracking needs evolve.
- Improved Site Performance: Optimize tag loading to enhance website speed and user experience.
- Error Reduction: Minimize the risk of code conflicts and errors by using GTM’s built-in validation and debugging tools.
Step-by-Step Guide to Installing the CallRail JavaScript Snippet Using Google Tag Manager
Follow these detailed steps to install the CallRail JavaScript snippet on your website using Google Tag Manager, ensuring accurate call tracking and seamless integration.
Step 1: Sign In to Your CallRail Account
- Access CallRail:
- Open your web browser and navigate to CallRail.
- Click on the Sign In button located at the top-right corner of the homepage.
- Enter Credentials:
- Input your CallRail account email and password.
- Click Sign In to access your CallRail dashboard.
Step 2: Obtain Your CallRail JavaScript Snippet
- Navigate to Integrations:
- In the CallRail dashboard, click on the Settings icon (typically represented by a gear).
- Select Integrations from the dropdown menu.
- Access JavaScript Snippet:
- Click on JavaScript Snippet.If you have previously added the snippet, it will show as active. To install a new snippet, ensure you have the correct script copied.Copy the JavaScript Snippet: Highlight the entire script and copy it to your clipboard.
Step 3: Sign In to Your Google Tag Manager Account
- Access Google Tag Manager:
- Open a new tab and navigate to Google Tag Manager.
- Enter Credentials:
- Sign in with your Google account credentials associated with your GTM container.
- Select the Appropriate Container:
- Choose the container linked to the website where you want to install the CallRail snippet.
Step 4: Create a New Tag in Google Tag Manager
- Navigate to Tags:
- In the GTM dashboard, click on Tags in the left-hand sidebar.
- Create a New Tag:
- Click on the New button to create a new tag.
- Configure the Tag:
- Name Your Tag: Enter a descriptive name, such as
CallRail JavaScript Snippet.Choose Tag Type: Click on Tag Configuration and select Custom HTML from the list of tag types.Paste the JavaScript Snippet: In the HTML field, paste the CallRail JavaScript snippet you copied earlier.
- Name Your Tag: Enter a descriptive name, such as
- Set Triggering:
- Click on Triggering and select All Pages to ensure the snippet loads on every page of your website.
Step 5: Save and Publish Your Tag
- Save the Tag:
- After configuring the tag and setting the trigger, click Save to finalize the tag setup.
- Submit Changes:
- Click on the Submit button in the top-right corner of the GTM dashboard.
- Publish the Container:
- Add a version name and description (optional) for your changes.Click Publish to apply the new tag to your website.
Step 6: Verify the Installation
- Test the Tag:
- Use GTM’s Preview Mode to ensure the CallRail snippet is firing correctly on your website.
- Click on Preview in GTM and enter your website URL to start the debug session.
- Check CallRail Dashboard:
- Make a test call to your tracking number and verify that the call appears in your CallRail dashboard.
- Use Tag Assistant:
- Optionally, use Google’s Tag Assistant browser extension to verify that the CallRail tag is correctly installed and firing on your website.
Best Practices for Installing CallRail with Google Tag Manager
Implementing best practices ensures that your CallRail installation is both effective and secure, providing accurate data without disrupting your website’s performance.
Use Descriptive Naming Conventions
- Tag Names: Clearly name your tags (e.g.,
CallRail JavaScript Snippet) to easily identify their purpose within GTM. - Version Control: Document changes with version names and descriptions to track updates and modifications over time.
Keep Tags Organized
- Folders: Use folders within GTM to categorize tags based on their function or marketing channel.
- Consistent Structure: Maintain a consistent tagging structure to simplify management and troubleshooting.
Minimize Third-Party Integrations
- Selective Integration: Only integrate essential third-party scripts to reduce potential conflicts and maintain site performance.
- Regular Audits: Periodically review and clean up unused tags to keep your GTM container streamlined.
Monitor Tag Performance
- Regular Checks: Continuously monitor your CallRail tags to ensure they are firing correctly and collecting accurate data.
- Analytics Integration: Integrate CallRail with Google Analytics to gain deeper insights into call performance and user behavior.
Maintain Security
- Access Control: Limit GTM access to trusted team members and use strong authentication methods.
- Secure Scripts: Ensure that all scripts, including the CallRail snippet, are securely implemented to prevent vulnerabilities.
Common Mistakes to Avoid
Avoiding these common pitfalls can enhance the effectiveness of your CallRail installation and ensure accurate call tracking.
Incorrect Snippet Placement
- Impact: Placing the CallRail snippet in the wrong location can prevent it from functioning correctly.
- Solution: Always place the snippet within a Custom HTML tag in GTM and ensure it is set to fire on all pages.
Failing to Publish Changes
- Impact: Changes made in GTM won’t take effect until the container is published.
- Solution: After configuring and saving your tags, always remember to submit and publish the container to apply the changes.
Not Testing the Implementation
- Impact: Without testing, you won’t know if the snippet is working correctly, leading to missed call data.
- Solution: Use GTM’s Preview Mode and perform test calls to verify that the snippet is firing and tracking calls as intended.
Overloading the Tag Manager
- Impact: Adding too many tags can slow down your website and complicate tag management.
- Solution: Keep your GTM container clean by only adding necessary tags and regularly reviewing and removing unused ones.
Ignoring Call Analytics
- Impact: Failing to analyze call data means missing out on valuable insights to optimize your marketing strategies.
- Solution: Regularly review your CallRail dashboard and integrate data with your analytics tools to make informed decisions.
Frequently Asked Questions
Can I Install the CallRail JavaScript Snippet Without Google Tag Manager?
Yes, you can manually install the CallRail JavaScript snippet by adding it directly to your website’s HTML, typically within the <head> section. However, using Google Tag Manager simplifies the process, especially if you plan to manage multiple tags or require frequent updates.
Will Using Google Tag Manager Affect My Website’s Performance?
Properly implemented tags through GTM should have minimal impact on your website’s performance. It’s important to regularly audit and optimize your tags to ensure they load efficiently and do not slow down your site.
How Do I Update the CallRail Snippet in Google Tag Manager?
- Access GTM: Log in to your Google Tag Manager account.
- Navigate to Tags: Click on Tags in the left sidebar.
- Select the CallRail Tag: Find and click on the
CallRail JavaScript Snippettag. - Update the Snippet: Modify the Custom HTML with the new CallRail snippet as provided in your CallRail account.
- Save and Publish: Click Save, then Submit and Publish to apply the changes.
Can I Use CallRail with Multiple Websites in One GTM Account?
Yes, you can use CallRail with multiple websites by creating separate containers for each website in Google Tag Manager or by managing multiple tags within a single container, depending on your organization’s structure and needs.
Do I Need a CallRail Account to Use Their JavaScript Snippet?
Yes, you need an active CallRail account to generate and utilize the JavaScript snippet for call tracking on your website.
Maximizing the Impact of CallRail on Your Website
To fully leverage the benefits of CallRail, integrate these strategies into your broader marketing and operational plans.
Align with Your Marketing Goals
- Define Clear Objectives: Determine what you want to achieve with call tracking, such as increasing lead generation, improving customer service, or optimizing ad campaigns.
- Tailor Tracking to Goals: Set up specific tracking numbers for different marketing channels to attribute calls accurately and measure campaign effectiveness.
Use Data to Optimize Strategies
- Analyze Call Data: Regularly review call analytics to understand which campaigns are driving the most calls and conversions.
- Refine Marketing Strategies: Use insights from CallRail to adjust your marketing strategies, focusing on high-performing channels and improving underperforming ones.
Integrate with Other Marketing Tools
- Connect with CRM Systems: Integrate CallRail with your Customer Relationship Management (CRM) system to streamline lead management and follow-up processes.
- Leverage Google Analytics: Combine CallRail data with Google Analytics to gain a comprehensive view of user behavior and campaign performance.
Leverage Advanced CallRail Features
- Dynamic Number Insertion (DNI): Use DNI to display unique phone numbers to visitors from different traffic sources, enhancing call attribution.
- Call Recording and Transcription: Utilize CallRail’s call recording and transcription features to gain deeper insights into customer interactions and improve service quality.
Foster Team Collaboration
- Regular Reporting: Generate and share regular call reports with your team to keep everyone informed about campaign performance and lead quality.
- Training and Education: Ensure that your team members are trained on using CallRail effectively, understanding how to interpret call data and act on insights.
Enhance Customer Experience
- Prompt Lead Follow-Up: Use CallRail’s call tracking data to ensure that leads are followed up promptly, increasing the likelihood of conversions.
- Personalize Interactions: Leverage call data to personalize customer interactions, addressing their specific needs and preferences effectively.
How to Add Users to CallRail Account
Managing your CallRail account effectively is crucial for tracking and analyzing your call sources, optimizing your marketing strategies, and enhancing team collaboration. Whether you need to delegate tasks to customer service representatives (CSRs), collaborate with an agency, or grant access to team members, adding users to your CallRail account ensures that everyone involved can contribute efficiently while maintaining the security and integrity of your call data. This comprehensive guide will walk you through the process of adding users to your CallRail account, detailing each step and offering best practices to ensure seamless and secure user management.
Why Adding Users to Your CallRail Account Matters
Delegating access within your CallRail account allows multiple team members or external partners to monitor and manage call tracking without compromising your account’s security. Proper user management enhances collaboration, ensures accurate call data analysis, and optimizes your marketing efforts by allowing specialized roles to handle specific tasks.
Benefits of Adding Users
- Collaborative Management: Enable team members to view and analyze call data, manage tracking numbers, and configure settings based on their roles.
- Enhanced Efficiency: Delegate specific tasks such as managing campaigns, monitoring call performance, or handling billing, allowing you to focus on strategic initiatives.
- Improved Security: Assign appropriate access levels to ensure that users have only the permissions necessary for their roles, minimizing the risk of unauthorized changes.
- Scalability: Easily manage access as your team grows, accommodating new members without disrupting existing workflows.
Step-by-Step Guide to Adding Users in CallRail
Follow these detailed steps to securely add users to your CallRail account, ensuring that each user has the appropriate access level for their role.
Step 1: Sign In to Your CallRail Account
- Access CallRail:
- Open your web browser and navigate to CallRail.
- Click on the Sign In button located at the top-right corner of the homepage.
- Enter Credentials:
- Input your CallRail account email and password.
- Click Sign In to access your CallRail dashboard.
Step 2: Navigate to the Users Section
- Open the Dashboard:
- Once logged in, you’ll be directed to your CallRail dashboard, which provides an overview of your call tracking numbers, campaigns, and performance metrics.
- Access Users:
- In the top-left corner of the screen, you’ll see your business initials or name.Click on these initials to open a dropdown menu.Select Users from the dropdown to navigate to the Users management page.
Step 3: Add a New User
- Click on Create User:
- On the Users page, locate the blue Create User button and click on it to initiate the user addition process.
- Enter User Details:
- First Name: Enter the first name of the user (e.g., Natalie).Last Name: Enter the last name of the user.Email Address: Input the user’s email address (e.g., [email protected]).Chat Display Name: This is how the user will appear in any internal chat or communication tools.
Step 4: Assign Access Levels
- Select Access Level:
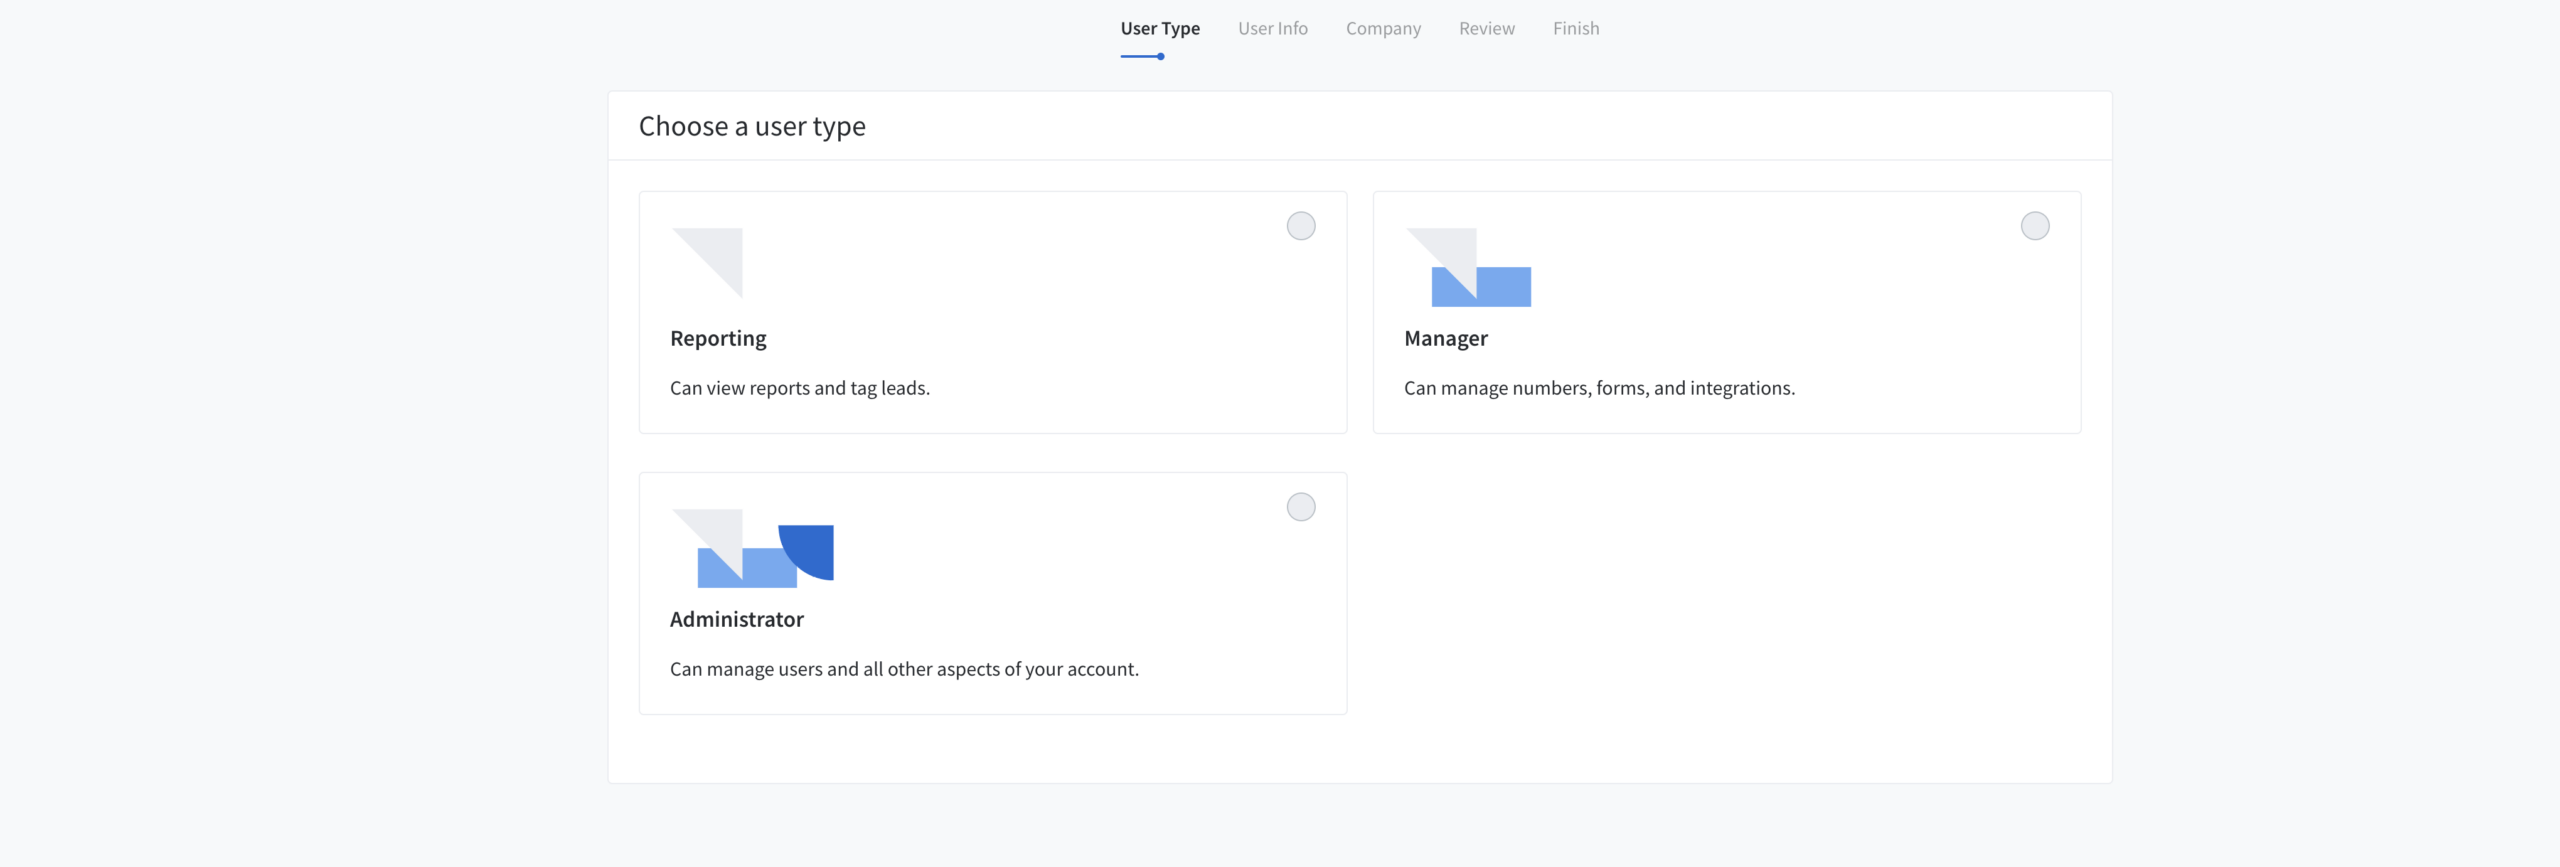
- CallRail offers three primary access levels to control what each user can do within the account:
- Reporting: Users can view call data and generate reports but cannot make any changes to settings or tracking numbers.
- Manager: Users can manage tracking numbers, campaigns, and view reports. They have more control than Reporting users but cannot add or remove other users.
- Administrator: Users have full access to the account, including adding or removing users, managing tracking numbers, and configuring account settings.
- For example, if you want Natalie to have full control over the account, select Administrator.
- CallRail offers three primary access levels to control what each user can do within the account:
- Choose the Appropriate Role:
- Reporting: Ideal for team members who need to analyze call data without modifying account settings.
- Manager: Suitable for users who manage campaigns and tracking numbers.
- Administrator: Best for trusted individuals who oversee the entire CallRail account.
Step 5: Review and Send Invitation
- Review User Information:
- Ensure that all the entered details are correct.
- Decide whether to send an invitation email to notify the user about their new access.
- Optional Settings:
- Send Invoice Emails: Choose whether the user should receive invoice-related emails.
- Add a Custom Message: You can include a personalized message in the invitation email.
- Send Invitation:
- Click Send to dispatch the invitation email to the new user.The user will receive an email with instructions to accept the invitation and set up their access.
Step 6: Confirm and Manage Access
- Verify Invitations:
- After sending the invitation, the new user will appear under the Pending Invitations section.
- Once the user accepts the invitation, they will move to the Active Users list.
- Adjust Permissions if Needed:
- To change a user’s permission level, click on their name in the Active Users list.
- Select a different role from the dropdown menu and save the changes.
- Remove Users:
- To revoke a user’s access, click the three-dot menu next to their name and select Remove Access.Confirm the action to ensure the user no longer has access to your CallRail account.
Best Practices for Adding Users to CallRail
Implementing best practices ensures that granting access to your CallRail account is secure, efficient, and beneficial for your business.
Define Clear Roles and Responsibilities
- Assess Needs: Determine what tasks each user needs to perform and assign roles based on their responsibilities.
- Avoid Overlapping Duties: Clearly define each user’s role to prevent confusion and ensure accountability.
Limit Access Based on Necessity
- Principle of Least Privilege: Grant only the access necessary for users to perform their tasks. Avoid assigning higher permissions than required.
- Regularly Review Permissions: Periodically audit user access to ensure that permissions are still appropriate and revoke access for users who no longer need it.
Maintain Security
- Use Strong Passwords: Ensure that all users have strong, unique passwords for their CallRail accounts.
- Enable Two-Factor Authentication (2FA): Add an extra layer of security by enabling 2FA for all accounts with access to your CallRail.
- Monitor Account Activity: Regularly check the Users section for any unusual activity or unauthorized access.
Communicate Effectively
- Provide Guidelines: Share clear guidelines on how users should interact with the CallRail account to maintain data integrity and consistency.
- Foster Collaboration: Encourage open communication among team members to streamline workflows and address any issues promptly.
Utilize CallRail Features
- Leverage Reporting Tools: Use CallRail’s reporting features to monitor call performance and generate insights.
- Manage Tracking Numbers: Assign users the responsibility of managing specific tracking numbers to organize call sources effectively.
- Integrate with Other Tools: Connect CallRail with your CRM, Google Analytics, or other marketing tools to enhance data synchronization and reporting.
Common Mistakes to Avoid
Avoiding these common pitfalls can enhance the effectiveness and security of granting access to your CallRail account.
Granting Excessive Permissions
- Impact: Assigning higher permissions than necessary can lead to unauthorized changes or misuse of your call data.
- Solution: Carefully evaluate the access level required for each user and assign roles accordingly.
Neglecting to Update Permissions
- Impact: Failing to update permissions when roles change or when users leave can compromise your account’s security.
- Solution: Regularly review and update user permissions to reflect current team structures and responsibilities.
Overlooking Security Measures
- Impact: Inadequate security can expose your call tracking data to potential threats.
- Solution: Implement robust security practices, including strong passwords and 2FA, to protect your account.
Poor Communication
- Impact: Lack of clear communication can lead to misunderstandings and inconsistent account management.
- Solution: Establish clear communication channels and provide comprehensive training and guidelines for all users.
Ignoring Call Analytics Insights
- Impact: Failing to utilize the data collected can result in missed opportunities for optimizing your marketing strategies.
- Solution: Encourage users to actively engage with the call analytics data and use it to inform decision-making processes.
Frequently Asked Questions
Can I Grant Access to Multiple People at Once?
Yes, you can invite multiple users by repeating the invitation process for each individual. However, manage invitations carefully to maintain control over who has access to your CallRail account.
What Are the Different Permission Levels?
- Reporting: Can view call data and generate reports but cannot make any changes to settings or tracking numbers.
- Manager: Can manage tracking numbers, campaigns, and view reports. Cannot add or remove other users.
- Administrator: Full access to the account, including adding or removing users, managing tracking numbers, and configuring account settings.
How Do I Remove Someone’s Access?
- Navigate to Users Section:
- Go to the Users tab in your CallRail dashboard.
- Find the User:
- Locate the user you want to remove in the Active Users list.
- Remove Access:
- Click the three-dot menu next to their name and select Remove Access.
- Confirm the action to revoke their access.
Do Users Need a CallRail Account to Access My CallRail Account?
Yes, users must have a CallRail account to accept an invitation and access your CallRail account. Ensure that you are adding users with valid email addresses to facilitate account creation.
Can I Change a User’s Permission Level After Granting Access?
Yes, you can adjust a user’s permission level at any time by navigating to the Users section, clicking on the user’s name, and selecting a new role from the dropdown menu.
Maximizing the Impact of Added Users
To fully leverage the benefits of adding users to your CallRail account, integrate these strategies into your broader marketing and operational plans.
Align with Your Marketing Goals
- Define Clear Objectives: Identify what you want to achieve with your call tracking, such as increasing lead generation, improving customer service, or optimizing ad campaigns.
- Tailor Reporting: Set up specific reports and dashboards in CallRail that align with your marketing objectives, ensuring that users have access to the most relevant data.
Use Data to Optimize Strategies
- Analyze Call Data: Regularly review call analytics to understand which campaigns are driving the most calls and conversions.
- Refine Marketing Strategies: Use insights from CallRail to adjust your marketing strategies, focusing on high-performing channels and improving underperforming ones.
Integrate with Other Marketing Tools
- Connect with CRM Systems: Integrate CallRail with your Customer Relationship Management (CRM) system to streamline lead management and follow-up processes.
- Leverage Google Analytics: Combine CallRail data with Google Analytics to gain a comprehensive view of user behavior and campaign performance.
Leverage Advanced CallRail Features
- Dynamic Number Insertion (DNI): Use DNI to display unique phone numbers to visitors from different traffic sources, enhancing call attribution.
- Call Recording and Transcription: Utilize CallRail’s call recording and transcription features to gain deeper insights into customer interactions and improve service quality.
Foster Team Collaboration
- Regular Reporting: Generate and share regular call reports with your team to keep everyone informed about campaign performance and lead quality.
- Training and Education: Ensure that your team members are trained on using CallRail effectively, understanding how to interpret call data and act on insights.
Enhance Customer Experience
- Prompt Lead Follow-Up: Use CallRail’s call tracking data to ensure that leads are followed up promptly, increasing the likelihood of conversions.
- Personalize Interactions: Leverage call data to personalize customer interactions, addressing their specific needs and preferences effectively.
Conclusion
Adding users to your CallRail account is a strategic move that enhances your call tracking capabilities, facilitates team collaboration, and optimizes your marketing strategies. By following the step-by-step guide provided in this post, implementing best practices, and avoiding common mistakes, you can ensure that your CallRail account is managed securely and efficiently. Proper delegation and strategic management of your CallRail account not only streamline operations but also drive better performance and foster long-term success in the competitive business landscape.