
Tag: Google Tag Manager
How to Add Users to Your Google Tag Manager Account

Collaborating effectively is essential for managing and optimizing your website’s tracking and analytics. Whether you’re working with an agency, hiring a marketing specialist, or coordinating with team members, granting access to your Google Tag Manager (GTM) account allows others to manage tags, triggers, and variables efficiently. In the “How to Add Users to Your Google Tag Manager Account” video, you learn a straightforward method to provide access using GTM’s built-in user management features. This comprehensive guide will expand on those instructions, offering detailed steps, best practices, and additional insights to ensure secure and effective management of your GTM account.
Why Granting Access to Your Google Tag Manager Account Matters
Providing access to your GTM account enables collaboration, streamlines workflow, and enhances your website’s tracking capabilities. Here’s why it’s crucial:
Enhanced Collaboration
Allowing multiple users to manage your GTM account fosters teamwork and ensures that tracking implementations are handled efficiently. Whether you’re delegating tasks or working together on tag configurations, shared access facilitates seamless collaboration.
Efficient Tag Management
With multiple users managing tags, triggers, and variables, you can maintain an organized and optimized tagging structure. This efficiency is vital for businesses that rely on accurate data collection for marketing and analytics.
Scalability
As your business grows, so does the complexity of your tracking needs. Granting access to additional users allows you to scale your GTM setup without overburdening a single individual, ensuring that your tracking infrastructure evolves with your business.
Security and Control
Google Tag Manager’s user management features provide granular control over who can access and modify your tags. By assigning appropriate permissions, you can safeguard your data and maintain the integrity of your tracking setup.
Step-by-Step Guide to Adding Users in Google Tag Manager
Follow these detailed steps to securely add users to your Google Tag Manager account, whether at the account level or within specific containers.
Step 1: Sign In to Your Google Tag Manager Account
- Access Google Tag Manager:
- Navigate to Google Tag Manager and sign in with your Google account credentials associated with your GTM account.
- Select Your Account:
- If you manage multiple accounts, select the one you want to grant access to from the list of available accounts.
Step 2: Navigate to Admin Settings
- Open Admin Panel:
- In the top-right corner of the GTM dashboard, click on the Admin gear icon to access the administrative settings.
Step 3: Grant Access at the Account Level
Granting access at the account level provides the user with permissions across all containers within the account.
- Access Account User Management:
- In the Account column (the first column), click on User Management.
- Add a New User:
- Click on the + button (often labeled as “Add”) in the top-right corner.
- Select Add Users from the dropdown menu.
- Enter User Details:
- Input the email address of the person you want to grant access to. Ensure it is a Google account email.
- Assign Permissions:
- Choose the appropriate permission levels:
- Administrator: Full access, including managing users and account settings.
- User: Can manage tags, triggers, and variables but cannot manage user permissions.
- Choose the appropriate permission levels:
- Configure Container Permissions:
- Decide whether to grant access to all containers within the account or specific ones.
- For comprehensive management, select All Containers. To restrict access, choose specific containers.
- Send Invitation:
- Click Invite to send the access invitation. The invited user will receive an email notification to accept access.
Step 4: Grant Access at the Container Level
If you prefer to grant access to a specific container within your GTM account, follow these steps:
- Select Container:
- In the Container column (the second column), select the container you want to grant access to.
- Access Container User Management:
- Click on User Management under the selected container.
- Add a New User:
- Click on the + button (often labeled as “Add”) in the top-right corner.
- Select Add Users from the dropdown menu.
- Enter User Details:
- Input the email address of the person you want to grant access to. Ensure it is a Google account email.
- Assign Permissions:
- Choose the appropriate permission levels:
- Administrator: Full access, including managing users and container settings.
- User: Can manage tags, triggers, and variables but cannot manage user permissions.
- Choose the appropriate permission levels:
- Send Invitation:
- Click Invite to send the access invitation. The invited user will receive an email notification to accept access.
Step 5: Confirm and Manage Access
- Verify Invitations:
- Ensure that the invited users have accepted the invitations by checking the User Management sections for both account and container levels.
- Adjust Permissions if Needed:
- To change a user’s permission level, click on their name and select a different role from the dropdown menu.
- Remove Users:
- To revoke access, click the three-dot menu next to the user’s name and select Remove.
Best Practices for Granting Access
Implementing best practices ensures that granting access to your GTM account is secure, efficient, and beneficial for your business.
Define Clear Roles and Responsibilities
- Assess Needs: Determine what tasks each user needs to perform and assign roles based on their responsibilities.
- Avoid Overlapping Duties: Clearly define each user’s role to prevent confusion and ensure accountability.
Limit Access Based on Necessity
- Principle of Least Privilege: Grant only the access necessary for users to perform their tasks. Avoid assigning higher permissions than required.
- Regularly Review Permissions: Periodically audit user access to ensure that permissions are still appropriate and revoke access for users who no longer need it.
Maintain Security
- Use Strong Passwords: Ensure that all users have strong, unique passwords for their Google accounts.
- Enable Two-Factor Authentication (2FA): Add an extra layer of security by enabling 2FA for all accounts with access to your GTM.
- Monitor Account Activity: Regularly check the User Management sections for any unusual activity or unauthorized access.
Communicate Effectively
- Provide Guidelines: Share clear guidelines on how users should interact with the GTM account to maintain data integrity and consistency.
- Foster Collaboration: Encourage open communication among team members to streamline workflows and address any issues promptly.
Utilize GTM Features
- Use Workspaces: Leverage GTM’s workspaces to manage changes and collaborate without interfering with each other’s work.
- Implement Version Control: Regularly create versions of your container to track changes and revert to previous configurations if needed.
Common Mistakes to Avoid
Avoiding these common pitfalls can enhance the effectiveness and security of granting access to your GTM account.
Granting Excessive Permissions
- Impact: Assigning higher permissions than necessary can lead to unauthorized changes or misuse of your tracking setup.
- Solution: Carefully evaluate the access level required for each user and assign roles accordingly.
Neglecting to Update Permissions
- Impact: Failing to update permissions when roles change or when users leave can compromise your account’s security.
- Solution: Regularly review and update user permissions to reflect current team structures and responsibilities.
Overlooking Security Measures
- Impact: Inadequate security can expose your tracking setup to potential threats.
- Solution: Implement robust security practices, including strong passwords and 2FA, to protect your account.
Poor Communication
- Impact: Lack of clear communication can lead to misunderstandings and inconsistent tag management.
- Solution: Establish clear communication channels and provide comprehensive training and guidelines for all users.
Ignoring Analytics Insights
- Impact: Failing to utilize the data collected can result in missed opportunities for optimizing your website and marketing strategies.
- Solution: Encourage users to actively engage with the analytics data and use it to inform decision-making processes.
Frequently Asked Questions
Can I Grant Access to Multiple People at Once?
Yes, you can invite multiple users by repeating the invitation process for each individual. However, manage invitations carefully to maintain control over who has access to your GTM account.
What Are the Different Permission Levels?
- Administrator: Full access, including managing users and account/container settings.
- User: Can manage tags, triggers, and variables but cannot manage user permissions.
How Do I Remove Someone’s Access?
- Navigate to Admin > User Management for either the account or container level.
- Find the User: Locate the user you want to remove.
- Remove Access: Click the three-dot menu next to their name and select Remove.
Do Users Need a Google Account to Access My Tag Manager?
Yes, users must have a Google account to accept an invitation and access your GTM account or container.
Can I Change a User’s Permission Level After Granting Access?
Yes, you can adjust a user’s permission level at any time by navigating to User Management, clicking on the user’s name, and selecting a new role.
Maximizing the Impact of Granted Access
To fully leverage the benefits of granting access to your GTM account, integrate these strategies into your broader marketing and operational plans.
Align with Your Marketing Goals
- Define Clear Objectives: Identify what you want to achieve with your GTM setup, such as improving tracking accuracy, enhancing data collection, or optimizing marketing campaigns.
- Tailor Tracking to Goals: Set up specific tags, triggers, and variables in GTM that align with your marketing objectives to capture the most relevant data.
Use Data to Optimize Campaigns
- Analyze Tag Performance: Regularly review the performance of your tags to ensure they are firing correctly and collecting accurate data.
- Refine Tracking Strategy: Use insights gained from your analytics to refine your tracking setup, ensuring it continues to meet your evolving business needs.
Integrate with Other Marketing Tools
- CRM Integration: Connect your GTM data with your Customer Relationship Management (CRM) system to streamline lead management and follow-up processes.
- Email Marketing: Use GTM data to create targeted email marketing campaigns based on user interactions and behaviors on your website.
Leverage Advanced GTM Features
- Custom Templates: Create custom tag templates in GTM to streamline the creation and deployment of tags.
- API Access: Utilize GTM’s API to automate tag management tasks and integrate GTM with other systems and workflows.
Foster Team Collaboration
- Training and Education: Ensure that all users understand how to use GTM effectively. Provide training sessions and resources to keep everyone updated on best practices.
- Shared Responsibilities: Distribute tag management tasks among team members to maintain efficiency and reduce the risk of errors.
Enhance User Experience
- Optimize Website Performance: Use GTM data to identify and address issues that affect user experience, such as slow-loading pages or high bounce rates.
- Personalize Content: Leverage user behavior data to create personalized content and experiences that cater to the preferences and needs of your audience.
Conclusion
Adding users to your Google Tag Manager account is a strategic move that can significantly enhance your tag management, data collection, and marketing efforts. By following the step-by-step guide provided in this post, implementing best practices, and avoiding common mistakes, you can ensure that your GTM setup is secure, efficient, and aligned with your business objectives. Proper collaboration and strategic management of your GTM account not only streamline operations but also drive better performance and foster long-term success in the competitive digital landscape.
How to Setup a Google Analytics Tag in Google Tag Manager

Accurately tracking and analyzing website traffic is fundamental for optimizing your online presence and enhancing user engagement. Setting up a Google Analytics tag through Google Tag Manager (GTM) streamlines this process, allowing you to manage all your tracking codes in one centralized location without altering your website’s code directly. In the “How to Setup a Google Analytics Tag in Google Tag Manager” video, you learn a straightforward method to implement this essential tracking mechanism. This comprehensive guide will expand on those instructions, providing you with detailed steps, best practices, and additional insights to ensure your Google Analytics tag is correctly installed and functioning effectively.
Why Setting Up a Google Analytics Tag Matters
Implementing a Google Analytics tag via GTM offers numerous benefits that enhance your ability to monitor and analyze website performance.
Enhanced Data Collection
A properly configured Google Analytics tag ensures that you collect accurate and comprehensive data about your website visitors’ behaviors, interactions, and conversions. This data is invaluable for understanding your audience and making informed decisions to improve your website and marketing strategies.
Streamlined Tag Management
Google Tag Manager allows you to manage all your tracking codes in one place, simplifying the process of adding, updating, or removing tags without the need to modify your website’s code directly. This reduces the risk of errors and enhances efficiency, especially for businesses with multiple tracking needs.
Improved Website Performance
By managing your tags through GTM, you can optimize the loading times of your website. GTM handles asynchronous loading of tags, ensuring that tracking scripts do not interfere with the user experience or slow down your site.
Flexibility and Scalability
As your website grows, GTM provides the flexibility to add more tags and tracking mechanisms without overcomplicating your site’s codebase. This scalability is crucial for businesses looking to expand their analytics capabilities over time.
Step-by-Step Guide to Setting Up a Google Analytics Tag in Google Tag Manager
Follow these detailed steps to set up a Google Analytics tag using Google Tag Manager, ensuring that your website’s traffic is accurately tracked and analyzed.
Step 1: Access Your Google Tag Manager Account
- Sign In to Google Tag Manager
- Navigate to Google Tag Manager and log in with your Google account credentials.
- Select Your Container
- Choose the container associated with your website. If you haven’t created a container yet, click on Create Account, enter your account and container details, and follow the prompts to set it up.
Step 2: Create a New Tag
- Navigate to Tags Section
- In your GTM workspace, click on Tags in the left-hand menu.
- Create a New Tag
- Click on the New button to create a new tag.
- Name Your Tag: For example, “GA4 – Page View”.
- Configure Tag Settings
- Click on Tag Configuration.
- Select Google Analytics: GA4 Configuration from the list of tag types.
- Enter Your Measurement ID
- In a separate tab, open your Google Analytics account.
- Navigate to Admin (gear icon) in the bottom-left corner.
- Under the Property column, click on Data Streams.
- Select the relevant data stream for your website.
- Copy the Measurement ID (formatted like G-XXXXXXXXXX).
- Return to GTM and paste the Measurement ID into the Measurement ID field.
Step 3: Set Up the Trigger
- Add a Trigger
- In the tag configuration, click on Triggering.
- Select the All Pages trigger. This ensures that the Google Analytics tag fires on every page of your website, tracking all page views.
Step 4: Save and Publish Your Tag
- Save the Tag
- After configuring the tag and trigger, click Save.
- Submit and Publish
- Click on the Submit button in the top-right corner of the GTM interface.
- Version Name: Enter a descriptive name, such as “GA4 Page View Setup”.
- Version Description: Optionally, add a description like “Added GA4 Page View tag to track all page views”.
- Click Publish to make the changes live on your website.
Step 5: Verify the Tag Installation
- Use Preview Mode
- In GTM, click on Preview to enter the debug mode.
- Enter your website URL to start a debugging session.
- Navigate through your website to ensure that the Google Analytics tag is firing correctly on each page.
- Check in Google Analytics
- Go to your Google Analytics account.
- Navigate to Realtime > Overview.
- Open your website in a new tab and browse around. You should see your own activity reflected in the Realtime report, confirming that the tag is working.
Step 6: Implement Additional Tracking (Optional)
- Set Up Event Tracking
- To track specific user interactions like button clicks or form submissions, create additional tags in GTM using the GA4 Event tag type.
- Configure triggers based on the specific actions you want to track.
- Use Variables and Triggers
- Utilize GTM variables and triggers to define more complex tracking scenarios, enhancing the depth of your analytics data.
Best Practices for Setting Up Google Analytics Tags
Implementing best practices ensures that your Google Analytics tags provide accurate and actionable data.
Use Clear Naming Conventions
- Descriptive Names: Name your tags and triggers descriptively (e.g., “GA4 – Button Click”) to easily identify their purpose within GTM.
- Consistent Format: Maintain a consistent naming format across all tags and triggers to enhance organization and manageability.
Test Before Publishing
- Preview Mode: Always use GTM’s Preview mode to test your tags before publishing them live.
- Browser Extensions: Utilize browser extensions like Google Tag Assistant to verify tag functionality and troubleshoot issues.
Regularly Audit Your Tags
- Periodic Reviews: Conduct regular audits of your tag setup to ensure all tags are firing correctly and data is being accurately collected.
- Update Tags: Update your tags as needed to reflect changes in your website structure or tracking requirements.
Leverage Google Analytics Features
- Enhanced Measurement: Enable Enhanced Measurement in Google Analytics to automatically track common interactions like scrolls, outbound clicks, and video engagements.
- Custom Dimensions and Metrics: Utilize custom dimensions and metrics to capture additional data specific to your business needs.
Secure Your GTM Account
- Access Control: Limit access to your GTM account to only those who need it, using appropriate user permissions.
- Two-Factor Authentication: Enable two-factor authentication (2FA) for added security.
Common Mistakes to Avoid
Avoiding these common pitfalls can enhance the accuracy and reliability of your Google Analytics tracking.
Incorrect Measurement ID
- Impact: Using an incorrect Measurement ID can lead to data being sent to the wrong Google Analytics property, resulting in inaccurate reporting.
- Solution: Double-check and verify the Measurement ID before entering it into GTM.
Not Setting Up Triggers Correctly
- Impact: Improperly configured triggers can cause tags to fire at unintended times or not at all, leading to incomplete data.
- Solution: Ensure that triggers are correctly set up to match the desired user interactions. Test triggers thoroughly in Preview mode.
Overloading GTM with Unnecessary Tags
- Impact: Having too many tags can slow down your website and complicate tag management, increasing the risk of errors.
- Solution: Only implement essential tags and regularly review your GTM setup to remove any redundant or obsolete tags.
Ignoring Data Privacy Regulations
- Impact: Failing to comply with data privacy laws like GDPR or CCPA can result in legal consequences and damage to your reputation.
- Solution: Implement necessary consent mechanisms and anonymize IP addresses where required. Stay informed about relevant data privacy regulations.
Neglecting to Monitor and Maintain Tags
- Impact: Over time, tags can become outdated or misconfigured, leading to inaccurate data collection.
- Solution: Regularly monitor your tags using tools like Google Tag Assistant and perform routine maintenance to ensure continued accuracy.
Frequently Asked Questions
Do I Need Google Tag Manager to Use Google Analytics?
No, you can add Google Analytics directly to your website by inserting the tracking code into your site’s HTML. However, using Google Tag Manager offers greater flexibility and ease of managing multiple tags without modifying your website’s code directly.
How Often Should I Audit My Google Analytics Tags?
It’s recommended to audit your Google Analytics tags at least once a month or whenever you make significant changes to your website or tracking requirements. Regular audits help ensure that your tags are functioning correctly and collecting accurate data.
Can I Track Specific Events with Google Analytics in GTM?
Yes, you can set up event tracking in GTM to monitor specific user interactions, such as button clicks, form submissions, or video plays. Use the GA4 Event tag type and configure appropriate triggers to capture these events.
What Should I Do If My Google Analytics Tag Isn’t Firing?
- Check Tag Configuration: Ensure that the Measurement ID is correct and matches your Google Analytics property.
- Verify Trigger Settings: Confirm that the trigger is correctly configured to fire on the intended actions or pages.
- Use Preview Mode: Utilize GTM’s Preview mode to debug and identify any issues with tag firing.
- Consult Documentation: Refer to Google’s official documentation or seek support if problems persist.
How Can I Assign Values to Different Conversions?
In Google Analytics, you can assign values to different conversions by setting up goal tracking with monetary values. This helps in measuring the ROI of your marketing efforts more accurately.
Maximizing the Impact of Your Google Analytics Tag
To fully leverage the benefits of a properly installed Google Analytics tag, integrate these strategies into your broader marketing and operational plans.
Align with Your Marketing Goals
- Define Clear Objectives: Identify what you want to achieve with your tracking setup, such as increasing conversions, improving user engagement, or enhancing campaign performance.
- Tailor Tracking to Goals: Set up specific events and goals in Google Analytics that align with your marketing objectives, ensuring that you capture the most relevant data for your analysis.
Use Data to Optimize Campaigns
- Analyze Traffic Sources: Use Google Analytics to understand where your traffic is coming from and which channels are most effective in driving conversions.
- Refine Targeting: Adjust your marketing strategies based on insights gained from your analytics data to reach more qualified audiences and improve campaign performance.
Integrate with Other Marketing Tools
- CRM Integration: Connect Google Analytics with your Customer Relationship Management (CRM) system to gain deeper insights into customer behavior and streamline lead management.
- Email Marketing: Use analytics data to segment your email lists and create targeted email campaigns that resonate with different audience segments.
Leverage Advanced Analytics Features
- Enhanced Ecommerce: If you run an ecommerce website, implement Enhanced Ecommerce tracking to gain detailed insights into user purchase behavior and product performance.
- Custom Dashboards: Create custom dashboards in Google Analytics to monitor key performance indicators (KPIs) that are most relevant to your business goals.
Foster Team Collaboration
- Training and Education: Ensure that your team members are trained on using Google Analytics and GTM effectively. Encourage continuous learning to stay updated with the latest features and best practices.
- Shared Reporting: Develop standardized reporting templates that team members can use to share insights and collaborate on data-driven decision-making.
Enhance User Experience
- Optimize Website Performance: Use insights from Google Analytics to identify and address issues that affect user experience, such as slow-loading pages or high bounce rates.
- Personalize Content: Leverage user behavior data to create personalized content and experiences that cater to the preferences and needs of your audience.
Conclusion
Setting up a Google Analytics tag in Google Tag Manager is a vital step for businesses aiming to track and analyze website performance effectively. By following the step-by-step guide provided in this post, implementing best practices, and avoiding common mistakes, you can ensure that your Google Analytics tag is accurately installed and functioning optimally. Proper tracking not only enhances your ability to measure campaign performance but also provides valuable insights to refine your marketing strategies, ultimately driving sustained business growth and success in the competitive online landscape.
How to Set Up Google Ads Conversion Tracking for Phone Calls
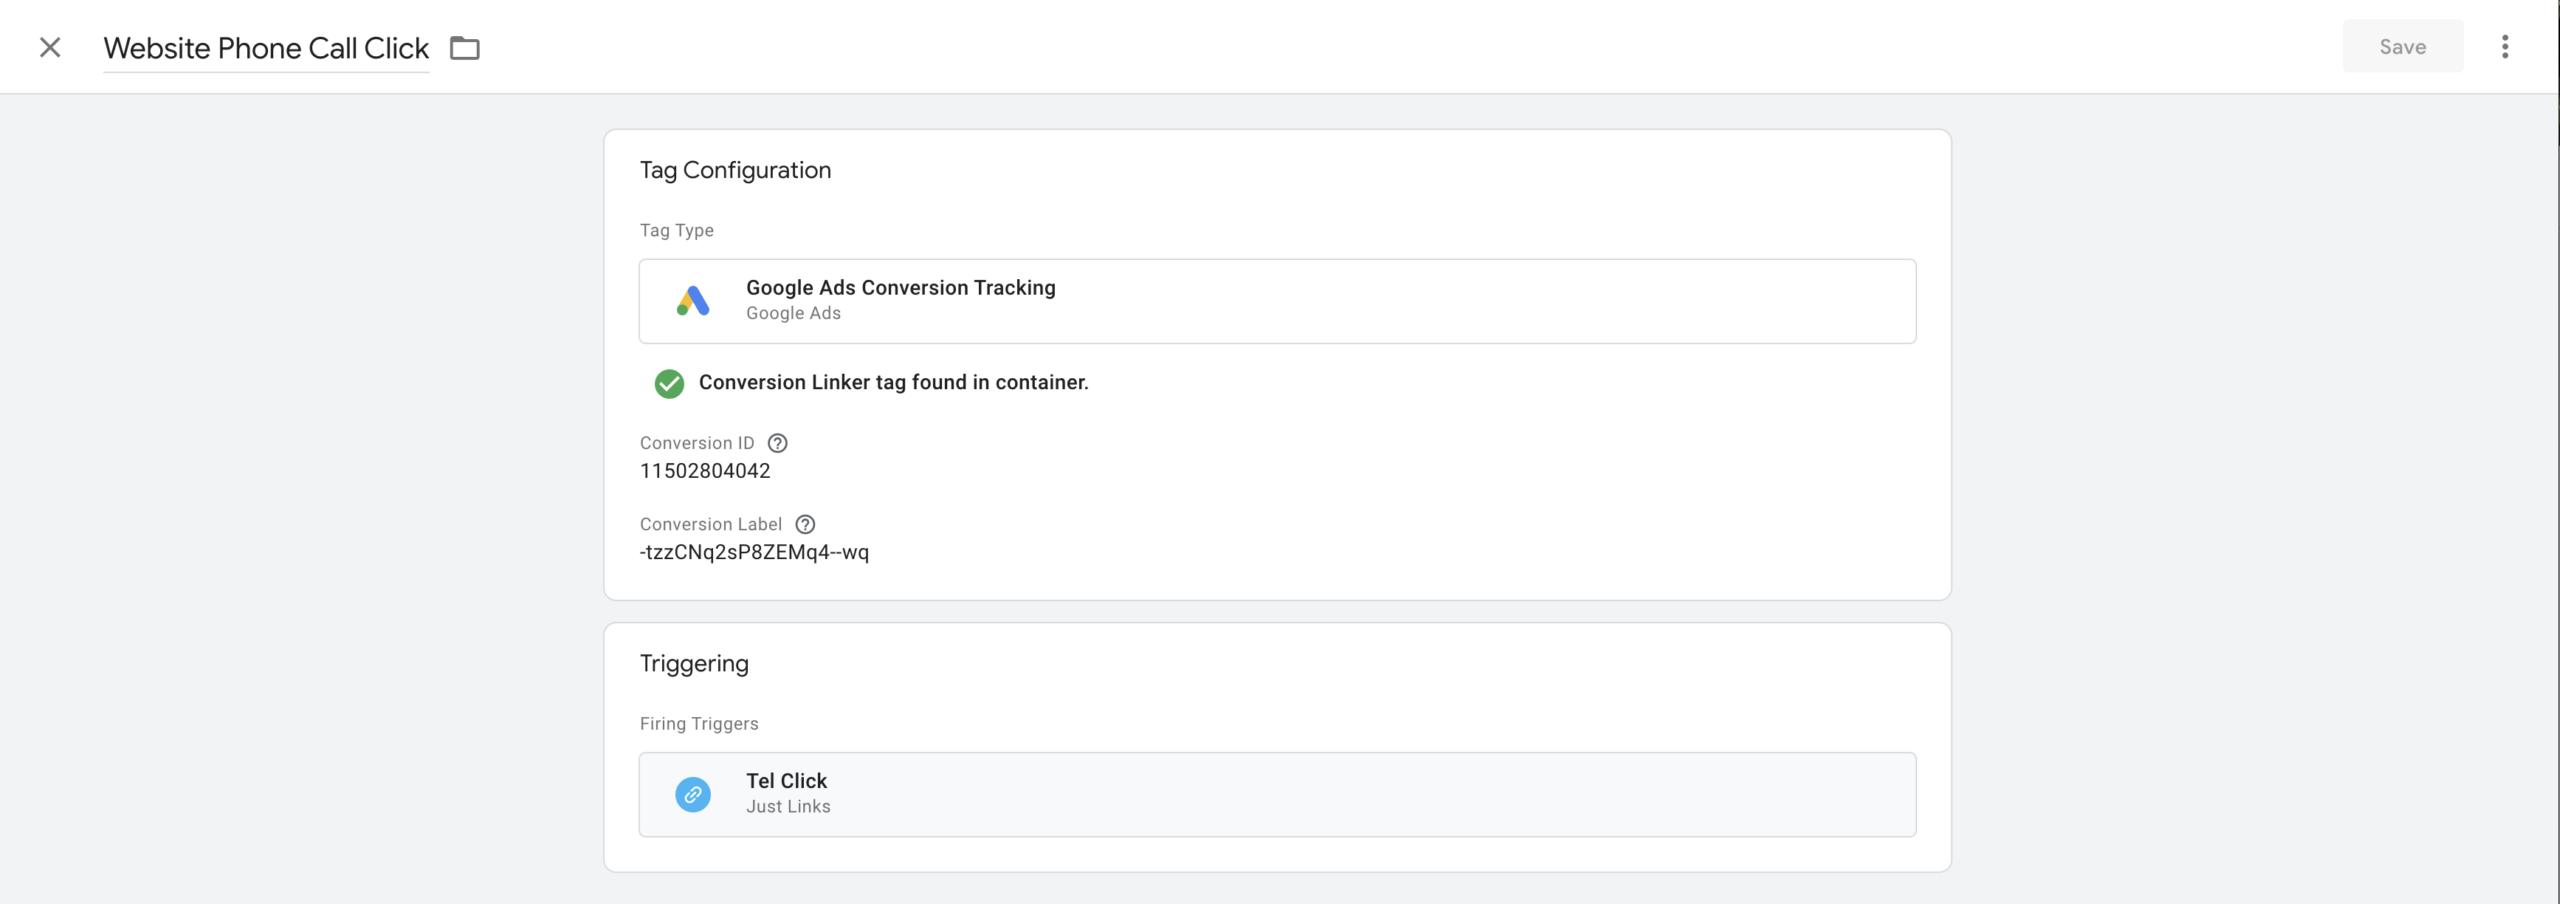
Tracking phone call conversions is essential for businesses that rely on phone inquiries to generate leads and sales. By setting up Google Ads Conversion Tracking for phone calls, you can measure the effectiveness of your advertising campaigns, optimize your ad spend, and gain valuable insights into customer behavior. In the “How to Set Up Google Ads Conversion Tracking for Phone Calls” video, you learn a comprehensive method to implement this tracking using Google Tag Manager. This detailed guide will expand on those instructions, providing you with step-by-step directions, best practices, and additional tips to ensure your phone call conversions are accurately tracked and effectively utilized.
Why Phone Call Conversion Tracking Matters
Phone calls are a direct and personal way for customers to engage with your business. Tracking these conversions provides several benefits:
Measure Campaign Effectiveness
By tracking phone call conversions, you can determine which ads, keywords, and campaigns are driving the most valuable customer interactions. This data is crucial for assessing the ROI of your marketing efforts.
Optimize Ad Spend
Understanding which elements of your campaigns are performing well allows you to allocate your budget more efficiently. Invest more in high-performing areas and adjust or eliminate underperforming segments.
Gain Customer Insights
Analyzing phone call data helps you understand customer preferences and behavior. This information can guide your marketing strategies and improve customer service.
Enhance Reporting
Detailed conversion tracking enables you to provide comprehensive reports to stakeholders, demonstrating the tangible impact of your advertising campaigns.
Step-by-Step Guide to Setting Up Phone Call Conversion Tracking
Follow these steps to set up Google Ads Conversion Tracking for phone calls using Google Tag Manager (GTM).
Step 1: Create a Conversion Action in Google Ads
- Sign In to Your Google Ads Account
- Navigate to Google Ads and log in with your credentials.
- Access the Conversions Section
- In the top menu, click on the Tools and Settings icon (🔧).
- Under the Measurement section, select Conversions.
- Create a New Conversion Action
- Click on the + New conversion action button.
- Choose Phone calls as the conversion source.
- Configure the Conversion Action
- Category: Select Calls to a phone number on your website.
- Conversion Name: Enter a descriptive name, such as “Website Phone Call Click”.
- Value: Choose Don’t use a value unless you want to assign a monetary value to each call.
- Count: Select One to count each call once, avoiding multiple counts for repeat calls from the same user.
- Click-through conversion window: Set an appropriate time frame (e.g., 30 days) based on your sales cycle.
- Call reporting: Enable Use Google forwarding numbers to track call details without revealing your actual phone number.
- Set Up the Tag
- Under Tag setup, choose Use Google Tag Manager.
- Note down the Conversion ID and Conversion Label provided. You will need these for GTM.
- Finalize and Save
- Click Done to save your new conversion action.
Step 2: Configure Google Tag Manager
- Sign In to Your Google Tag Manager Account
- Navigate to Google Tag Manager and log in.
- Select Your Container
- Choose the container associated with your website where you want to implement the conversion tracking.
- Create a New Tag
- Click on Tags in the left-hand menu.
- Click the New button to create a new tag.
- Name the Tag: For example, “Google Ads Phone Call Conversion”.
- Set Up the Tag Configuration
- Click on Tag Configuration and select Google Ads Conversion Tracking.
- Enter the Conversion ID and Conversion Label you obtained from Google Ads.
- Set Up the Trigger
- Click on Triggering and then the + icon to add a new trigger.
- Name the Trigger: For example, “Phone Call Click”.
- Choose Trigger Type: Select Just Links under Click triggers.
- Configure Trigger:
- Choose Some Link Clicks.
- Set the condition to trigger on the phone number link. For instance:
- Click URL contains
tel:
- Click URL contains
- Click Save to finalize the trigger.
- Save and Publish the Tag
- After configuring the tag and trigger, click Save.
- Click on Submit in the top-right corner.
- Enter a version name and description (e.g., “Added Phone Call Conversion Tracking”).
- Click Publish to make the changes live.
Step 3: Verify the Conversion Tracking Setup
- Use Google Tag Assistant
- Install the Google Tag Assistant Chrome extension if you haven’t already.
- Navigate to your website and perform a test phone call by clicking the phone number link.
- Check in Google Ads
- Go back to your Google Ads account.
- In the Conversions section, verify that the conversion was recorded.
- Test Multiple Times
- Submit the phone call conversion multiple times to ensure consistency in tracking.
Step 4: Monitor and Optimize
- Analyze Conversion Data
- Use Google Ads reports to monitor the performance of your phone call conversions.
- Identify which campaigns, ads, and keywords are driving the most phone calls.
- Optimize Campaigns
- Adjust your bids, budgets, and targeting based on the conversion data to maximize ROI.
- Focus on high-performing areas and refine or eliminate underperforming segments.
Best Practices for Phone Call Conversion Tracking
Implementing best practices ensures that your conversion tracking setup is both accurate and effective.
Ensure Accurate Tag Placement
- Correct Placement: Make sure the Meta Pixel code is correctly placed in the
<head>section of your website’s HTML. - Consistent IDs: Verify that the Pixel ID in the code matches the one in your Meta Ads Manager.
Use Descriptive Naming Conventions
- Tag Names: Name your tags descriptively (e.g., “Google Ads Phone Call Conversion”) to easily identify them in GTM.
- Trigger Names: Similarly, name triggers clearly to avoid confusion when managing multiple tags.
Regularly Monitor Conversion Data
- Performance Tracking: Regularly review your conversion data in Google Ads to identify trends and areas for improvement.
- Adjust Campaigns: Use the insights gained from conversion data to refine your ad targeting, messaging, and budget allocation.
Protect Against Double Tracking
- Unique Triggers: Ensure that each conversion action has a unique trigger to prevent multiple tags from firing for a single action.
- Thorough Testing: Test your setup thoroughly to confirm that each phone call is tracked only once, maintaining accurate data collection.
Common Mistakes to Avoid
Avoiding these common pitfalls can enhance the effectiveness of your phone call conversion tracking efforts.
Incomplete Tag Setup
- Impact: Incomplete or incorrect tag setup can lead to missed conversions and inaccurate data.
- Solution: Follow each step meticulously and verify each part of the setup using testing tools.
Ignoring Mobile Users
- Impact: Failing to account for mobile users can result in incomplete tracking, as phone calls often originate from mobile devices.
- Solution: Test your conversion tracking on both mobile and desktop devices to ensure consistency.
Not Updating After Website Changes
- Impact: Changes to your website structure or URL can break your conversion tracking setup.
- Solution: Update your GTM triggers and tags immediately after making significant changes to your website.
Overcomplicating the Setup
- Impact: An overly complex setup can lead to errors and make troubleshooting difficult.
- Solution: Keep your conversion tracking setup as simple and straightforward as possible, focusing on essential actions.
Neglecting Regular Audits
- Impact: Over time, tracking setups can become outdated or accumulate errors, leading to inaccurate data.
- Solution: Conduct regular audits of your conversion tracking setup to ensure it remains accurate and effective.
Frequently Asked Questions
Do I Need Google Tag Manager to Track Phone Call Conversions?
No, you don’t necessarily need Google Tag Manager to track phone call conversions. However, using GTM simplifies the process of managing and deploying tracking codes without needing to modify your website’s code directly. It offers greater flexibility and ease of use, especially for businesses with multiple tracking needs.
How Can I Assign a Value to Each Phone Call Conversion?
When setting up your conversion action in Google Ads, you can choose to assign a specific value to each conversion. This value can represent the average revenue you expect from a phone call or the importance of the call to your business. Assigning values helps in measuring the ROI of your campaigns more accurately.
Can I Track Multiple Phone Numbers on My Website?
Yes, you can track multiple phone numbers by creating separate conversion actions and corresponding tags and triggers in Google Tag Manager. Ensure each phone number has a unique identifier or link to differentiate between them.
What If My Phone Number Link Uses a Different Format?
If your phone number link doesn’t use the tel: format, you can adjust the trigger conditions in GTM accordingly. For example, if your link uses a JavaScript function or another protocol, set the trigger based on that specific identifier.
How Do I View Conversion Data in Google Ads?
After setting up conversion tracking, go to the Conversions section in Google Ads. Here, you can view detailed reports on the number of conversions, conversion rate, cost per conversion, and other relevant metrics. Use these insights to evaluate and optimize your campaigns.
Maximizing the Impact of Phone Call Conversion Tracking
To fully leverage the benefits of phone call conversion tracking, integrate these strategies into your broader marketing and operational plans.
Align with Your Marketing Goals
- Define Clear Objectives: Identify what you want to achieve with your phone call tracking, such as increasing lead generation, improving customer service, or boosting sales.
- Tailor Campaigns to Goals: Ensure that your ad campaigns and tracking setup align with your business objectives to maximize effectiveness.
Integrate with CRM Systems
- Seamless Data Flow: Connect your phone call conversion data with your Customer Relationship Management (CRM) system to streamline lead management and follow-up processes.
- Enhanced Lead Nurturing: Use the data from phone call conversions to segment your leads and tailor your nurturing strategies, increasing the likelihood of converting leads into customers.
Utilize Advanced Analytics
- Multi-Channel Attribution: Understand how different marketing channels contribute to phone call conversions. Use this information to develop a multi-channel attribution model that accurately reflects your marketing efforts.
- Behavioral Insights: Analyze the behavior of users who make phone calls to gain deeper insights into customer preferences and improve your marketing strategies.
Foster Team Collaboration
- Shared Responsibilities: Ensure that all team members understand the importance of accurate conversion tracking and work collaboratively to maintain the tracking setup.
- Training and Guidelines: Provide training on using Google Ads and Tag Manager effectively. Ensure that team members are equipped to manage and troubleshoot the tracking setup.
Enhance Customer Experience
- Personalized Follow-Ups: Use the information from phone call conversions to personalize follow-up communications with leads, addressing their specific needs and increasing engagement.
- Responsive Service: Ensure that your team promptly responds to phone calls tracked as conversions. A swift response can significantly improve conversion rates and customer satisfaction.
Conclusion
Setting up Google Ads Conversion Tracking for phone calls using Google Tag Manager is a vital step for businesses aiming to optimize their marketing efforts and drive more qualified leads. By following the detailed steps outlined in this guide, implementing best practices, and avoiding common mistakes, you can ensure that your phone call conversions are accurately tracked and effectively utilized. Proper conversion tracking not only enhances your ability to measure campaign performance but also provides valuable insights to refine your marketing strategies, ultimately leading to sustained business growth and success.
How to Check if a Website is Tagged Properly (Google Tag, Google Analytics, Google Tag Manager)
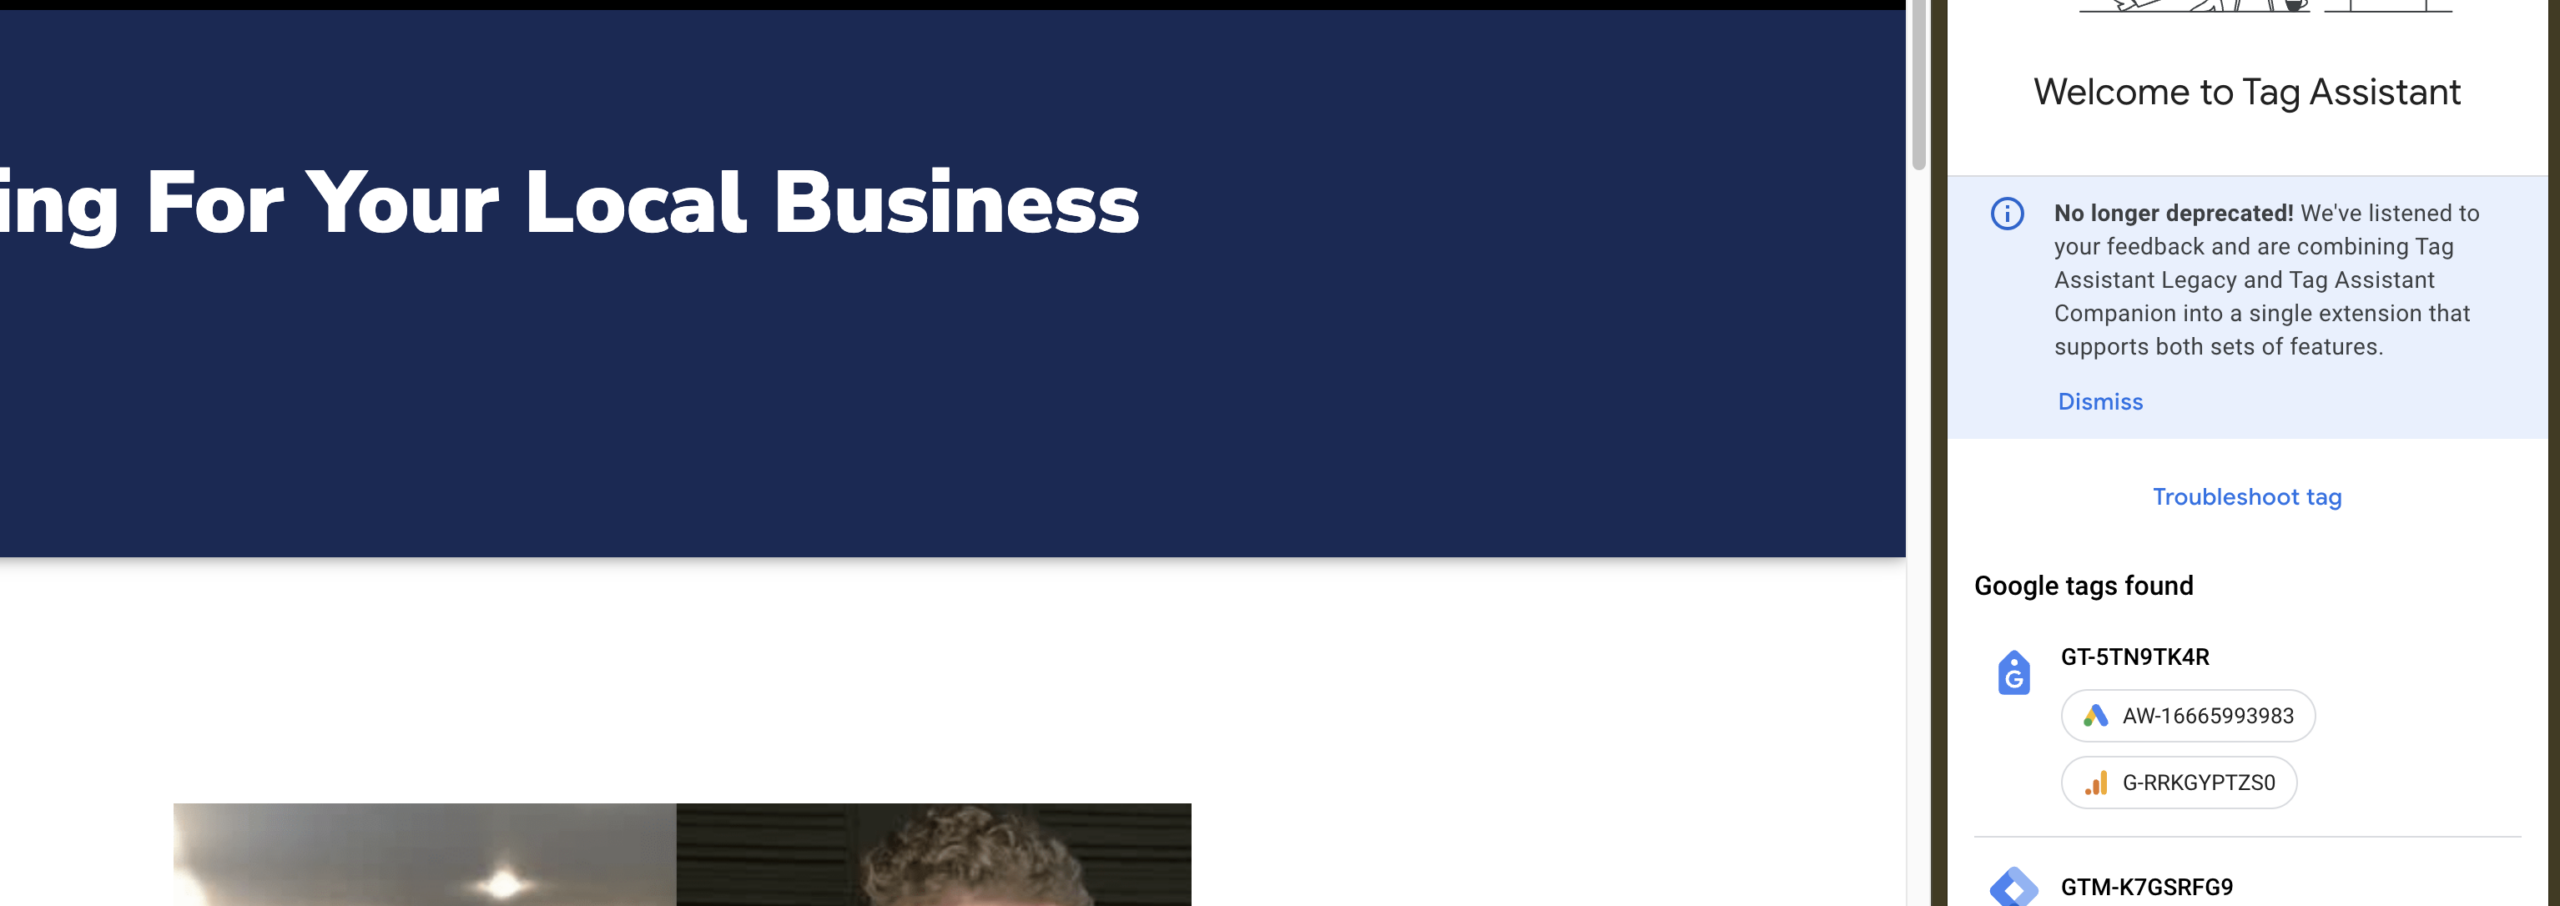
Ensuring that your website is correctly tagged with essential tools like Google Tags, Google Analytics, and Google Tag Manager is crucial for effective digital marketing and data-driven decision-making. In the “How to Check if a Website is Tagged Properly” video, you learn how to verify the installation of these tags using the Google Tag Assistant Chrome extension. This comprehensive guide will expand on those instructions, providing you with detailed steps, best practices, and additional insights to ensure your website is accurately tagged for optimal performance and analytics.
Why Proper Tag Installation Matters
Accurate tagging of your website is fundamental for tracking user interactions, measuring campaign effectiveness, and optimizing your marketing strategies. Here’s why it’s essential:
Enhanced Data Collection
Proper tags ensure that you collect accurate and comprehensive data about your website visitors’ behaviors, interactions, and conversions. This data is invaluable for understanding your audience and improving your website’s performance.
Improved Marketing ROI
By accurately tracking conversions and user actions, you can better assess the effectiveness of your marketing campaigns. This allows you to allocate your budget more efficiently, focusing on strategies that yield the highest return on investment (ROI).
Better User Experience
Tags help you understand how users interact with your website, enabling you to make informed decisions about website design and functionality. Enhancing user experience can lead to higher engagement and increased conversions.
Compliance and Security
Proper tag management ensures that your website complies with data privacy regulations, such as GDPR and CCPA. It also helps maintain the security and integrity of the data you collect.
Step-by-Step Guide to Checking Tag Installation
Follow these steps to verify that your website or any other website has Google Tags, Google Analytics, and Google Tag Manager installed properly using the Google Tag Assistant Chrome extension.
Step 1: Install the Google Tag Assistant Chrome Extension
- Access the Chrome Web Store:
- Open Google Chrome and navigate to the Chrome Web Store.
- Search for Google Tag Assistant:
- In the search bar, type “Google Tag Assistant” and press Enter.
- Add the Extension to Chrome:
- Locate the Google Tag Assistant extension in the search results.
- Click on the Add to Chrome button.
- Confirm the installation by clicking Add extension in the pop-up dialog.
- Pin the Extension for Easy Access:
- After installation, click on the puzzle piece icon (🔍) in the Chrome toolbar.
- Find Google Tag Assistant in the list and click the pin icon to add it to your extension bar for easy access.
Step 2: Verify Tag Installation on Your Website
- Navigate to the Website:
- Open a new tab and go to the website you want to check for tag installations.
- Activate the Google Tag Assistant:
- Click on the Google Tag Assistant icon in the Chrome toolbar.
- Analyze the Tag Status:
- The extension will display a small window indicating whether Google Tags are detected on the page.
- If Tags are Found:
- You will see details about the tags installed, including Google Analytics, Google Ads, and Google Tag Manager.
- The extension may provide additional information about each tag, such as version and any potential issues.
- If No Tags are Found:
- The extension will notify you that no Google Tags were detected on the page.
Step 3: Troubleshoot Common Tag Issues
- Tags Not Found:
- Check Tag Installation Code: Ensure that the tag codes for Google Analytics, Google Ads, and Google Tag Manager are correctly placed in the
<head>section of your website’s HTML. - Use Correct IDs: Verify that the IDs used in the tag codes match those in your respective Google accounts.
- Clear Browser Cache: Sometimes, cached data can prevent the latest tag codes from loading. Clear your browser cache and reload the page.
- Check Tag Installation Code: Ensure that the tag codes for Google Analytics, Google Ads, and Google Tag Manager are correctly placed in the
- Multiple Tags Detected:
- Consolidate Tags: Ensure that you only have one instance of each tag installed to avoid data discrepancies.
- Remove Duplicates: Delete any duplicate tag codes from your website’s HTML or CMS settings.
- Tag Errors or Warnings:
- Follow Google Tag Assistant Suggestions: The extension will provide specific warnings or errors. Address these based on the recommendations provided.
- Update Tag Codes: Ensure that your tag codes are up-to-date with the latest versions provided by Google.
Step 4: Test Tag Functionality
- Perform Test Actions:
- Navigate through your website and perform actions you want to track, such as filling out a form, making a purchase, or clicking a button.
- Check Google Tag Assistant:
- After performing each action, check the Google Tag Assistant to see if the corresponding tags are firing correctly.
- Verify Event Data:
- Ensure that the correct events are being tracked and that the data captured aligns with your tracking goals.
Best Practices for Tag Management
Implementing best practices ensures that your tags function correctly and provide accurate data for your marketing strategies.
Use Google Tag Manager for Easier Management
- Centralized Tag Management: Google Tag Manager (GTM) allows you to manage all your tracking codes in one place without modifying your website’s code directly.
- Simplified Updates: Easily add, update, or remove tags through GTM’s user-friendly interface.
Regularly Audit Your Tags
- Periodic Checks: Regularly use Google Tag Assistant to verify that your tags are functioning correctly and capturing the desired events.
- Monitor Tag Performance: Use Google Analytics and Google Ads to review tag data and ensure that your tracking aligns with your campaign objectives.
Implement Enhanced Tracking Features
- Enhanced Ecommerce: For ecommerce websites, enable Enhanced Ecommerce tracking in Google Analytics to gain deeper insights into user behavior and purchase patterns.
- Custom Events: Set up custom events in GTM to track specific user interactions that are unique to your business needs.
Maintain Consistency Across Platforms
- Uniform Tagging: Ensure that your tagging strategy is consistent across all web pages and marketing platforms to maintain data integrity.
- Cross-Device Tracking: Implement cross-device tracking to understand user behavior across different devices, enhancing your marketing strategies.
Protect Against Double Tracking
- Unique Triggers: Ensure that each tag has a unique trigger to prevent multiple tags from firing for a single action.
- Thorough Testing: Test your tag setup thoroughly to confirm that each action is tracked only once, maintaining accurate data collection.
Common Mistakes to Avoid
Avoiding these common pitfalls can enhance the effectiveness of your tag management efforts.
Incorrect Tag Placement
- Impact: Placing tag codes outside the
<head>section or on incorrect pages can prevent proper tracking. - Solution: Ensure that all tag codes are correctly placed in the
<head>section of every page you want to track.
Using Outdated Tag Codes
- Impact: Outdated tag codes can lead to inaccurate data collection and reduced functionality.
- Solution: Regularly update your tag codes to the latest versions provided by Google. Use GTM to manage and implement these updates seamlessly.
Ignoring Tag Errors
- Impact: Unresolved tag errors can compromise data accuracy and tracking reliability.
- Solution: Address any errors or warnings reported by Google Tag Assistant promptly. Follow the provided recommendations to resolve issues.
Overloading with Multiple Tags
- Impact: Installing too many tags can slow down your website and lead to data discrepancies.
- Solution: Only install necessary tags and regularly review your tag implementation to remove any redundant or unnecessary tags.
Neglecting Mobile Optimization
- Impact: Tags not optimized for mobile devices can result in incomplete tracking, as mobile and desktop versions of your website might behave differently.
- Solution: Test your tags on both mobile and desktop devices to ensure consistent tracking across all platforms.
Frequently Asked Questions
What is the Google Tag Assistant Chrome Extension?
The Google Tag Assistant is a Chrome extension developed by Google that helps you verify the correct installation of various Google tags on your website, including Google Analytics, Google Ads, and Google Tag Manager. It provides real-time feedback on tag functionality and highlights any issues or errors.
Do I Need Google Tag Manager to Use Google Tag Assistant?
No, Google Tag Assistant can be used independently of Google Tag Manager. However, using GTM simplifies the management and deployment of tags, making it easier to implement and maintain your tracking setup.
Can I Use Google Tag Assistant on Any Website?
Yes, you can use Google Tag Assistant to check tags on any website, not just your own. This is particularly useful for auditing competitor websites or learning how other businesses implement their tracking codes.
How Often Should I Audit My Tags?
It’s recommended to audit your tags at least once a month or whenever you make significant changes to your website’s structure or marketing strategies. Regular audits help ensure that your tags are functioning correctly and collecting accurate data.
What Should I Do If a Tag Isn’t Firing Correctly?
If a tag isn’t firing correctly, follow these steps:
- Check Tag Placement: Ensure the tag code is correctly placed in the website’s HTML.
- Verify Tag ID: Confirm that the tag ID matches the one in your Google account.
- Clear Cache: Clear your browser cache and reload the page.
- Disable Conflicting Extensions: Some browser extensions might interfere with tag firing. Try disabling them temporarily.
- Consult Google’s Documentation: Refer to Google’s official documentation or seek support if issues persist.
Maximizing the Impact of Proper Tag Installation
To fully leverage the benefits of a properly installed tagging system, integrate these strategies into your broader marketing and operational plans.
Align with Your Marketing Goals
- Define Clear Objectives: Identify what you want to achieve with your tracking setup, such as increasing conversions, improving user engagement, or enhancing campaign performance.
- Tailor Events to Goals: Set up specific events that align with your marketing objectives, ensuring that you capture the most relevant data for your analysis.
Use Data to Optimize Campaigns
- Analyze Conversion Data: Use the data collected by your tags to understand which campaigns, channels, and strategies are driving the most conversions.
- Refine Targeting: Adjust your ad targeting based on insights gained from tag data to reach more qualified audiences and improve campaign effectiveness.
Integrate with Other Marketing Tools
- CRM Integration: Connect your tagging data with your Customer Relationship Management (CRM) system to streamline lead management and follow-up processes.
- Email Marketing: Use tag data to create targeted email marketing campaigns based on user interactions and behaviors on your website.
Leverage Advanced Analytics Features
- Enhanced Ecommerce: For ecommerce websites, implement Enhanced Ecommerce tracking to gain deeper insights into customer purchase behavior and product performance.
- Custom Dashboards: Create custom dashboards in Google Analytics to visualize and monitor the most important metrics for your business.
Foster Team Collaboration
- Training and Guidelines: Ensure that all team members understand the importance of accurate tagging and are trained on how to manage and troubleshoot tags using GTM and Google Tag Assistant.
- Shared Responsibilities: Distribute tag management tasks among team members to maintain efficiency and accuracy in your tracking setup.
Conclusion
Ensuring that your website is properly tagged with Google Tags, Google Analytics, and Google Tag Manager is essential for capturing accurate data, optimizing your marketing strategies, and driving business growth. By following the step-by-step guide provided in this post, implementing best practices, and avoiding common mistakes, you can ensure that your tagging setup is both accurate and effective. Regularly audit your tags and stay updated with the latest tracking technologies to maintain a robust and insightful analytics system that supports your business objectives.
How to Setup Conversion Tracking for Lead Form Submissions in Google Ads Using Google Tag Manager
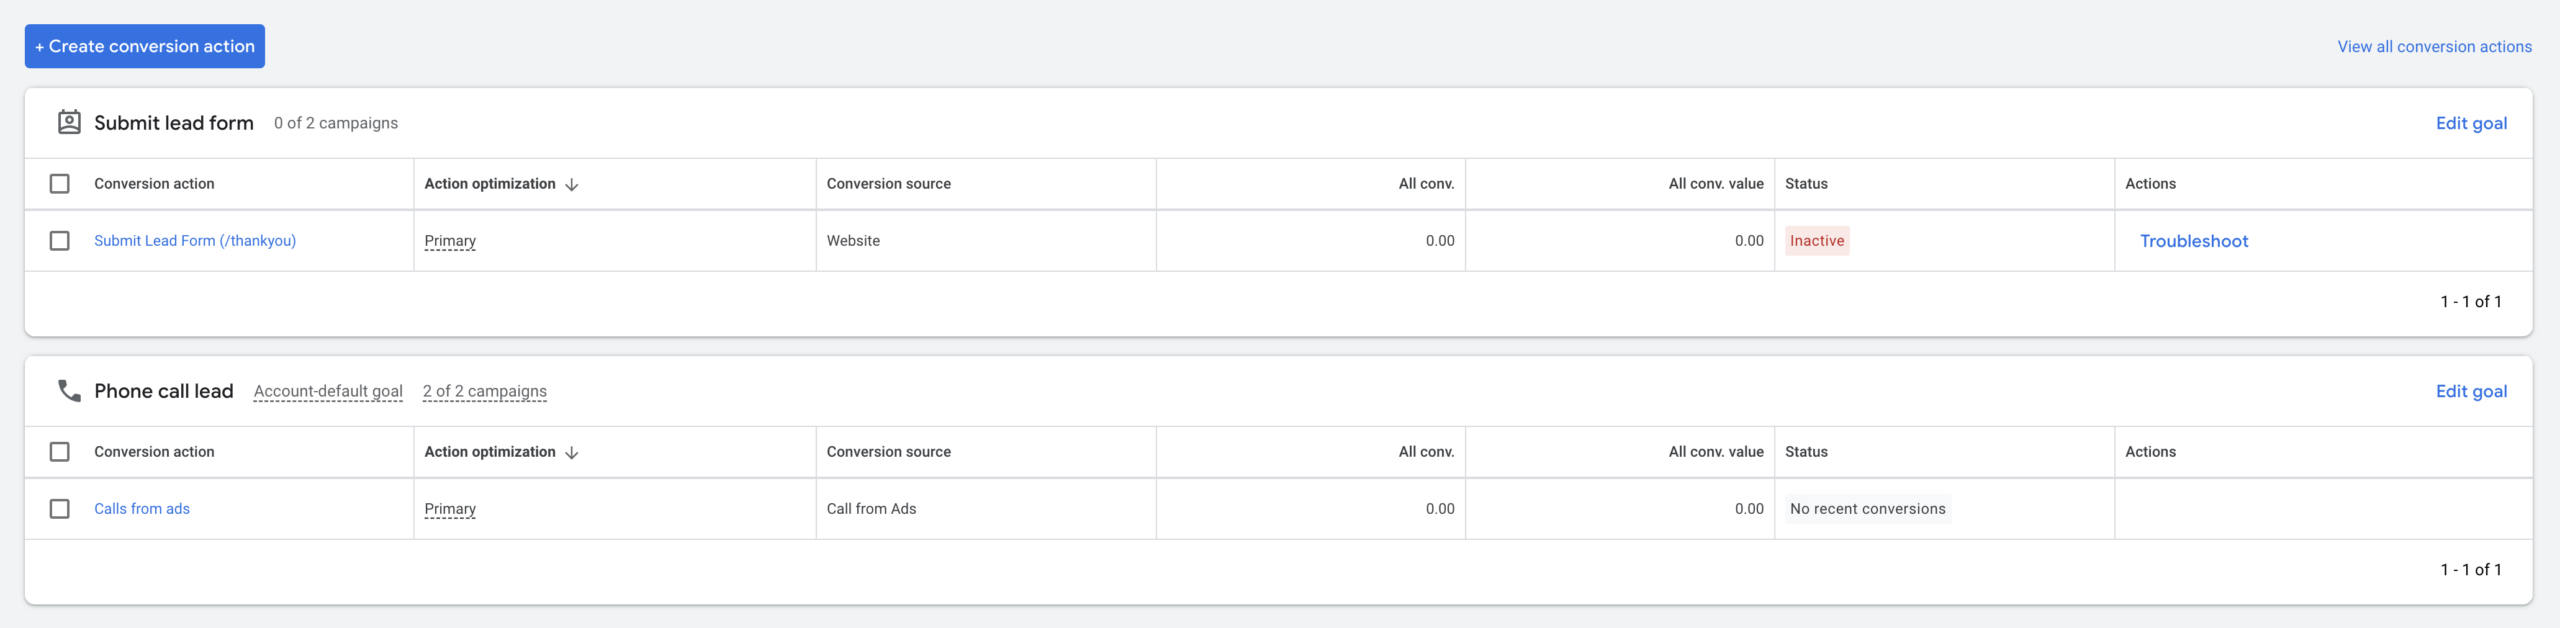
Effective conversion tracking is a cornerstone of successful digital marketing strategies. By accurately tracking lead form submissions, home-service businesses can measure the effectiveness of their Google Ads campaigns, optimize their marketing efforts, and ultimately drive more qualified leads. In the “How to Setup Conversion Tracking for Lead Form Submissions in Google Ads Using Google Tag Manager” video, you learn a streamlined process to implement this tracking mechanism. This comprehensive guide will expand on those instructions, providing you with detailed steps, best practices, and additional insights to ensure your conversion tracking setup is both accurate and efficient.
Why Conversion Tracking Matters
Conversion tracking allows you to understand how well your ads are performing in driving desired actions, such as lead form submissions. Here’s why it’s essential:
Measure Campaign Effectiveness
By tracking conversions, you can determine which ads, keywords, and campaigns are generating the most leads. This data is crucial for making informed decisions about where to allocate your marketing budget for maximum ROI.
Optimize Ad Spend
Understanding which aspects of your campaigns are performing well enables you to optimize your ad spend. You can increase investment in high-performing areas while reducing or eliminating spend on underperforming segments.
Improve Targeting and Messaging
Conversion data provides insights into your audience’s behavior and preferences. This information can help you refine your targeting strategies and craft more compelling ad messages that resonate with potential customers.
Enhance Overall Marketing Strategy
Integrating conversion tracking with your broader marketing efforts allows for a more cohesive and effective strategy. It helps you align your online advertising with your business goals, ensuring that your marketing activities contribute directly to your bottom line.
Step-by-Step Guide to Setting Up Conversion Tracking
Follow these detailed steps to set up conversion tracking for lead form submissions in Google Ads using Google Tag Manager (GTM).
Step 1: Create a Conversion Action in Google Ads
- Sign In to Your Google Ads Account
- Navigate to Google Ads and log in with your credentials.
- Access the Conversions Section
- In the top menu, click on the Tools and Settings icon (🔧).
- Under the Measurement section, select Conversions.
- Create a New Conversion Action
- Click on the + New conversion action button.
- Choose Website as the source of the conversion.
- Configure the Conversion Action
- Category: Select Lead to categorize the conversion appropriately.
- Conversion Name: Enter a descriptive name, such as “Lead Form Submission.”
- Value: Choose whether to assign a value to each conversion. For simplicity, you can select Don’t use a value if you prefer not to assign monetary values.
- Count: Select One to count each conversion only once per ad interaction.
- Set Up the Tag
- Under Tag setup, choose Use Google Tag Manager.
- Note down the Conversion ID and Conversion Label provided. You will need these for GTM.
- Finalize and Save
- Click Done to save your new conversion action.
Step 2: Configure Google Tag Manager
- Sign In to Your Google Tag Manager Account
- Navigate to Google Tag Manager and log in.
- Select Your Container
- Choose the container associated with your website where you want to implement the conversion tracking.
- Create a New Tag
- Click on Tags in the left-hand menu.
- Click the New button to create a new tag.
- Name the Tag: For example, “Google Ads Lead Form Conversion.”
- Set Up the Tag Configuration
- Click on Tag Configuration and select Google Ads Conversion Tracking.
- Enter the Conversion ID and Conversion Label you obtained from Google Ads.
- Set Up the Trigger
- Click on Triggering and then the + icon to add a new trigger.
- Name the Trigger: For example, “Lead Form Submission.”
- Choose Trigger Type: Select Page View.
- Configure Trigger:
- Choose Some Page Views.
- Set the condition to trigger on the thank-you page URL. For instance, if your thank-you page URL contains
/contact/thank-you, set the condition as:- Page URL contains
/contact/thank-you.
- Page URL contains
- Click Save to finalize the trigger.
- Save and Publish the Tag
- After configuring the tag and trigger, click Save.
- Click on Submit in the top-right corner.
- Enter a version name and description (e.g., “Added Lead Form Conversion Tracking”).
- Click Publish to make the changes live.
Step 3: Verify the Conversion Tracking Setup
- Use Google Tag Assistant
- Install the Google Tag Assistant Chrome extension to verify that your tags are firing correctly.
- Navigate to your website and submit a lead form to trigger the thank-you page.
- Check in Google Ads
- Go back to your Google Ads account.
- In the Conversions section, verify that the conversion was recorded.
- Test Multiple Times
- Submit the lead form multiple times to ensure consistency in tracking.
Best Practices for Conversion Tracking
Implementing best practices ensures that your conversion tracking setup is both accurate and effective.
Ensure Accurate Thank-You Page URL
- Unique URL: Make sure that the thank-you page has a unique URL that can be easily targeted with your trigger.
- Consistent Naming: Use consistent naming conventions for URLs to simplify trigger setup.
Utilize Descriptive Naming Conventions
- Tag Names: Name your tags descriptively (e.g., “Google Ads Lead Conversion”) to easily identify them in GTM.
- Trigger Names: Similarly, name triggers clearly to avoid confusion when managing multiple tags.
Regularly Monitor Conversion Data
- Analyze Trends: Regularly review your conversion data in Google Ads to identify trends and areas for improvement.
- Adjust Campaigns: Use the insights gained from conversion data to refine your ad targeting, messaging, and budget allocation.
Maintain Consistency Across Platforms
- Google Business Profile: Ensure that your business information is consistent across your Google Business Profile and website.
- Other Tracking Tools: If you use other tracking tools (e.g., Google Analytics), ensure they are integrated and synchronized with your conversion tracking setup.
Protect Against Double Tracking
- Unique Triggers: Ensure that each conversion action has a unique trigger to prevent multiple tags from firing for a single action.
- Testing: Thoroughly test your setup to confirm that each lead form submission is tracked only once.
Common Mistakes to Avoid
Avoiding these common pitfalls can enhance the effectiveness of your conversion tracking efforts.
Incomplete Tag Setup
- Impact: Incomplete or incorrect tag setup can lead to missed conversions and inaccurate data.
- Solution: Follow each step meticulously and verify each part of the setup using testing tools.
Ignoring Mobile Users
- Impact: Failing to account for mobile users can result in incomplete tracking, as mobile and desktop versions of your website might behave differently.
- Solution: Test your conversion tracking on both mobile and desktop devices to ensure consistency.
Not Updating After Website Changes
- Impact: Changes to your website structure or URL can break your conversion tracking setup.
- Solution: Update your GTM triggers and tags immediately after making significant changes to your website.
Overcomplicating the Setup
- Impact: An overly complex setup can lead to errors and make troubleshooting difficult.
- Solution: Keep your conversion tracking setup as simple and straightforward as possible, focusing on essential actions.
Neglecting Regular Audits
- Impact: Over time, tracking setups can become outdated or accumulate errors, leading to inaccurate data.
- Solution: Conduct regular audits of your conversion tracking setup to ensure it remains accurate and effective.
Frequently Asked Questions
Do I Need Google Tag Manager to Track Conversions?
No, you don’t necessarily need Google Tag Manager to track conversions. However, using GTM simplifies the process of managing and deploying tracking codes without needing to modify your website’s code directly. It offers greater flexibility and ease of use, especially for businesses with multiple tracking needs.
How Can I Assign a Value to Each Conversion?
When setting up your conversion action in Google Ads, you can choose to assign a specific value to each conversion. This value can represent the average revenue you expect from a lead or the importance of the lead to your business. Assigning values helps in measuring the ROI of your campaigns more accurately.
Can I Track Multiple Forms on My Website?
Yes, you can track multiple lead forms by creating separate conversion actions and corresponding tags and triggers in Google Tag Manager. Ensure each form redirects to a unique thank-you page or uses specific identifiers to differentiate between them.
What If My Thank-You Page URL Changes?
If your thank-you page URL changes, you must update the trigger condition in Google Tag Manager to match the new URL. Failing to do so will result in conversions not being tracked correctly.
How Do I View Conversion Data in Google Ads?
After setting up conversion tracking, go to the Conversions section in Google Ads. Here, you can view detailed reports on the number of conversions, conversion rate, cost per conversion, and other relevant metrics. Use these insights to evaluate and optimize your campaigns.
Maximizing the Impact of Conversion Tracking
To fully leverage the benefits of conversion tracking, integrate these strategies into your broader marketing and operational plans.
Align with Your Marketing Goals
- Goal-Oriented Tracking: Define clear marketing goals and ensure your conversion actions align with these objectives. Whether it’s generating leads, sales, or sign-ups, track actions that directly contribute to your goals.
- Campaign Optimization: Use conversion data to optimize your marketing campaigns. Allocate more budget to high-performing ads and refine underperforming ones based on conversion insights.
Integrate with CRM Systems
- Seamless Data Flow: Connect your conversion tracking with your Customer Relationship Management (CRM) system to streamline lead management and follow-up processes.
- Enhanced Lead Nurturing: Use the data from conversions to segment your leads and tailor your nurturing strategies, increasing the likelihood of converting leads into customers.
Utilize Advanced Analytics
- Multi-Channel Attribution: Understand how different marketing channels contribute to conversions. Use this information to develop a multi-channel attribution model that accurately reflects your marketing efforts.
- Behavioral Insights: Analyze user behavior post-conversion to gain deeper insights into your customers’ journey. This can help in refining your marketing strategies and improving customer retention.
Foster Team Collaboration
- Shared Goals: Ensure that all team members understand the importance of conversion tracking and work collaboratively to achieve common marketing goals.
- Training and Support: Provide training on using Google Ads and Tag Manager effectively. Ensure that team members are equipped to manage and troubleshoot the tracking setup.
Enhance Customer Experience
- Personalized Follow-Ups: Use conversion data to personalize follow-up communications with leads, addressing their specific needs and increasing engagement.
- Responsive Service: Ensure that your team promptly responds to leads tracked through conversions. A swift response can significantly improve conversion rates and customer satisfaction.
Conclusion
Setting up conversion tracking for lead form submissions in Google Ads using Google Tag Manager is a vital step for home-service businesses aiming to optimize their marketing efforts and drive more qualified leads. By following the detailed steps outlined in this guide, implementing best practices, and avoiding common mistakes, you can ensure that your conversion tracking setup is both accurate and effective. Proper conversion tracking not only enhances your ability to measure campaign performance but also provides valuable insights to refine your marketing strategies, ultimately leading to sustained business growth and success.