
Capturing leads through contact forms is a fundamental strategy for businesses looking to grow their customer base and enhance engagement. However, without timely notifications, valuable leads can go unnoticed, leading to missed opportunities and reduced conversion rates. If you’re using Elementor on your WordPress website, setting up email notifications for form submissions is a straightforward process that ensures you never miss a lead. This comprehensive guide will walk you through the steps to configure email notifications for Elementor forms, helping you stay responsive and capitalize on every opportunity.
Why Email Notifications for Form Submissions Matter
Email notifications play a crucial role in managing and responding to leads effectively. Here’s why setting up email alerts for your Elementor forms is essential:
Benefits of Email Notifications
- Immediate Awareness: Receive instant alerts when a visitor submits a form, allowing you to respond promptly.
- Enhanced Customer Engagement: Timely responses to inquiries can significantly improve customer satisfaction and increase the likelihood of conversions.
- Efficient Lead Management: Keep track of all form submissions in real-time, ensuring that no leads are overlooked.
- Optimized Marketing Efforts: Monitor the effectiveness of your forms and marketing campaigns by analyzing the volume and quality of submissions.
Step-by-Step Guide to Setting Up Email Notifications in Elementor
Follow these detailed steps to configure email notifications for your Elementor forms, ensuring you stay informed about every lead submission.
Step 1: Access Your WordPress Dashboard
- Log In to WordPress:
- Open your web browser and navigate to
yourwebsite.com/wp-admin.Enter your username and password, then click Log In to access your dashboard.
- Open your web browser and navigate to
Step 2: Navigate to the Page with Your Elementor Form
- Go to Pages:
- In the left-hand sidebar, click on Pages.Select the page that contains the Elementor form you want to modify and click Edit with Elementor.
Step 3: Select and Configure the Form Widget
- Locate the Form:
- In the Elementor editor, scroll to the section containing your form.
- Click on the form to select the Form Widget.
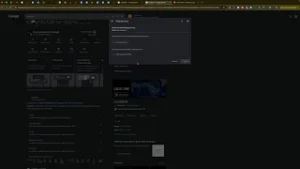
- Access Form Settings:
- Once the form is selected, the Form settings panel will appear on the left side of the screen.
Step 4: Add Email Action After Submit
- Go to Content Tab:
- In the Form settings panel, ensure you are in the Content tab.
- Configure Actions After Submit:
- Scroll down to the Actions After Submit section.By default, you might see actions like Collect Submissions and Email.If Email is not listed, click on the Add Action dropdown and select Email.
Step 5: Customize Email Notification Settings
- Email Content Configuration:
- Under the Email tab, you can customize various aspects of the email notification:
- To: Enter the email addresses where you want to receive form submissions. Separate multiple emails with commas (e.g.,
you@example.com, team@example.com).From Name: Set the name that will appear as the sender of the email.From Email: Specify the email address that will appear as the sender. It’s recommended to use an email associated with your domain to improve deliverability.Reply-To: Optionally, set a reply-to email address where responses can be sent.Subject: Customize the subject line to make it easily identifiable (e.g., “New Lead Submission from Your Website”).Message: Configure the email content. Use the Insert dropdown to add form fields dynamically, ensuring all relevant information is included.
- To: Enter the email addresses where you want to receive form submissions. Separate multiple emails with commas (e.g.,
- Under the Email tab, you can customize various aspects of the email notification:
- Ensure All Fields are Included:
- To capture all necessary information from the form, ensure that your message template includes all relevant fields.
Step 6: Add a Redirect Action (Optional)
- Add Redirect Action:
- In the Actions After Submit section, click on the Add Action dropdown and select Redirect.This action allows you to send users to a thank-you page after they submit the form, enhancing the user experience and enabling better tracking.
- Configure Redirect Settings:
- Enter the URL of your thank-you page.
- Click Update to save the redirect settings.
Step 7: Save and Test Your Form
- Save Changes:
- Click the Update button at the bottom of the Elementor panel to save all your changes.
- Test the Form:
- Visit the page containing the form on your website.Submit a test entry to ensure that you receive the email notification as configured.Check Spam Folder: If the test email doesn’t appear in your inbox, check your spam folder and mark it as “Not Spam” to improve future deliverability.
Step 8: Monitor and Optimize
- Ensure Reliability:
- Regularly test your form to confirm that email notifications are working correctly.
- Monitor your email deliverability and make adjustments as needed (e.g., using a transactional email service like SendGrid or Mailgun for better reliability).
- Enhance Tracking:
- Integrate with tools like Google Tag Manager and Google Analytics to track form submissions and optimize your marketing campaigns based on conversion data.
Best Practices for Managing Email Notifications
Implementing best practices ensures that your email notifications are effective, reliable, and contribute positively to your lead management strategy.
1. Use a Professional From Email Address
- Domain-Related Email: Use an email address associated with your domain (e.g.,
info@yourwebsite.com) to improve deliverability and avoid being marked as spam.
2. Customize Subject Lines
- Clarity: Ensure subject lines clearly indicate the purpose of the email (e.g., “New Contact Form Submission”).
- Relevance: Include relevant information such as the source of the submission or the page it was submitted from.
3. Include All Relevant Form Fields
- Comprehensive Information: Ensure that all necessary form fields are included in the email content to provide a complete overview of the lead.
4. Set Up Multiple Recipients
- Team Collaboration: Add multiple email addresses to the To field to ensure that relevant team members receive the notifications and can follow up promptly.
5. Avoid Overloading with Notifications
- Filter Emails: Use email filtering rules to manage incoming form notifications efficiently, preventing your inbox from becoming cluttered.
Common Mistakes to Avoid
Avoiding these common pitfalls can enhance the effectiveness of your email notifications and ensure you never miss a valuable lead.
1. Leaving the Email Field Empty
- Issue: Not specifying an email address in the To field means you won’t receive any form submissions.
- Solution: Always enter at least one valid email address in the To field when configuring email actions.
2. Using Generic Subject Lines
- Issue: Generic or unclear subject lines can make it difficult to identify the purpose of the email quickly.
- Solution: Customize subject lines to be specific and descriptive, indicating the form’s purpose or the source of the submission.
3. Ignoring Spam Folder Issues
- Issue: Form submission emails may end up in the spam folder, causing you to miss important leads.
- Solution: Regularly check your spam folder during testing and mark emails as “Not Spam” to improve future deliverability.
4. Not Testing After Configuration
- Issue: Failing to test the form after setting up email notifications can leave you unaware of potential issues.
- Solution: Always perform test submissions to ensure that email notifications are functioning as expected.
5. Overcomplicating Email Content
- Issue: Including too much information or unnecessary fields can make emails cluttered and hard to read.
- Solution: Focus on essential information and organize the email content for clarity and ease of use.
Frequently Asked Questions
Can I Use Multiple Email Actions in Elementor Forms?
Yes, Elementor allows you to add multiple email actions. You can send notifications to different email addresses or customize emails for different purposes by adding multiple Email actions in the Actions After Submit section.
How Can I Improve Email Deliverability for Form Notifications?
- Use a Reliable SMTP Service: Consider using SMTP plugins like WP Mail SMTP to ensure your emails are sent reliably.
- Authenticate Your Email: Set up SPF, DKIM, and DMARC records for your domain to improve email authentication and reduce the likelihood of emails being marked as spam.
- Avoid Spam Trigger Words: Ensure your email content doesn’t include words or phrases commonly associated with spam.
Is It Possible to Customize the Email Template?
Yes, you can customize the email template by editing the Message section in the Email action. Use Elementor’s dynamic tags to include form fields and format the content to suit your needs.
Can I Redirect Users to Different Pages Based on Form Inputs?
Yes, using conditional logic in Elementor Pro, you can set up different redirect URLs based on user inputs. This requires more advanced configurations but allows for personalized user experiences.
How Do I Handle Form Submissions if Emails Fail to Send?
- Backup Methods: Consider integrating form submissions with CRM systems or using third-party form handling services as a backup.
- Monitor Notifications: Regularly monitor your email deliverability and address any issues promptly to ensure you receive all form submissions.
Maximizing the Impact of Email Notifications
To fully leverage the benefits of email notifications for Elementor forms, integrate these strategies into your broader lead management and marketing efforts.
1. Integrate with CRM Systems
- Seamless Lead Management: Connect your form submissions with Customer Relationship Management (CRM) systems like HubSpot or Salesforce to streamline lead tracking and follow-up processes.
- Automated Workflows: Set up automated workflows to nurture leads based on their form submissions, improving conversion rates.
2. Enhance Follow-Up Strategies
- Timely Responses: Respond to form submissions promptly to increase the chances of converting leads into customers.
- Personalized Communication: Use the information collected from the form to personalize your follow-up emails and interactions.
3. Analyze Form Performance
- Track Conversion Rates: Use analytics tools to monitor the performance of your forms, identifying which forms are generating the most leads.
- Optimize Form Fields: Analyze which form fields are most frequently filled out and optimize them for better user engagement and higher submission rates.
4. Utilize A/B Testing
- Test Different Configurations: Experiment with different email templates, subject lines, and form designs to determine what works best for your audience.
- Measure Effectiveness: Use A/B testing results to refine your forms and email notifications for optimal performance.
5. Ensure Mobile Responsiveness
- Optimize for Mobile Users: Ensure that your forms are responsive and function correctly on all devices, as a significant portion of users access websites via mobile devices.
- Test Across Devices: Regularly test your forms on various devices and screen sizes to ensure a seamless user experience.
Conclusion
Setting up email notifications for your Elementor forms on WordPress is a simple yet powerful way to ensure you capture every lead and respond promptly. By following this step-by-step guide, you can configure your forms to send customized email alerts, enhancing your lead management and marketing efforts. Remember to implement best practices, avoid common mistakes, and continuously monitor and optimize your forms to maximize their effectiveness. With reliable email notifications in place, you can focus on nurturing leads and growing your business with confidence.