Integrating a live chat widget on your website is an effective way to engage visitors and boost conversions. In this guide, we’ll walk you through installing the Podium chat widget using Google Tag Manager (GTM) on your website. Podium’s chat widget is designed to help you capture leads, answer customer queries, and drive more conversions through real-time interactions. If you’re running a home service business or any business that relies on quick customer communication, adding this widget can be a game changer.
Why Use the Podium Chat Widget?
Podium is a powerful tool that offers an array of features to help businesses improve customer engagement and increase conversions. With the chat widget installed on your website, you can:
- Capture More Leads: Engage website visitors instantly and convert them into potential customers.
- Enhance Customer Support: Provide real-time support, answer questions, and resolve issues quickly.
- Boost Conversions: Directly interact with visitors during their decision-making process, leading to increased sales.
- Customize User Experience: Tailor the widget’s appearance and behavior to match your brand identity and specific business needs.
Using Google Tag Manager to install the Podium widget streamlines the process, allowing you to manage and update tracking codes without modifying your website’s source code.
Overview of the Installation Process
This guide explains how to install the Podium chat widget using GTM. We will cover the following key steps:
- Setting Up in Podium: How to access your Podium account and get the widget code.
- Configuring Google Tag Manager: How to add a new tag in GTM and paste the widget code.
- Deploying the Tag: How to trigger the widget on all pages of your website.
- Verifying the Installation: Testing your setup to ensure the widget appears correctly.
Step 1: Retrieve the Podium Chat Widget Code
Before you can add the widget via GTM, you need to access the Podium chat widget code from your Podium account.
Access Your Podium Account
- Sign In to Podium:
- Log in to your Podium account using your credentials.
- Ensure that you select the correct location if you manage multiple businesses or have several locations.
- Navigate to Lead Sources:
- Once logged in, go to the Lead Sources section in your Podium dashboard.
- Select Web Chat to access the chat widget options.
- Get Your Widget Code:
- Click on Widget Options (often represented by three dots in the upper right corner).
- Locate the widget code and click Copy to copy it to your clipboard.
Step 2: Configure Google Tag Manager
With your Podium widget code copied, the next step is to set up a new tag in Google Tag Manager (GTM) to deploy the widget.
Log In to Google Tag Manager
- Access GTM:
- Open your browser and go to Google Tag Manager.
- Log in with the correct account credentials. Make sure you’re in the right GTM account for the website you want to modify.
- Select the Correct Container:
- From the GTM dashboard, select the container associated with your website. This ensures that any changes you make will only affect the intended site.
Create a New Tag for Podium
- Go to Workspace and Tags:
- In your GTM account, click on Workspace from the top left menu.
- Then, select Tags in the left-hand sidebar.
- Add a New Tag:
- Click on the New button in the top right corner to create a new tag.
- Name your tag (for example, “Podium Chat Widget – 1”).
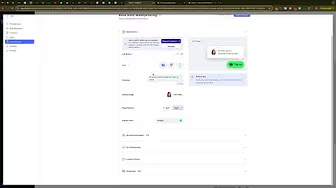
- Configure the Tag:
- Under Tag Configuration, select Custom HTML.
- Paste the Podium chat widget code you copied from your Podium account into the HTML field.
- Ensure the code is pasted correctly; this script is what will load the chat widget on your website.
Set Up Tag Triggering
- Choose Your Trigger:
- In the Triggering section, select All Pages. This will ensure the Podium chat widget loads on every page of your website, making it accessible to all visitors.
- Save Your Tag:
- Once the tag configuration and trigger settings are complete, click Save to finalize the tag setup.
Step 3: Deploy and Verify Your Podium Chat Widget
With your new tag created in GTM, it’s time to deploy it on your website and verify that it works correctly.
Publish Your Changes in GTM
- Submit Your Container:
- Click the Submit button in GTM to publish your changes.
- Optionally, add a version name or description (e.g., “Installed Podium Chat Widget”) to help keep track of updates.
- Confirm the Deployment:
- Once submitted, your GTM container will update, and the Podium chat widget should now be live on your website.
Test the Widget on Your Website
- Visit Your Website:
- Open your website in a new browser tab and navigate through a few pages.
- Look for the Podium chat widget—typically a chat box icon—on the pages.
- Perform a Test Submission:
- Interact with the widget to ensure it functions correctly.
- Check if the widget loads as expected and if its appearance matches any customizations you’ve set up in Podium.
- Debug if Necessary:
- If the widget does not appear, return to GTM and use the Preview mode to debug the tag.
- Verify that the correct code is pasted and that the trigger is set to All Pages.
Customizing the Podium Chat Widget
While the installation process using GTM gets the widget live, Podium also offers options to customize its appearance and functionality. Customizations can include:
Appearance Settings
- Theme and Colors: Adjust the color scheme of the chat widget to match your website’s branding.
- Layout Options: Configure the size and position of the widget on the page.
- Custom Greetings: Set up personalized greetings or messages that appear when a visitor interacts with the widget.
Advanced Functionality
- Automated Responses: Configure autoresponders to engage visitors immediately after they initiate a chat.
- Lead Collection: Integrate lead capture forms within the chat widget to collect visitor information.
- Analytics Integration: Connect the widget with your analytics tools to track conversions and interactions effectively.
For detailed customizations, refer to Podium’s own documentation or explore additional videos on our channel that dive into these advanced features.
Best Practices for Implementing Chat Widgets
Implementing a chat widget is not just about installation—it’s also about ensuring it enhances user experience and drives conversions. Here are some best practices:
1. Ensure Responsive Design
- Mobile-Friendly: Make sure the chat widget is optimized for mobile devices, as a significant portion of your traffic may come from smartphones and tablets.
- Fast Loading: Optimize the widget to load quickly without affecting the overall performance of your website.
2. Maintain Consistent Branding
- Visual Consistency: Use colors, fonts, and imagery that align with your brand identity.
- Professional Tone: Ensure that any automated messages or responses are written in a tone that reflects your brand’s personality.
3. Monitor and Analyze Performance
- Track Engagement: Use tools like Google Analytics and GTM to monitor how users interact with your chat widget.
- Adjust Strategies: Based on performance data, fine-tune the widget’s settings and messages to improve conversion rates.
4. Provide Clear Calls-to-Action
- Encourage Interaction: Use clear and compelling calls-to-action (CTAs) to prompt visitors to engage with the chat widget.
- Follow-Up Mechanisms: Implement a system to follow up on leads captured through the chat widget promptly.
5. Regularly Update and Test
- Ongoing Testing: Periodically test the chat widget to ensure it remains functional and effective.
- Stay Current: Update the widget’s customizations as needed to reflect changes in your branding or marketing strategies.
Common Pitfalls and How to Avoid Them
Even with the best tools, some common issues can arise during the installation and use of chat widgets. Here are a few pitfalls and how to avoid them:
1. Incorrect Code Pasting
- Impact: A misplaced or incomplete script can prevent the widget from loading.
- Solution: Double-check the Podium code in GTM to ensure it’s correctly pasted without any modifications.
2. Wrong Trigger Settings
- Impact: If the tag trigger isn’t set to All Pages, the widget may not appear on every page of your website.
- Solution: Verify the trigger settings in GTM and test the widget on multiple pages.
3. Conflicts with Other Scripts
- Impact: Other scripts or plugins might conflict with the Podium widget, causing it to malfunction.
- Solution: Use GTM’s preview mode to test for conflicts and adjust the tag sequencing if necessary.
4. Delayed Widget Loading
- Impact: Slow widget loading can negatively affect user experience and engagement.
- Solution: Ensure that your GTM container is published correctly and that your website’s performance isn’t compromised by excessive script loading.
5. Lack of Customization
- Impact: A generic widget that doesn’t reflect your brand may fail to engage users.
- Solution: Take advantage of Podium’s customization options to tailor the widget’s appearance and functionality to your specific needs.
Frequently Asked Questions
How Do I Know if the Podium Chat Widget is Working?
After publishing your GTM container, visit your website and check for the presence of the chat widget. Interact with it to ensure that it loads correctly and that automated responses or lead capture functions are working as expected.
Can I Customize the Appearance of the Podium Chat Widget?
Yes, Podium provides several customization options, including color schemes, layouts, and custom greetings. You can adjust these settings within your Podium account under Widget Options.
What Should I Do if the Widget Doesn’t Load?
If the widget fails to load, use GTM’s Preview mode to troubleshoot the tag. Verify that the correct code is pasted, that the trigger is set to All Pages, and that there are no conflicts with other scripts on your website.
Is It Necessary to Use Google Tag Manager to Install Podium?
While there are multiple methods to install Podium, using Google Tag Manager offers a centralized and efficient way to manage your tracking scripts. It also simplifies updates and troubleshooting, especially if you manage multiple tags on your site.
How Can I Track the Effectiveness of My Chat Widget?
Integrate your chat widget with analytics tools like Google Analytics and GTM. Set up conversion tracking to monitor how many leads the widget generates and use this data to optimize your marketing strategy.
Conclusion
Installing the Podium chat widget on your website using Google Tag Manager is an effective way to boost customer engagement and improve conversion rates. By following the steps outlined in this guide, you can seamlessly integrate the widget into your website and customize its functionality to align with your brand. Remember to regularly test and update the widget to ensure optimal performance and to track its impact on your marketing efforts.
Leveraging tools like GTM not only simplifies the installation process but also provides the flexibility to manage various tracking codes in one place. Whether you’re a home service business or any other type of business looking to enhance online interactions, the Podium chat widget can be a valuable addition to your digital marketing strategy.