Understanding how to add a redirect on a GoHighLevel form before or after the submission button is pressed can significantly improve user navigation and conversion rates on your website. Whether you’re guiding visitors to a thank-you page, an upsell offer, or a specific action, redirects play an essential role in funnel optimization.
In this comprehensive guide, we’ll cover two distinct methods to set up redirects on your GoHighLevel forms:
- Redirecting after form submission
- Redirecting based on specific actions within the form
By the end of this guide, you’ll be fully equipped to implement effective redirects tailored to your marketing strategies.
Why Use Redirects on Your GoHighLevel Forms?
Using redirects on your forms has numerous benefits, including:
- Improved User Experience: Direct visitors to relevant content or offers.
- Enhanced Tracking: Better track conversions and user behavior.
- Higher Conversions: Seamlessly guide visitors through your sales funnel.
With these advantages in mind, let’s explore each method step-by-step.
Method 1: Redirecting After Submission
Redirecting users after they submit a form is the most common scenario. Here’s how to set it up:
Step 1: Open Your Form
Log in to your GoHighLevel account and navigate to your forms:
- Select the form you wish to add the redirect to.
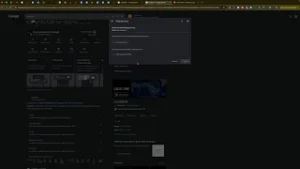
Step 2: Set Up the Redirect
- Click the Styles and Options (gear icon) on the right-hand side of your form.
- Select the Options tab.
- Under On Submit, you’ll typically see it set to “Default Message.”
- Change this setting to “Open URL.”
Step 3: Insert Your Desired URL
- Paste the URL you’d like visitors to land on after submitting the form.
- Ensure the URL is complete, including “https://”.
Step 4: Save and Publish
- Once the URL is entered, click Save.
- Test your form to verify the redirect works as intended.
Now, whenever a user submits your form, they’ll automatically be redirected to your chosen URL.
Method 2: Redirecting Based on Specific Form Actions
While less common, sometimes it’s beneficial to redirect users based on specific actions they take within your form—such as selecting a radio button or filling out an email address.
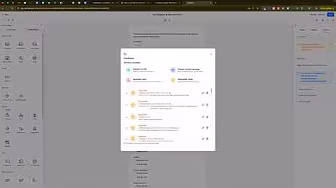
Step 1: Access Conditional Logic
- Open your form editor in GoHighLevel.
- Click “Conditional Logic” located on the top-left side of your screen.
Step 2: Set Up Conditional Redirect
- Select “Redirect to URL”.
- Define your condition clearly. For instance:
- If a specific field (e.g., Email) is filled out, the user gets redirected.
- You can set similar rules for radio buttons, checkboxes, or other specific inputs.
Step 3: Enter Your Redirect URL
- Enter the URL to which you want users redirected when the specified condition is met.
Step 4: Save Your Conditional Logic
- Click Save.
- Test your form thoroughly to ensure the conditional logic triggers the redirect properly.
Troubleshooting Common Redirect Issues
Sometimes, redirects might not behave as expected. Here’s how to solve common issues:
Issue: Redirect Not Working
- Ensure your URL is correctly entered.
- Confirm the conditional logic is correctly defined.
- Clear your browser cache or test using an incognito/private window.
Issue: Redirect Delay or Error
- Test your URLs separately in a new browser tab.
- Check for conflicting scripts or plugins within your page.
- Refresh your GoHighLevel integration settings.
Advanced Tips for Optimizing Redirects
To maximize your redirects’ effectiveness, consider these advanced tips:
- Utilize Analytics: Regularly monitor how many users follow your redirects to optimize your funnel.
- Use Relevant Content: Ensure your redirected pages align closely with user expectations from the form.
- A/B Testing: Experiment with different redirect URLs or landing pages to identify which yields higher engagement.
Practical Applications of Redirects
Redirects are versatile tools suitable for various marketing scenarios, such as:
- Guiding users to a personalized thank-you page after registration.
- Offering exclusive discounts after newsletter sign-ups.
- Directing users to relevant product pages based on their selections.
Conclusion
Mastering how to add a redirect on a GoHighLevel form before or after the submission button is pressed provides a powerful capability to optimize your customer journey, enhance engagement, and boost conversions. By following these clear and practical steps, you’ll confidently implement redirects tailored to your unique marketing needs.
Make redirects an integral part of your form strategy to deliver a seamless and impactful user experience today.