Effectively managing and tracking your website’s performance is crucial for business success. Google Tag Manager (GTM) is an indispensable tool that simplifies the process of adding and managing various tracking codes and scripts on your website without the need for constant code modifications. Whether you’re a home service business owner or managing any other type of website, setting up GTM correctly ensures you can monitor and optimize your marketing efforts seamlessly. This comprehensive guide will walk you through the process of creating a Google Tag Manager account from start to finish, including adding tracking numbers to everything, to help you make the most out of your online presence.
Why Use Google Tag Manager?
Google Tag Manager is a powerful tool that acts as a central hub for managing all your website tags—snippets of code that track user interactions and gather data. Instead of manually inserting each tag into your website’s code, GTM allows you to handle everything through an intuitive interface, saving time and reducing the risk of errors.
Benefits of Using Google Tag Manager
- Ease of Use: Manage all your tracking codes from a single dashboard without needing to alter your website’s code.
- Flexibility: Add, edit, or remove tags quickly to respond to changing marketing needs.
- Efficiency: Streamline your tag management process, reducing dependency on web developers for routine updates.
- Error Reduction: Utilize built-in debugging tools to ensure tags are firing correctly, minimizing tracking issues.
- Enhanced Performance: Optimize tag loading to improve website speed and user experience.
Step-by-Step Guide to Creating a Google Tag Manager Account
Follow these detailed steps to set up your Google Tag Manager account, add tracking numbers, and integrate various tags to enhance your website’s tracking capabilities.
Step 1: Sign Up for Google Tag Manager
- Access Google Tag Manager:
- Open your web browser and navigate to Google Tag Manager.
- Sign Up or Sign In:
- If you don’t have a GTM account, click on Create Account.
- If you already have an account, click Sign In and enter your Google credentials.
Step 2: Create a New Account and Container
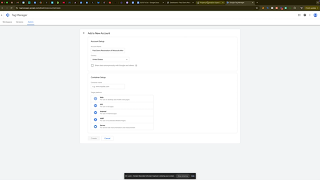
- Account Setup:
- Account Name: Enter your business name (e.g., “Paul Davis Restoration”).
- Country: Select your country from the dropdown menu.
- Container Setup:
- Container Name: Typically, use your website’s URL (e.g., “pauldavisrestoration.com”).
- Where to Use Container: Select Web for standard websites.
- Agree to Terms:
- Read and accept the Google Tag Manager Terms of Service.
- Create Container:
- Click Create to finalize the setup.
Step 3: Install the Google Tag Manager Code on Your Website
Google Tag Manager provides you with two snippets of code—one for the <head> section and one immediately after the opening <body> tag of your website’s HTML. These are essential for GTM to function correctly.
- Copy the Code Snippets:
- After creating your container, GTM will display the code snippets.
- Head Code: Copy the first snippet and paste it into the
<head>section of your website. - Body Code: Copy the second snippet and paste it immediately after the opening
<body>tag.
- Using WordPress SiteKit Plugin (Recommended for WordPress Users):
- Install SiteKit:
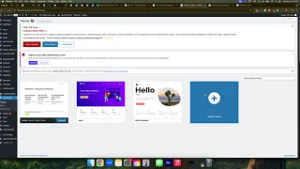
- In your WordPress dashboard, navigate to Plugins > Add New.
- Search for Site Kit by Google and install it.
- Activate the plugin.
- Connect GTM via SiteKit:
- Go to Site Kit > Settings.
- Click on Connect Service and select Tag Manager.
- Follow the prompts to authenticate and connect your GTM account.
- Install SiteKit:
- Manual Installation (For Non-WordPress Users or Custom Websites):
- Access Website Files:
- Use an FTP client or your hosting provider’s file manager to access your website’s HTML files.
- Edit HTML Files:
- Open the
header.php(or equivalent) file and paste the Head Code snippet within the<head>section. - Open the
index.php(or equivalent) file and paste the Body Code snippet immediately after the<body>tag.
- Open the
- Save and Upload:
- Save the changes and upload the modified files back to your server.
- Access Website Files:
- Verify Installation:
- Use the Google Tag Assistant Chrome extension to verify that GTM is correctly installed on your website.
Step 4: Add Tracking Numbers and Set Up Tags
Once GTM is installed, you can begin adding various tracking codes and scripts to monitor different aspects of your website’s performance.
1. Creating a Google Ads Conversion Tracking Tag
Tracking conversions from Google Ads is essential for measuring the effectiveness of your advertising campaigns.
- Create a New Tag:
- In GTM, navigate to Tags > New.
- Name your tag (e.g., “Google Ads Conversion Tracking”).
- Configure Tag:
- Click on Tag Configuration and select Google Ads Conversion Tracking.
- Enter your Conversion ID and Conversion Label from your Google Ads account.
- Set Up Triggering:
- Click on Triggering and select the appropriate trigger (e.g., form submission, thank-you page view).
- Save and Publish:
- Click Save, then Submit, and Publish your container to activate the tag.
2. Setting Up the Conversion Linker Tag
The Conversion Linker tag helps in attributing conversions accurately by linking ad clicks to conversions.
- Create a New Tag:
- Navigate to Tags > New.
- Name the tag “Conversion Linker”.
- Configure Tag:
- Click on Tag Configuration and select Conversion Linker.
- Set Up Triggering:
- Choose All Pages as the trigger.
- Save and Publish:
- Click Save, then Submit, and Publish your container.
3. Adding a Google Analytics Tag
Integrating Google Analytics provides comprehensive insights into your website traffic and user behavior.
- Create a New Tag:
- Go to Tags > New.
- Name the tag “Google Analytics”.
- Configure Tag:
- Click on Tag Configuration and select Google Analytics: Universal Analytics or Google Analytics 4 based on your setup.
- Enter your Tracking ID or Measurement ID.
- Set Up Triggering:
- Select All Pages as the trigger.
- Save and Publish:
- Click Save, then Submit, and Publish your container.
4. Embedding a Facebook Pixel via Custom HTML Tag
Tracking Facebook ad performance is vital for optimizing your social media marketing efforts.
- Create a New Tag:
- Navigate to Tags > New.
- Name the tag “Facebook Pixel”.
- Configure Tag:
- Click on Tag Configuration and select Custom HTML.
- Paste your Facebook Pixel code into the HTML field.
- Set Up Triggering:
- Choose All Pages as the trigger.
- Save and Publish:
- Click Save, then Submit, and Publish your container.
5. Adding Other Tracking Scripts (e.g., Hotjar, CallRail)
Google Tag Manager allows you to add virtually any tracking script to your website.
- Create a New Tag:
- Go to Tags > New.
- Name the tag based on the script you’re adding (e.g., “Hotjar Tracking”).
- Configure Tag:
- Click on Tag Configuration and select Custom HTML.
- Paste the tracking script provided by the service.
- Set Up Triggering:
- Select All Pages as the trigger.
- Save and Publish:
- Click Save, then Submit, and Publish your container.
Step 5: Maintain Ownership of Your Assets
It’s crucial to retain ownership and control over your Google Tag Manager account and other digital assets.
- Avoid Granting Ownership to Agencies: While it’s common to collaborate with marketing agencies, never grant them full ownership of your GTM account. Instead, assign appropriate user roles with limited permissions.
- Regularly Review User Access: Periodically check who has access to your GTM account and adjust permissions as necessary to maintain security.
Best Practices for Using Google Tag Manager
Implementing best practices ensures that your GTM setup is efficient, secure, and optimized for your business needs.
1. Define Clear Tracking Goals
- Identify Objectives: Determine what you want to track, such as conversions, user behavior, or ad performance.
- Plan Your Tags: Map out the tags you need to achieve your tracking goals before setting them up in GTM.
2. Use Descriptive Naming Conventions
- Tag Names: Use clear and descriptive names for your tags (e.g., “Google Ads Conversion – Contact Form”).
- Folder Organization: Utilize folders within GTM to categorize tags based on their purpose or marketing channel.
3. Regularly Test and Debug Tags
- Preview Mode: Always use GTM’s Preview Mode to test tags before publishing them.
- Tag Assistant: Utilize the Google Tag Assistant extension to verify that tags are firing correctly on your website.
4. Keep GTM Updated
- Regular Audits: Periodically review your GTM setup to remove outdated tags and update existing ones.
- Stay Informed: Keep up with the latest GTM features and updates to leverage new functionalities.
5. Secure Your GTM Account
- Enable Two-Factor Authentication (2FA): Add an extra layer of security to your GTM account.
- Limit User Access: Grant access only to trusted team members and assign roles based on their responsibilities.
Common Mistakes to Avoid
Avoiding these common pitfalls can enhance the effectiveness and reliability of your GTM setup.
1. Overcomplicating Tag Management
- Issue: Adding too many tags can clutter your GTM workspace and slow down your website.
- Solution: Only add necessary tags and regularly audit your GTM setup to remove redundant ones.
2. Incorrect Tag Configuration
- Issue: Misconfigured tags can lead to inaccurate data collection and tracking issues.
- Solution: Double-check all tag settings and use GTM’s debugging tools to ensure tags are set up correctly.
3. Ignoring Trigger Conditions
- Issue: Failing to set appropriate triggers can result in tags not firing or firing unnecessarily.
- Solution: Carefully define trigger conditions based on your tracking objectives and test them thoroughly.
4. Not Testing Tags Before Publishing
- Issue: Unverified tags may not function as intended, leading to data discrepancies.
- Solution: Always test tags in Preview Mode before publishing to ensure they are working correctly.
5. Sharing Full Access with Third Parties
- Issue: Granting full access to agencies or third parties can compromise your tracking setup.
- Solution: Assign limited permissions to external collaborators and regularly review user access.
Frequently Asked Questions
Can I Use Google Tag Manager for Multiple Websites?
Yes, Google Tag Manager allows you to manage multiple websites from a single GTM account by creating separate containers for each website. This makes it easier to organize and manage your tracking setups across different domains.
How Do I Find My Google Ads Conversion ID and Label?
- Access Google Ads:
- Log in to your Google Ads account.
- Navigate to Conversions:
- Click on Tools & Settings (wrench icon) in the top-right corner.
- Under Measurement, select Conversions.
- Select Conversion Action:
- Click on the specific conversion action you want to track.
- Your Conversion ID and Conversion Label will be displayed in the tag setup instructions.
What Is the Difference Between Google Analytics and Google Ads Tags?
Google Analytics tags track overall website performance, user behavior, and engagement metrics, while Google Ads tags specifically track conversions and the effectiveness of your advertising campaigns. Both tags provide complementary data that can enhance your marketing strategies when used together.
Do I Need Technical Skills to Use Google Tag Manager?
While some basic technical knowledge is helpful, Google Tag Manager is designed to be user-friendly. Following step-by-step guides and utilizing GTM’s intuitive interface allows even non-technical users to manage their website tags effectively. However, for more complex tracking setups, some familiarity with web development concepts may be beneficial.
Can I Integrate CallRail with Google Tag Manager?
Yes, CallRail can be integrated with Google Tag Manager by adding CallRail’s JavaScript snippets through GTM’s Custom HTML tags. This allows you to dynamically track calls and gather detailed insights into your call interactions.
Maximizing the Impact of Google Tag Manager
To fully leverage the benefits of Google Tag Manager, integrate these strategies into your broader marketing and operational plans.
Align with Your Marketing Goals
- Define Objectives: Clearly outline what you aim to achieve with your tags, such as tracking conversions, monitoring user behavior, or optimizing ad performance.
- Tailor Tagging Strategy: Ensure that your tagging setup aligns with your marketing objectives by focusing on the most relevant metrics and actions.
Use Data to Optimize Strategies
- Analyze Collected Data: Regularly review the data collected through GTM to gain insights into your website’s performance and user interactions.
- Refine Marketing Efforts: Use the insights gained to adjust your marketing strategies, optimize ad campaigns, and improve user experience.
Integrate with Other Marketing Tools
- Connect with CRM Systems: Integrate GTM with Customer Relationship Management (CRM) tools to streamline lead management and enhance customer interactions.
- Leverage Marketing Automation: Use GTM in conjunction with marketing automation platforms to create personalized and targeted marketing campaigns based on user behavior.
Foster Team Collaboration
- Share Insights: Regularly share data insights with your team to inform collective marketing strategies and objectives.
- Provide Training: Ensure that team members understand how to use GTM effectively and interpret the data it collects to maximize the tool’s potential.
Enhance Customer Experience
- Optimize Landing Pages: Use tracking data to refine landing pages, ensuring they are tailored to convert traffic driven by your marketing efforts.
- Personalize User Interactions: Leverage data collected through GTM to personalize customer interactions, addressing their specific needs and preferences effectively.
Conclusion
Creating a Google Tag Manager account and setting it up correctly is a strategic move that can significantly enhance your website’s tracking capabilities and marketing effectiveness. By following this comprehensive guide, you can ensure that all your tracking needs are met efficiently, allowing you to focus on what matters most—growing your business and serving your customers. Embrace the power of Google Tag Manager to streamline your tag management process, gain valuable insights, and drive informed marketing decisions that propel your business forward.


