Verifying ownership of your website in Google Search Console is a crucial step for optimizing your site’s presence in search results, monitoring performance, and leveraging various SEO tools. One of the most reliable methods to verify your website ownership is through DNS (Domain Name System) verification. In the “How to Verify Website Ownership in Google Search Console Using DNS” video, you learn a straightforward method to complete this verification using your domain name provider. This comprehensive guide will expand on those instructions, providing you with detailed steps, best practices, and additional insights to ensure a smooth and successful verification process.
Why Verify Website Ownership in Google Search Console?
Google Search Console (GSC) is an indispensable tool for website owners and SEO professionals. Verifying ownership grants you access to a wealth of data and tools that help you understand how Google views your website and how you can improve its visibility in search results.
Benefits of Verification
- Access to Performance Data: Monitor how your site performs in Google Search, including clicks, impressions, click-through rates (CTR), and average positions.
- Identify and Fix Issues: Detect and resolve technical issues such as crawl errors, indexing problems, and security vulnerabilities.
- Optimize Content: Gain insights into which keywords drive traffic and how users interact with your site’s content.
- Submit Sitemaps: Help Google crawl and index your site more efficiently by submitting XML sitemaps.
- Enhance SEO Strategies: Utilize the data and tools in GSC to refine your SEO strategies and improve your site’s search ranking.
Step-by-Step Guide to Verifying Website Ownership Using DNS
Follow these detailed steps to verify your website ownership in Google Search Console using the DNS verification method.
Step 1: Access Google Search Console
- Sign In to Google Search Console:
- Navigate to Google Search Console and sign in with your Google account credentials.
- Add a Property:
- Click on the Add Property button.Choose the Domain property type for DNS verification. This method covers all subdomains (e.g.,
www.example.com,blog.example.com).
- Click on the Add Property button.Choose the Domain property type for DNS verification. This method covers all subdomains (e.g.,
Step 2: Obtain the DNS Verification Code
- Enter Your Domain:
- Input your domain name (e.g.,
example.com) and click Continue.
- Input your domain name (e.g.,
- Copy the TXT Record:
- Google will provide a TXT record that you need to add to your domain’s DNS settings.The TXT record typically looks like:
google-site-verification=xxxxxxxxxxxxxxxxxxxxxxxxxxxxxxCopy this TXT record for the next step.
- Google will provide a TXT record that you need to add to your domain’s DNS settings.The TXT record typically looks like:
Step 3: Add the TXT Record to Your Domain’s DNS Settings
- Log In to Your Domain Registrar:
- Access the account where your domain is registered (e.g., Namecheap, GoDaddy, Bluehost).
- Navigate to DNS Management:
- Find the section for managing DNS settings or DNS records. This is often labeled as DNS Management, DNS Settings, Zone File Settings, or similar.
- Add a New TXT Record:
- Click on Add Record or a similar option to create a new DNS record.Type: Select TXT.Host: Enter
@or leave it blank, depending on your registrar’s requirements.Value: Paste the TXT record you copied from Google Search Console.TTL: You can typically leave this at the default value (e.g., 3600 seconds).
- Click on Add Record or a similar option to create a new DNS record.Type: Select TXT.Host: Enter
- Save the Record:
- After entering the details, save the new TXT record. Changes may take a few minutes to propagate, but it can sometimes take up to 48 hours.
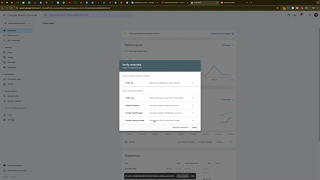
Step 4: Confirm Verification in Google Search Console
- Return to Google Search Console:
- After adding the TXT record, go back to the GSC verification page.
- Verify:
- Click the Verify button.Google will check for the TXT record in your domain’s DNS settings. If found, your ownership will be verified.
- Completion:
- Upon successful verification, you will gain full access to your Google Search Console property.
Step 5: Maintain Your Verification
- Do Not Remove the TXT Record:
- To maintain verification, ensure that the TXT record remains in your DNS settings. Removing it will result in loss of access to GSC.
- Monitor DNS Changes:
- Be cautious when making future DNS changes. Avoid deleting or altering the verification TXT record inadvertently.
Best Practices for DNS Verification
Implementing best practices ensures that your verification process is smooth and your GSC access remains secure.
Use a Reliable Domain Registrar
- Choose a reputable domain registrar that offers easy DNS management and reliable support. Popular registrars include Namecheap, GoDaddy, Bluehost, and Google Domains.
Double-Check DNS Entries
- Ensure that the TXT record is entered correctly without any typos. Even a minor error can prevent successful verification.
Allow Sufficient Time for DNS Propagation
- DNS changes can take time to propagate. If verification fails initially, wait a few hours and try again. In some cases, it might take up to 48 hours.
Secure Your Domain Account
- Protect your domain registrar account with strong passwords and enable two-factor authentication (2FA) to prevent unauthorized access and changes to your DNS settings.
Keep Documentation Handy
- Document the verification process and keep a record of the TXT record you added. This information is useful for troubleshooting and future reference.
Common Mistakes to Avoid
Avoiding these common pitfalls can enhance the accuracy and efficiency of your website ownership verification.
Incorrect TXT Record Entry
- Impact: An incorrect or incomplete TXT record will prevent successful verification.
- Solution: Carefully copy and paste the TXT record provided by Google Search Console without modifications.
Removing the TXT Record After Verification
- Impact: Deleting the TXT record will revoke verification, leading to loss of access to GSC features.
- Solution: Keep the TXT record intact in your DNS settings to maintain continuous verification.
Not Waiting for DNS Propagation
- Impact: Attempting verification before DNS changes have fully propagated can result in failed verification.
- Solution: Allow ample time (up to 48 hours) for DNS propagation before attempting verification.
Using Multiple Verification Methods Simultaneously
- Impact: Having multiple verification methods active can cause conflicts and confusion.
- Solution: Stick to one verification method at a time. If you switch methods, ensure the previous verification steps are properly removed.
Ignoring Security Best Practices
- Impact: Poor security measures can expose your domain to unauthorized access and potential misuse.
- Solution: Implement robust security practices, including strong passwords and 2FA for your domain registrar account.
Frequently Asked Questions
Can I Verify My Website Using Other Methods?
Yes, Google Search Console offers multiple verification methods, including HTML file upload, HTML tag, Google Analytics, and Google Tag Manager. Choose the method that best suits your technical comfort and access to website files.
What Should I Do If Verification Fails?
- Check DNS Entry: Ensure that the TXT record is correctly entered without any typos.
- Wait for Propagation: Allow additional time for DNS changes to propagate.
- Retry Verification: Attempt the verification process again after confirming the DNS settings.
- Seek Support: If issues persist, contact your domain registrar’s support or refer to Google’s Search Console Help for assistance.
How Long Does Verification Take?
DNS verification typically takes a few minutes to a few hours, but it can sometimes take up to 48 hours depending on your domain registrar’s DNS propagation speed.
Do I Need to Re-Verify My Website Periodically?
No, once your website is verified using DNS, it remains verified as long as the TXT record stays in your DNS settings. Avoid removing or altering the TXT record to maintain continuous verification.
Can I Verify Multiple Domains in One Google Search Console Account?
Yes, you can add and verify multiple domains within a single Google Search Console account. Each domain requires its own verification process.
Maximizing the Impact of Google Search Console
To fully leverage the benefits of Google Search Console, integrate these strategies into your broader SEO and website management plans.
Regularly Monitor Performance Metrics
- Track Impressions and Clicks: Use GSC to monitor how your site appears in search results, including impressions, clicks, and CTR.
- Analyze Search Queries: Identify which keywords drive traffic to your site and optimize your content accordingly.
Identify and Fix Technical Issues
- Crawl Errors: Detect and resolve crawl errors that prevent Google from indexing your pages effectively.
- Mobile Usability: Ensure your website is mobile-friendly by addressing any mobile usability issues flagged in GSC.
- Security Issues: Monitor for any security issues or manual actions that could impact your site’s visibility.
Optimize Content for SEO
- Submit Sitemaps: Regularly submit XML sitemaps to help Google crawl and index your website more efficiently.
- Enhance Rich Snippets: Implement structured data to enable rich snippets, improving your site’s appearance in search results.
- Manage URL Parameters: Use GSC to manage URL parameters and prevent duplicate content issues.
Utilize GSC Tools and Reports
- URL Inspection Tool: Use this tool to check the indexing status of specific URLs and request indexing for new or updated pages.
- Coverage Reports: Review coverage reports to understand which pages are indexed and identify any issues affecting indexing.
- Enhancements Reports: Access reports on various enhancements like AMP, structured data, and mobile usability to improve your site’s performance.
Stay Informed with GSC Updates
- New Features: Keep up with new features and updates in Google Search Console to continually enhance your SEO strategies.
- Educational Resources: Utilize Google’s educational resources and best practice guides to stay informed about effective SEO techniques.
Conclusion
Verifying your website ownership in Google Search Console using DNS is a fundamental step for any website owner aiming to optimize their site’s performance in search results. By following the step-by-step guide provided in this post, implementing best practices, and avoiding common mistakes, you can ensure a smooth and successful verification process. Once verified, leverage the full suite of tools and insights offered by Google Search Console to enhance your website’s SEO, monitor performance, and drive sustained growth. Proper verification and utilization of GSC empower you to make informed, data-driven decisions that can significantly impact your online presence and business success.